Healthy Protein Bars Recipe
- Time: Active 15 minutes, Passive 1 hours, Total 1 hours 15 minutes
- Flavor/Texture Hook: Velvety peanut butter base with a dark chocolate shatter
- Perfect for: Post workout recovery or a pre commute energy boost
- Crafting Nutritious and Satisfying Homemade Protein Bars
- Essential Statistics and Preparation Timing
- Why This Works
- Deep Dive into Nutrient Dense Ingredients
- Necessary Tools for a Smooth Process
- Methodical Assembly for Structural Integrity
- Fixing Common Binding and Texture Problems
- Smart Substitutions for Diverse Dietary Needs
- Best Practices for Freezing and Thawing
- Creative Serving Ideas for Peak Satisfaction
- Myths About Homemade Snacks
- Protein Bar FAQs
- 📝 Recipe Card
Crafting Nutritious and Satisfying Homemade Protein Bars
The first time I tried making my own snacks, it was a disaster. I followed a random recipe that promised "fudgy" results but ended up with something that tasted like sweetened sawdust. It was so dry I had to chug a liter of water just to swallow one bite.
That failure stayed with me, and it's why I spent weeks obsessing over the moisture levels in this specific batch. I wanted that perfect middle ground where the bar is firm enough to hold its shape but soft enough that your teeth sink right in.
When you mix the warm honey and creamy peanut butter, the kitchen fills with this incredible, nutty aroma that smells more like a candy shop than a "health food" session. There is something so satisfying about pressing that thick, pebbly dough into the pan and knowing exactly what’s inside.
No weird fillers, no soy protein isolates that leave a metallic aftertaste just real food that actually keeps you full until dinner.
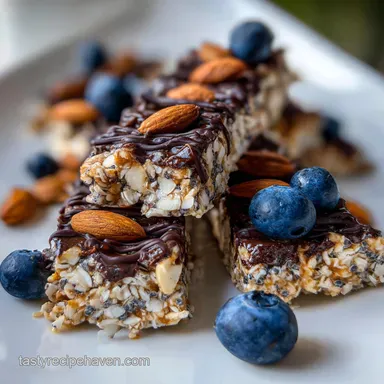
The magic happens when that thin layer of dark chocolate hits the cold oat base. It sets into a firm, glossy sheet that provides a necessary snap against the tender interior. It’s a contrast of textures that makes you forget you're eating something designed for "wellness." Trust me, once you see how easy it is to skip the $4 store-bought wrappers, you’ll never go back to the chalky alternatives.
Essential Statistics and Preparation Timing
Before we start mixing, it's helpful to look at how these bars scale and what to expect during the process. This isn't a "leave it in the oven and forget it" kind of recipe; it’s all about the assembly and the chill time.
| Servings | Ingredient Adjustments | Pan Size | Cook Time (Chill) |
|---|---|---|---|
| 5 bars | Half all quantities | 9x4 inch loaf pan | 1 hours |
| 10 bars | Use quantities as listed | 8x8 inch square pan | 1 hours |
| 20 bars | Double all quantities | 9x13 inch baking pan | 1 hours 30 mins |
The chilling phase is non negotiable here. While you might be tempted to slice into them immediately, the fats need time to solidify and bind the oats. If you rush it, you'll end up with a very tasty bowl of granola rather than a portable bar.
Why This Works
The Logic of the Lipid Bond: The fats in the natural peanut butter wrap around the dry protein powder particles, preventing them from absorbing too much moisture and becoming a gummy mess. This creates a stable emulsion that mimics the "fudgy" texture of a traditional brownie.
- Mechanical Compression: Pressing the mixture firmly into the pan forces the air out, creating a dense structure that doesn't crumble when handled.
- Starch Hydration: Pulsing the oats into a coarse meal increases their surface area, allowing them to absorb the honey and almond milk more evenly.
- Temperature Control: Using coconut oil in the chocolate topping lowers the melting point, ensuring the chocolate is snappy but doesn't splinter into a thousand pieces when bitten.
- Protein Synergy: Combining whey or plant based protein with ground flaxseed creates a complex fiber protein matrix that slows digestion and provides steady energy.
Chef Tip: If you find your protein powder is particularly "thirsty," add the almond milk one tablespoon at a time. Some plant based proteins absorb double the liquid of whey isolates.
Deep Dive into Nutrient Dense Ingredients
Choosing the right components is the difference between a bar that tastes like a treat and one that tastes like a chore. We are looking for high-quality fats and minimally processed grains.
| Ingredient | Science Role | Pro Secret |
|---|---|---|
| Quick cooking oats | Structural foundation | Pulse them briefly for a smoother, less "rustic" mouthfeel. |
| Natural Peanut Butter | Primary binder and fat source | Use the "drippy" kind with just peanuts and salt for the best mix. |
| Protein Powder | Muscle building amino acids | Whey Isolate yields the smoothest texture; pea protein is more filling. |
| Honey | Hygroscopic sweetener | Acts as a glue to keep the bars moist even after days in the fridge. |
For a similar vibe with a different shape, you might also enjoy my Protein Balls recipe which uses a very similar flavor profile but requires zero slicing.
Necessary Tools for a Smooth Process
You don't need a high tech kitchen to pull this off, but a few specific items make the "Double Compression" method much easier.
- Large Mixing Bowl: Use stainless steel or glass to prevent the honey from sticking too much to the sides.
- Food Processor: Just a quick 5 second pulse for the oats don't turn them into flour, or the bars will be too dense.
- 8x8 Square Baking Pan: Metal is better than glass here because the sharp corners help you get even, professional looking bars.
- Parchment Paper: Leave an "overhang" on two sides so you can lift the entire block out of the pan once chilled.
- Small Saucepan: For the chocolate topping, though a microwave safe bowl works if you're careful not to seize the chocolate.
Methodical Assembly for Structural Integrity

1. The Dry Integration
Start by whisking together 120g of protein powder, 180g of pulsed oats, 15g of ground flaxseed, and 0.5 tsp of sea salt. Ensure there are no clumps of protein powder, as these will turn into dry, bitter pockets in your finished bars.
2. The Emulsion Phase
In a separate bowl, stir together 250g of natural creamy peanut butter, 85g of honey, and 1 tsp of pure vanilla extract. If your peanut butter is stiff, microwave it for 20 seconds to make it more pliable.
3. The Hydration Adjustment
Pour the wet mixture into the dry ingredients. Stir with a sturdy spatula. Add 45ml of unsweetened almond milk. Note: The dough should feel like thick cookie dough heavy and slightly tacky but not sticking to your hands.
4. The Compression
Transfer the mixture to your lined pan. Use the bottom of a flat glass or a measuring cup to press down with significant force. Press until the surface is flat and matte, reaching every corner of the pan.
5. The Finishing Touch
Melt 60g of dark chocolate chips with 1 tsp of coconut oil in 30 second intervals in the microwave. Stir until velvety and glossy, then pour over the oat base. Tilt the pan to let the chocolate run to the edges.
6. The Precision Cut
Chill the pan for at least 1 hour. Lift the block out by the parchment paper. Use a sharp knife dipped in hot water to slice into 10 even bars. This prevents the chocolate from cracking.
Fixing Common Binding and Texture Problems
Even with the best instructions, humidity or different protein brands can throw things off. Most issues are easily fixed with a tiny adjustment of moisture or heat.
Bars are too soft or sticky
This usually happens if the peanut butter was too oily or if the honey to oat ratio was slightly high. If they won't hold their shape at room temperature, it's a sign the fats didn't have enough "dry" material to grab onto.
Grainy or Chalky Mouthfeel
This is the classic "protein powder" problem. It happens when the powder hasn't been properly hydrated or if you've used a low quality powder with too many fillers.
| Problem | Root Cause | Solution |
|---|---|---|
| Crumbly texture | Not enough binder or compression | Add 1 tbsp more honey and press harder into the pan next time. |
| Chocolate splinters | No oil in the coating | Always add the coconut oil; it softens the chocolate's "snap" just enough. |
| Sticky to touch | High humidity or too much milk | Store in the freezer and eat directly from cold; reduce milk by 10ml next time. |
Common Mistakes Checklist
- ✓ Pulsing oats too much: Turning them into flour makes the bars gummy rather than chewy.
- ✓ Using "No Stir" peanut butter: These often contain palm oil which changes the setting temperature; stick to natural.
- ✓ Skipping the salt: Salt is the "flavor forward" secret that cuts through the sweetness of the honey.
- ✓ Cutting while warm: The chocolate needs to be fully set to get those clean, professional edges.
- ✓ Forgetting parchment: Without it, you'll be digging bars out with a spoon, ruining the aesthetic.
Smart Substitutions for Diverse Dietary Needs
I know we all have different dietary requirements, so don't feel locked into these specific brands. The science remains the same even if the flavors shift.
| Original Ingredient | Substitute | Why It Works |
|---|---|---|
| Honey (85g) | Brown Rice Syrup (85g) | Similar viscosity. Note: Maple syrup is thinner; you may need more oats. |
| Peanut Butter (250g) | Almond or SunButter (250g) | SunButter makes them nut free for schools. Similar fat content. |
| Almond Milk (45ml) | Oat Milk or Water (45ml) | Any neutral liquid works to hydrate the protein. |
If you're in the mood for something even faster that doesn't require a pan, check out my Protein Mug Cake recipe — it's the perfect single serve alternative when you're craving that same protein rich satisfaction.
Best Practices for Freezing and Thawing
Since these Protein Bars contain no preservatives, they shouldn't live on the counter. In a warm kitchen, the natural peanut butter will soften, and the bars will lose their structural integrity.
Fridge Storage: Keep them in an airtight container for up to 10 days. Place a small piece of parchment paper between layers to prevent them from fusing together.
Freezer Storage: These are actually incredible when eaten frozen! Wrap individual bars in foil or plastic wrap and store in a freezer bag for up to 3 months. The texture becomes more like a dense candy bar.
Zero Waste Tip: If you have crumbs left over from cutting the bars, don't toss them! Toss those chocolatey, oaty bits into your morning yogurt or oatmeal for a "deconstructed" protein boost.
Creative Serving Ideas for Peak Satisfaction
I usually grab one of these as I’m heading out the door, but if you want to make it feel more like a meal, there are ways to "flavor forward" the experience.
The Post Workout Power Pair
Slice the bar into smaller "nuggets" and serve them alongside a bowl of fresh berries. The acidity of raspberries or strawberries cuts through the rich, fatty mouthfeel of the peanut butter perfectly. It turns a quick snack into a balanced plate.
The Breakfast Coffee Companion
If you have 30 seconds, pop a bar into the microwave for just 5-8 seconds. Don't melt it! Just warm it enough so the chocolate gets slightly soft and the peanut butter scent intensifies. It’s the perfect partner for a dark roast coffee.
Thickness and Doneness Decision Table
If you prefer a different mouthfeel, you can adjust the physical dimensions of the bar before they set.
| Desired Result | Action | Visual Cue |
|---|---|---|
| Fudgy/Dense | Press into 9x4 loaf pan | Bars will be ~1.5 inches thick and very chewy. |
| Snap/Crispy | Press into 9x13 pan | Bars will be thin; chocolate layer will feel more prominent. |
| Soft/Cakey | Increase almond milk by 15ml | Dough will look glossy and "slump" slightly in the pan. |
Myths About Homemade Snacks
Myth: You need "Special" protein for bars. Truth: You don't need a specific "baking" protein powder. However, Whey Casein blends often produce a softer bar than pure Whey Isolate because Casein absorbs more liquid. Both work, but the texture will vary slightly.
Myth: No bake means no chemistry. Truth: Just because there's no oven involved doesn't mean science isn't at play. We are relying on "Cold Setting," where the saturated fats in the peanut butter and coconut oil solidify to create the "snap" and structure.
Myth: Honey is just for sweetness. Truth: In this recipe, honey is a structural binder. Its sticky, viscous nature is what keeps the oats from falling apart. Replacing it with a granulated sweetener like Stevia will result in a pile of loose granola.
Protein Bar FAQs
What protein bars are healthiest?
Bars with whole food ingredients and minimal added sugars. Healthiest bars prioritize a high protein-to-sugar ratio, focusing on fats from nuts and seeds rather than processed oils. Look for at least 15g of protein and less than 5g of sugar per serving when purchasing commercially.
Which is the best protein bar?
The best one is usually the one you make at home. Homemade bars allow you to perfectly control protein source, sugar type, and binding agents, avoiding stabilizers often found in store-bought options.
If you enjoyed mastering the texture control in this recipe, you'll find similar structural principles apply when learning [How To Make Bread Stuffing Balls: Crispy Edges] for structural integrity in different food types.
Is 20g of protein a lot in a bar?
Yes, 20g is considered high end for a standard snack bar. Most recovery focused bars aim for 15g to 20g, which is typically enough to stimulate muscle protein synthesis post workout. If your goal is just a light energy boost, 10g to 12g is often sufficient.
How can I make my homemade protein bars less chalky?
Introduce a liquid binder gradually while mixing. Chalkiness results from dry protein powder absorbing all available moisture without distributing fats evenly. Whisk your wet ingredients (peanut butter, honey) first to create a stable emulsion before slowly incorporating the dry elements.
Why do my homemade bars crumble when I cut them?
Insufficient compression or a lack of strong binding agents. You must press the mixture firmly into the pan, eliminating air pockets so the ingredients lock together.
For a different application of binding logic, see how we use fat ratios to control spread in our [In and Out Burger Sauce Recipe: Copycat Spread in 5 Minutes].
Is it true that protein bars must always be baked?
No, baking is not required for most high protein bar formulations. Many popular bars rely on "no-bake" methods where the binding agents (like honey, nut butter, or melted chocolate) solidify upon chilling to create the final structure.
How long will homemade protein bars last?
Store them in the refrigerator for up to 10 days. Because they lack chemical preservatives, moisture management is key; tightly wrap individual bars and keep them airtight to prevent them from drying out or becoming sticky.
Homemade Protein Bars Recipe