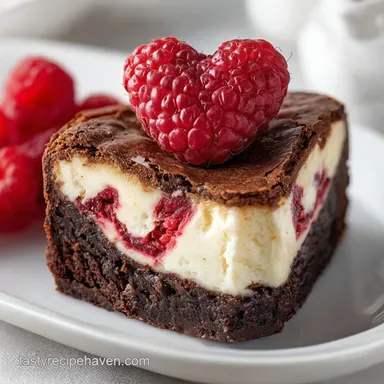
Heart Shaped Cheesecake Brownie
- Time: Active 25 minutes, Passive 35 minutes, Total 1 hour
- Flavor/Texture Hook: Fudgy, velvety, and tangy
- Perfect for: Date nights, Valentine's Day, or a thoughtful gift
- Bake the Ultimate Heart Shaped Cheesecake Brownie
- Science Behind the Perfect Swirl
- Recipe Specs and Key Timing
- Selecting Quality Ingredients for Baking
- Essential Tools for Easy Results
- Foolproof Methods for Layering Brownies
- Solving Common Baking Texture Issues
- Simple Ways to Customize Flavor
- Debunking Baking Myths
- Keeping Your Brownies Fresh Longer
- Creative Ideas for Plate Presentation
- Recipe FAQs
- 📝 Recipe Card
Bake the Ultimate Heart Shaped Cheesecake Brownie
The smell of bubbling butter and rich cocoa hitting the air is honestly one of the best parts of baking. There is something so satisfying about watching a thick, glossy brownie batter come together, knowing it’s about to become something spectacular.
Indulge in this unforgettable heart shaped brownie with raspberry swirl and cheesecake.
I used to think that achieving those beautiful, marble like swirls required professional training or expensive equipment. It turns out, you just need a toothpick and a little bit of patience.
This recipe is my go to when I want to impress someone without spending four hours in the kitchen washing a dozen different bowls.
We are going for a texture that is heavy on the fudge and light on the cake. By using Dutch processed cocoa and a specific ratio of fat to flour, we ensure the base is dark, intense, and moist. The cheesecake layer adds a sharp, creamy contrast that makes every bite feel like a balanced treat rather than a sugar bomb.
Science Behind the Perfect Swirl
The success of this recipe relies on simple physics and chemistry working together in your oven. We aren't just mixing things, we are creating a specific structure.
- Fat to Flour Ratio: High fat content from the butter and cream cheese inhibits gluten formation, ensuring a fudgy, melt in-your mouth texture rather than a bready one.
- Maillard Reaction: The sugars and proteins in the Dutch processed cocoa react under heat to produce a deep mahogany color and complex, roasted flavors.
- Emulsification: Room temperature eggs act as a bridge between the water and fat in the batter, creating a silky, cohesive crumb that doesn't separate during the bake.
Right then, before we get into the nitty gritty of the ingredients, let's look at how this method stacks up against the classic approach. You'll see why the minimal tool method is such a winner for busy home cooks who still want that high end finish.
| Method Type | Total Time | Tools Needed | Texture Profile |
|---|---|---|---|
| Minimal Tools | 1 hour | 1 bowl, 1 whisk | Uniformly fudgy and dense |
| Traditional | 1 hour 45 mins | Stand mixer, multiple bowls | Slightly airier, more "cake like" |
| store-bought Mix | 45 minutes | 1 bowl | Often overly sweet and crumbly |
Choosing the minimal tools method isn't just about saving time on the dishes, it actually helps keep the brownie base dense. When you use a stand mixer, you often whip too much air into the eggs, which leads to a domed top that cracks when you try to cut out your heart shapes.
By hand whisking, you control the aeration for a flat, velvety surface.
Recipe Specs and Key Timing
Precision is your best friend when you're dealing with cheesecake. If you pull it out too early, the center will be "slumpy," but if you wait too long, the cream cheese will puff up and then sink, creating unsightly wrinkles on your beautiful swirls.
| Ingredient | Science Role | Pro Secret |
|---|---|---|
| Dutch Cocoa | Provides structural depth | Sift it first to prevent tiny "flour bombs" in your batter |
| Cream Cheese | Adds tang and moisture | Use full fat blocks only, never the spreadable tub version |
| Egg Yolk | Emulsifier and fat source | Adds richness to the cheesecake without making it too liquid |
| Raspberries | Acidic brightness | Straining the seeds makes the swirl look like shattered glass |
When you are working with the fruit layer, the goal is to reduce the moisture. If the raspberry sauce is too watery, it will sink to the bottom of the brownie instead of sitting pretty on top. We want a thick coulis that holds its shape.
Selecting Quality Ingredients for Baking
You don't need a pantry full of specialty items, but the quality of your basics will shine through here. Since the cocoa is the primary flavor, using a Dutch processed version is non negotiable for that dark, Oreo like intensity.
- Unsalted Butter (115g): Melted and hot. The heat helps bloom the cocoa powder.
- Granulated Sugar (200g base + 50g cheesecake + 15g sauce): Standard white sugar works best for a clean sweetness.
- Large Eggs (2 room temp): These bind the brownie together.
- Pure Vanilla Extract (5ml): Adds that essential aromatic back note.
- Dutch processed Cocoa Powder (45g): Essential for the dark color and low acidity.
- All purpose Flour (65g): Just enough to hold everything together.
- Sea Salt (1/4 tsp): Never skip salt in chocolate desserts!
- Full fat Cream Cheese (225g): Must be very soft to avoid lumps.
- Egg Yolk (1 large): This makes the cheesecake layer extra velvety.
- Lemon Zest & Juice: Adds a bright citrus lift to the fruit and cheese.
- Raspberries (125g): Fresh or frozen both work perfectly.
If you are missing something, don't panic. Most of these have easy swaps that won't ruin your afternoon, though some will change the final vibe of the dish.
| Original Ingredient | Substitute | Why It Works |
|---|---|---|
| Dutch processed Cocoa | Natural Cocoa Powder | Works, but brownie will be lighter and more acidic |
| Raspberries | Strawberries | Similar sugar/acid ratio. Note: Flavor will be milder |
| Cream Cheese | Mascarpone | Very rich. Note: Less tangy, so add extra lemon juice |
Essential Tools for Easy Results
We are keeping the equipment list short and sweet. You probably have all of this in your drawer already. The only "special" thing you might need is a heart shaped cookie cutter, but even then, I'll tell you how to do it with a knife if you're in a pinch.
- 8x8 inch Baking Pan: Metal is better than glass for sharp edges.
- Parchment Paper: Essential for lifting the whole block out for clean cuts.
- Whisk and Spatula: No electric mixers are required here.
- Small Saucepan: For reducing the raspberries into a thick sauce.
- Fine Mesh Strainer: To get those pesky seeds out of your swirl.
- Heart Cookie Cutter: A 2 inch or 3 inch size is perfect.
If you are planning a full spread for a party, this recipe pairs beautifully with my Tasty Galentines Party recipe. It keeps the theme going from dinner all the way to dessert without making the table look cluttered.
Foolproof Methods for Layering Brownies

The trick to a "pro" look is all in the assembly. We aren't just dumping things in; we are building layers. Take your time with the marbling, as it’s the part everyone will notice first.
Step 1: Crafting the Raspberry Reduction
Place the raspberries, 15g sugar, and lemon juice in a saucepan. Simmer over medium heat for about 10 minutes until the sauce thickens and coats the back of a spoon. Strain through a mesh sieve to remove seeds and let it cool completely.
Note: Using hot sauce will melt your cheesecake layer prematurely.
Step 2: Building the Fudgy Foundation
Whisk the hot melted butter and 200g sugar in a large bowl. Add the eggs and vanilla, whisking vigorously for 2 minutes until the mixture looks pale and glossy. Stir in the cocoa, flour, and salt with a spatula just until the last streaks of white disappear.
Step 3: The Velvety Cheesecake Layer
In a separate small bowl, mash the softened cream cheese with 50g sugar, the egg yolk, and lemon zest. Whisk by hand until the texture is silky and lump free. If the cheese is stubborn, a few seconds in the microwave can help soften it further.
Step 4: Layering and Marbling
Spread the brownie batter into the lined pan, reserving about 3 tablespoons for the top. Dollop the cheesecake mixture over the brownie base. Drop small spoonfuls of the reserved brownie batter and the raspberry sauce on top.
Step 5: The Precision Swirl
Use a toothpick or a thin knife to swirl the layers together. Stop once you see a distinct marble pattern. If you over mix, the colors will blur into a muddy pinkish brown instead of sharp, defined lines.
Step 6: The Precision Bake
Bake at 350°F (175°C) for 30 to 35 minutes until the edges are set and a toothpick comes out with a few moist crumbs. The center should still have a very slight jiggle when you shake the pan gently.
Step 7: The Cooling Phase
Let the pan cool completely at room temperature, then chill in the fridge for at least 2 hours. Note: This is the most important step for clean heart cutouts.
Step 8: Creating the Hearts
Lift the brownies out using the parchment. Press your heart cutter firmly straight down and lift up. For the cleanest edges, wipe the cutter with a warm, damp cloth between every single cut.
Solving Common Baking Texture Issues
Even the best of us hit a snag sometimes. Usually, it's a temperature issue or a timing mistake. If your Shaped Cheesecake Brownie doesn't look like the picture, it's likely one of these quick fixes.
Preventing Surface Cracking
If your cheesecake layer looks like a dry desert floor, you likely overbaked it or your oven runs hot. Cheesecake hates sudden temperature changes. To avoid this, don't open the oven door every five minutes to peek. Trust the timer and the "jiggle test."
Fixing Grainy Cheesecake Mixtures
Lumps in the white layer happen when the cream cheese is too cold. If you've already started mixing and it's lumpy, set the bowl over a pot of steaming water (a makeshift bain marie) and whisk for 30 seconds. The gentle heat will smooth it right out.
| Problem | Root Cause | Solution |
|---|---|---|
| Muddy Swirls | Over mixing the layers | Use only 4-5 "figure eight" motions with a toothpick |
| Greasy Bottom | Butter was too hot when adding eggs | Let melted butter sit for 5 mins before mixing |
| Hearts Crumbling | Cutting while still warm | Chill for 2 hours; the fats must solidify for clean edges |
Common Mistakes Checklist
- ✓ Always use room temperature eggs to ensure proper emulsification.
- ✓ Don't skip the parchment paper "sling" or you'll never get the hearts out intact.
- ✓ Wipe your knife or cutter between every single slice.
- ✓ Sift your cocoa powder if it looks clumpy in the container.
- ✓ Use full fat cream cheese for the structural integrity of the swirl.
Simple Ways to Customize Flavor
The beauty of this Cheesecake Brownie is how adaptable it is. While the raspberry is classic, you can swap the fruit or the chocolate profile to suit whoever you are baking for.
- Darker Profile: Swap the Dutch cocoa for an "Extra Dark" or "Black Cocoa" for a bittersweet, sophisticated flavor.
- Fruit Variations: Use blackberry or blueberry reduction for a deeper purple swirl.
- dairy-free: Use a high-quality vegan butter and a cashew based cream cheese. Note: Texture will be softer, so freeze for 30 mins before cutting.
For those who want a larger centerpiece that fits this flavor profile, try my Delightful Valentines Day Cake recipe. It uses the same white chocolate and raspberry logic but in a tiered format.
If you're on a budget, you don't need to buy the most expensive organic berries to get a great result. Here is how to save a few dollars without sacrificing the "wow" factor.
| Premium Option | Budget Alternative | Flavor Impact | Savings |
|---|---|---|---|
| Fresh Raspberries | Frozen Raspberries | Virtually none once reduced | $3 - $5 |
| Pure Vanilla Bean | Vanilla Extract | Less visible "specks" | $10+ |
| Valrhona Cocoa | Hershey's Special Dark | Slightly less intense | $8 |
Debunking Baking Myths
Myth 1: You must use a mixer for cheesecake. Actually, whisking by hand prevents you from incorporating too much air. Air bubbles expand in the oven and cause the cheesecake to puff up and then collapse, leading to cracks. A hand whisked layer is denser and more velvety.
Myth 2: Glossy brownie tops are a matter of luck. The "crackly" top is a result of dissolving the sugar completely in the eggs and butter. Whisking the eggs and sugar for a full 2 minutes before adding the dry ingredients is the secret to that classic brownie "shatter" on top.
Keeping Your Brownies Fresh Longer
Because of the cream cheese, these need a little more care than a standard box mix brownie. You can't just leave them on the counter for a week.
- Storage: Keep them in an airtight container in the fridge for up to 5 days. The texture actually gets better and fudgier after 24 hours.
- Freezing: These freeze beautifully! Wrap individual hearts in plastic wrap and then foil. They stay fresh for up to 3 months. Thaw in the fridge overnight.
- Zero Waste: Don't throw away the "scraps" left over after cutting out your hearts! Crumble them over vanilla ice cream, or mix them into a milkshake for a decadent brownie cheesecake treat.
Creative Ideas for Plate Presentation
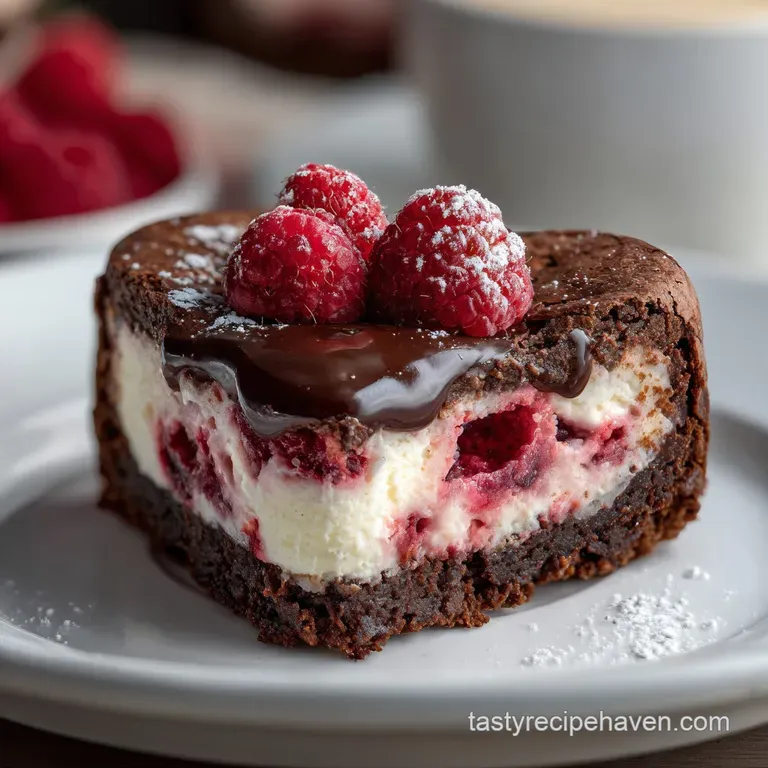
When you serve these, you want the Heart Shaped Cheesecake to be the star. Since they are quite rich, a little bit of acidic balance on the plate goes a long way.
I love serving these with a small dollop of whipped cream and a few extra fresh raspberries. If you want to go all out, a light dusting of powdered sugar right before serving makes the dark chocolate pop against the white plate.
If you are looking for a different kind of handheld treat to go alongside these, my Marzipankartoffeln Recipe offers a nutty, almond based contrast that looks lovely on a dessert platter.
- The "A La Mode" Upgrade: Serve a warm brownie heart with a scoop of tart raspberry sorbet.
- Sparkling Pair: A glass of Rosé or a sweet Moscato cuts through the richness of the cream cheese perfectly.
- Coffee Pairing: A strong espresso or a dark roast coffee balances the sugar and highlights the Dutch cocoa notes.
Trust me, once you master this simple marbling technique, you'll be looking for excuses to make these for every holiday. They are impressive, delicious, and surprisingly easy once you know the science behind the swirl!
Recipe FAQs
Can I use frozen raspberries for the swirl?
Yes, frozen raspberries work perfectly. Thaw them slightly before simmering to create your reduction, and they'll yield a vibrant swirl just like fresh ones.
How do I prevent the cheesecake layer from cracking?
Avoid overbaking and sudden temperature changes. Use the jiggle test the center should have a slight wobble. Cooling slowly at room temperature before chilling also helps prevent cracks.
What's the best way to get clean heart shapes?
Chill the brownies thoroughly before cutting. A very cold, firm brownie block is essential. Wipe your heart shaped cutter with a warm, damp cloth between each cut for the cleanest edges.
Why are my brownie swirls muddy instead of distinct?
You've likely overmixed the layers. Use a light hand with your toothpick and aim for only a few gentle swirls; too much manipulation blurs the colors into a muddy appearance.
Can I make this recipe dairy-free?
Yes, with a few substitutions. Use a high-quality vegan butter for the brownie base and a cashew based cream cheese alternative. The texture might be slightly softer, so a brief chill in the freezer before cutting is recommended.
Is it true that I need a stand mixer for the cheesecake layer?
No, this is a common misconception. Whisking the cream cheese mixture by hand is preferable as it prevents over aeration, which can lead to cracks and a less dense texture. If your cream cheese is very firm, a few seconds in the microwave can help soften it.
How should I store leftover Heart Shaped Cheesecake Brownies?
Store them in an airtight container in the refrigerator. They will keep for up to 5 days, and the fudgy texture often improves after the first 24 hours. If you enjoyed mastering the rich textures here, see how similar principles of fat balance create dense results in our Small Batch Cookie Recipes: Bakery Quality In 20 Minutes.
Heart Shaped Cheesecake Brownie