Mini Chicken Pot Pies in a Muffin Tin
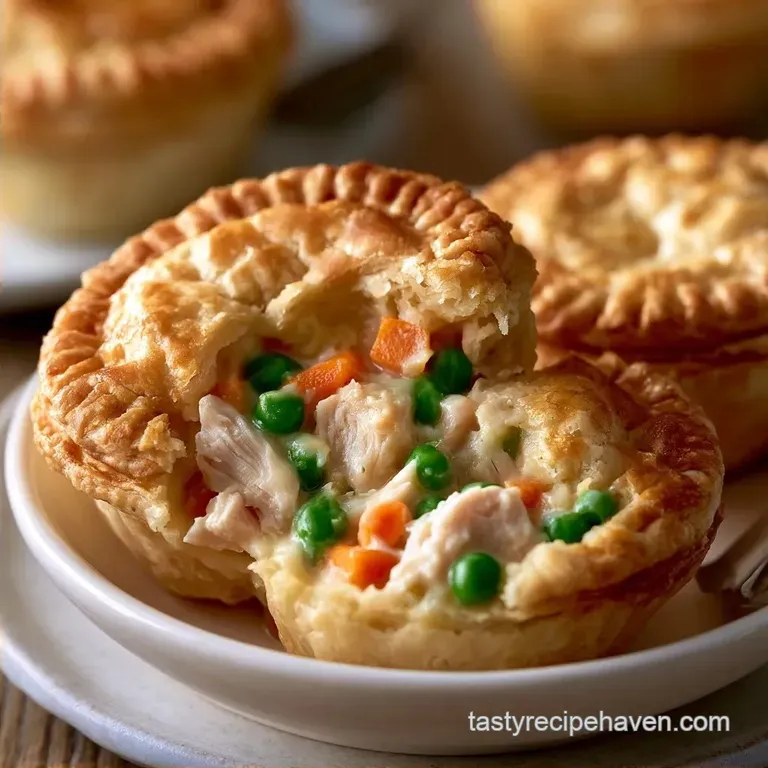
- Time: 10 min active + 25 min baking
- Flavor/Texture Hook: Shattering buttery crust with a rich, creamy center
- Perfect for: Quick weeknight dinners or easy party appetizers
The aroma of sizzling butter and thyme in a hot pan is the ultimate comfort on a rainy day. I used to prepare these in a single large dish, but I always struggled with a soggy bottom that resembled porridge more than pastry. It's a disappointing outcome after all that preparation.
Moving to individual portions solves everything. This method increases the ratio of pastry to filling, ensuring a golden, flaky crunch in every mouthful. These Mini Chicken Pot Pies offer the coziness of a slow cooked dish, perfect for a hectic Tuesday evening.
This recipe is incredibly approachable. By using a few shortcuts like store-bought pastry and pre-cooked chicken we keep the effort and cleanup to a minimum. You'll end up with a hearty, savory filling topped with a crust that stays perfectly crisp.
Quick and Easy Mini Chicken Pot Pies
Why choose this method over the classic deep dish approach? With one large pie, steam often collects at the bottom, leaving the crust soggy. Using a muffin tin allows heat to surround the filling, which lets moisture escape and keeps the pastry firm.
The roux is another advantage. Instead of simmering a sauce for an hour to achieve thickness, we use a concentrated butter and flour base. This produces a rich, clingy texture in about five minutes, offering maximum flavor with minimal effort.
Why This Method Actually Works
- Muffin Tin Heat
- The metal walls conduct heat directly into the filling, preventing the bottom from staying raw or gummy.
- The Roux Base
- Cooking flour in butter before adding liquid creates a stable binder that doesn't separate during baking.
- High Temp Bake
- 400°F (200°C) is the sweet spot for puff pastry, forcing the layers to separate rapidly for a taller rise.
| Method | Time | Texture | Best For |
|---|---|---|---|
| Classic Pie | 1.5 hours | Softer crust | Sunday dinner |
| Mini Version | 35 minutes | Shattering crisp | Fast weeknights |
You can serve these alongside some homemade dinner rolls to make it a full feast, or just keep it simple with a side salad.
The Ingredient Lineup
The key here is using ingredients that bring a lot of depth without requiring a ton of chopping. I prefer using pre cooked chicken breast because it saves a huge chunk of time and ensures the meat doesn't overcook while the pastry browns.
| Component | Purpose | Substitute Notes |
|---|---|---|
| Puff Pastry | Flaky top lid | Pie crust works, but loses the height |
| Heavy Cream | Richness | Whole milk: thinner sauce, less richness |
| Chicken Broth | Savory base | Vegetable broth: lighter, slightly sweeter |
| Mixed Peas/Carrots | Color and texture | Fresh diced carrots/peas: need a 3 min sauté first |
What You'll Need
- 2 cups (300g) cooked chicken breast, diced into ½ inch pieces
- 1 cup (150g) frozen mixed peas and carrots, thawed
- ½ cup (115g) unsalted butterWhy this? Adds a rich, nutty base for the sauce
- ⅓ cup (40g) all purpose flour
- 1 ½ cups (350ml) chicken broth, low sodium
- ½ cup (120ml) heavy creamWhy this? Creates a thick, creamy mouthfeel
- 1 tsp (5g) onion powder
- ½ tsp (3g) dried thyme
- ½ tsp (3g) salt
- ¼ tsp (1g) cracked black pepper
- 1 sheet (250g) frozen puff pastry, thawedWhy this? Maximum flakiness with zero rolling effort
- 1 large (50g) egg
- 1 tbsp (15ml) water
Gear You'll Need
This can be made with basic home equipment. A standard 12-slot muffin tin does most of the work here; I suggest greasing it lightly even if it's non-stick just to be sure.
Use a large skillet for the filling to ensure you have ample space to whisk the roux without splashing. You will also need a whisk and a pastry brush, though the back of a spoon is a perfectly fine substitute for the egg wash.
Making the Pies

Phase 1: Building the Base
- Melt the butter in a large skillet over medium heat until foaming.
- Whisk in the flour and cook for 1-2 minutes until it smells nutty but stays pale. Note: Don't let it brown or the sauce will look grey.
- Gradually pour in the chicken broth and heavy cream, whisking constantly to eliminate lumps until the sauce thickens into a velvety consistency.
Phase 2: Integrating the Hearty Mix
- Stir in the onion powder, thyme, salt, and black pepper.
- Fold in the diced cooked chicken and thawed mixed vegetables.
- Remove from heat immediately. Note: This prevents the sauce from over reducing and becoming too thick.
Phase 3: Assembling and Baking
- Preheat oven to 400°F (200°C).
- Spoon the chicken mixture evenly into 8 slots of a muffin tin, filling them about ¾ of the way.
- Cut the puff pastry into 8 equal circles or squares slightly larger than the muffin tin slots.
- Place the pastry over each pie, pressing the edges against the side of the tin to seal.
- Beat the egg with water and brush the tops of the pastry with the egg wash.
- Bake for 20-25 minutes until the pastry has risen and is deeply golden brown.
Fixing Common Issues
One mistake I made early on was filling the tins to the very top. This causes the filling to bubble over and burn onto the pan, which is a nightmare to scrub off later. Leave that little bit of head room for the sauce to expand.
Another thing to watch is the pastry temperature. If the puff pastry gets too warm while you're cutting it, the butter layers melt, and you lose that height. If it feels soft, pop it in the fridge for 10 minutes before cutting.
Fixing a Runny Filling
If the sauce looks thin before you add the chicken, simmer it for an extra 2-3 minutes. It should coat the back of a spoon heavily. Remember, it will thicken more as it cools and then again in the oven.
Preventing Burnt Tops
If the pastry is getting too dark but the sides aren't set, slide a baking sheet on the rack above them. This shields the tops from the direct heat of the broiler element.
Avoiding Soggy Pastry
Don't put the pastry on until the filling has cooled for a few minutes. Putting cold pastry on boiling hot filling can cause the bottom of the lid to steam instead of crisp.
| Problem | Fix |
|---|---|
| Sauce is lumpy | Whisk vigorously or pass through a sieve |
| Pastry didn't rise | Ensure oven is fully preheated to 400°F |
| Filling overflows | Only fill muffin slots ¾ of the way |
For those who like to plan ahead, these Mini Chicken Pot Pies are great for prep. Just don't add the pastry until you're ready to bake.
Ways to Switch Flavors
You can easily tweak the filling to use what's in your fridge. For a more rustic feel, swap the frozen peas for corn and diced carrots. If you have some leftover roast turkey, it works exactly the same way as the chicken.
For a cheesy twist, stir in a handful of sharp cheddar or parmesan once the sauce has thickened. The cheese adds a salty punch that cuts through the cream. If you're feeling fancy, a pinch of nutmeg in the cream makes the sauce taste like something from a French bistro.
For a lighter topper, you can use crescent roll dough instead of puff pastry. It's a bit softer and more bread like, but just as easy. Just remember to press the seams tightly so the filling doesn't leak.
| Goal | Adjustment |
|---|---|
| For a firmer set | Simmer filling 3 mins longer |
| For more spice | Add ¼ tsp cayenne pepper to the roux |
| For extra veg | Add diced celery and sauté with butter |
I've found that adding a teaspoon of Dijon mustard to the roux gives the sauce a subtle tang that keeps it from feeling too heavy.
Storing Your Leftovers
These store quite well, though the pastry is the first part to lose its quality. To keep them, place the cooled pies in a single layer within a container; they stay fresh in the fridge for about 3 days.
Try to avoid the microwave when reheating, as it turns a crisp crust into a rubbery one. Instead, use an oven or toaster oven at 350°F (175°C) for 10 minutes to bring back the crunch.
For freezer storage, the filling and pastry can be frozen separately. Keep the filling in an airtight bag for 3 months. Let it defrost overnight in the refrigerator, then assemble and bake as usual.
Don't throw away your puff pastry scraps. Twist them into small knots, brush with the leftover egg wash, and bake for 12 minutes for easy cheese free crackers.
Perfect Side Pairings
Since these Mini Chicken Pot Pies are quite indulgent, a refreshing side is key to balancing the meal. A fresh arugula salad tossed in a lemon dressing is a great choice, as the acidity cuts right through the butter and cream.
If you're serving these as starters, a side of garlic dipping sauce provides a pungent kick that complements the flaky crust. You could also serve steamed broccoli or roasted asparagus to keep the plate balanced.
For a comforting dinner, I recommend pairing them with creamy tomato soup. Dipping the pastry into the soup is a total win. Just be mindful of the salt in your soup, as the pot pie filling is already well seasoned.
Recipe FAQs
What is the secret to avoiding soggy crusts?
Cool the filling slightly before adding the puff pastry.
Tip: brush the pastry edges with egg wash to create a better seal.
Which pastry works best for these mini pies?
Frozen puff pastry provides the best lift and flakiness.
Tip: ensure the pastry is fully thawed before cutting into circles.
How long should mini pot pies bake?
Bake them for 20-25 minutes at 400°F (200°C).
Tip: remove them once the tops are deeply golden brown.
What gives the filling its velvety consistency?
Heavy cream whisked into the chicken broth creates that rich texture.
Tip: use a whisk constantly while adding liquids to avoid lumps.
How do I assemble the pies?
Spoon the chicken mixture into muffin tin slots and cover with pastry circles.
Tip: press the edges firmly against the tin for a professional look.
Is it true that only thighs can be used for the meat?
Actually, no. Cooked chicken breast works perfectly and is used in this recipe.
Tip: dice the breast into small 1/2 inch pieces for even distribution.
How to make the filling quickly?
Melt butter, whisk in flour, and gradually stir in broth and cream.
Tip: if you enjoy making small appetizers, try these crispy egg rolls for your next party.
Mini Chicken Pot Pies