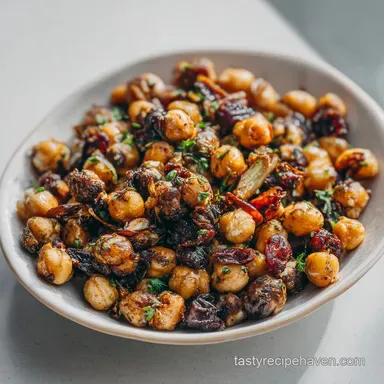
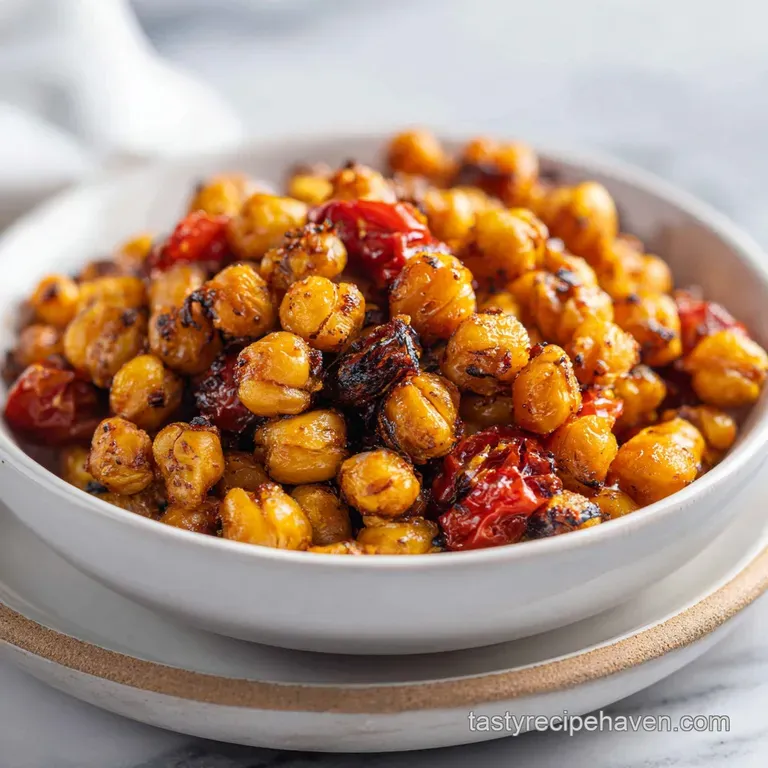
Roasted Chickpeas: Crispy and Nutrient-Dense
- Time: Active 15 minutes, Passive 25 minutes, Total 40 minutes
- Flavor/Texture Hook: Shatter crisp exterior with a nutty, smoky finish
- Perfect for: High protein snacking, salad toppers, or Mediterranean style grazing boards
- Creating a Healthy Snack with Roasted Chickpeas
- Why This Logic Actually Works
- Essential Elements for Flavor Layers
- Hardware for Maximum Crunch
- Executing the Roast Perfectly
- Managing Common Textural Hurdles
- Adjusting for Different Batches
- Precision Control Checkpoints
- Debunking Traditional Preparation Myths
- Preservation and Waste Reduction
- Dynamic Serving Styles
- Recipe FAQs
- 📝 Recipe Card
Creating a Healthy Snack with Roasted Chickpeas
Forget everything you think you know about healthy eating being a bland sacrifice of texture. For years, I believed that if I wanted that specific, tooth rattling crunch of a potato chip, I had to accept the grease and the processed baggage that came with it.
I tried every "baked" alternative on the market, but they always felt like a consolation prize, often turning into soggy little nuggets or flavorless pebbles that lacked any soul.
The real shift happened when I stopped treating the chickpea like a vegetable and started treating it like a tiny, moisture filled sponge that needed careful dehydration. We're taught that heat is the only factor in crisping, but that's a total myth.
If you don't address the surface water and the internal steam, you'll never get that satisfying "snap" that makes a snack truly addictive. It's about layers, timing, and a bit of kitchen patience.
When you pull these out of the oven, the aroma of smoked paprika and toasted herbs hits you first, followed by the sight of golden brown spheres that actually rattle when you shake the pan. They are nutrient dense powerhouses that don't just fill a void they genuinely excite the palate.
This isn't just a "healthy version" of something else; it's a stand alone masterpiece of Mediterranean inspired flavor that I find myself making twice a week just to keep the glass jars on my counter full.
Why This Logic Actually Works
- Surface Evaporation: Rinsing removes the viscous aquafaba, but the 20 minute air dry period is what allows the skins to become matte, ensuring the oil coats the bean rather than sliding off a water film.
- Thermal Conductivity: Extra virgin olive oil acts as a heat bridge, transferring the oven's energy directly into the chickpea skin to create that initial "shatter" layer.
- Delayed Volatility: Adding delicate spices like paprika and oregano after the over high heat roast prevents the oils in the spices from scorching and turning bitter.
- Residual Dehydration: Cooling the chickpeas on the hot baking sheet allows the last remnants of internal steam to escape without being trapped by a storage lid.
| Method | Time | Texture | Best For |
|---|---|---|---|
| Oven Roast | 25 minutes | Evenly crisp, deep nutty flavor | Large batches and meal prep |
| Stovetop | 15 minutes | Charred spots, softer centers | Quick salad toppers for one |
| Air Fryer | 15 minutes | Extremely light and airy | Maximum crunch in half the time |
While the oven remains my favorite for the sheer volume it can handle, the choice of method often depends on how much time you have before that mid afternoon hunger hits. The oven provides a more sustainable heat that penetrates the core of the chickpea, which is vital for long term storage and maintaining that crunch over several days.
| Component | Science Role | Pro Secret |
|---|---|---|
| Chickpeas | Starch structure | Use canned for consistent moisture levels and thinner skins. |
| Olive Oil | Heat distribution | Don't skimp; the fat creates the barrier that stops them from turning into rocks. |
| Sea Salt | Moisture extraction | Salting before roasting draws internal water to the surface to evaporate. |
Essential Elements for Flavor Layers
To build a truly satisfying snack, we have to respect the ingredients. We're using 2 cans of organic chickpeas, which is roughly 850g or 30 oz. This volume is the sweet spot for a standard rimmed baking sheet. If you overcrowd the pan, you're essentially steaming them, and we want to avoid that at all costs.
- 2 cans (approx. 850g / 30 oz) Organic Chickpeas, rinsed and drained Why this? Canned beans are pre softened, leading to a lighter, airier internal texture.
- 2 tbsp (30ml) Extra Virgin Olive Oil Why this? high-quality fat provides the necessary heat transfer for a golden finish.
- 1 tsp (6g) Fine Sea Salt Why this? Fine grains distribute evenly and help pull out stubborn moisture.
- 1 tsp (2g) Smoked Paprika Why this? Adds a deep, wood fired aroma without needing actual smoke.
- 1 tsp (2g) Garlic Powder Why this? Provides a savory base note that rounds out the earthy chickpeas.
- 1/2 tsp (1g) Dried Oregano Why this? Traditional Mediterranean herb that stands up well to the remaining heat.
- 1/2 tsp (1g) Dried Thyme Why this? Adds a floral, citrus like backnote that brightens the heavy spices.
- 1/4 tsp (0.5g) Freshly Cracked Black Pepper Why this? Essential for a subtle heat that lingers on the tongue.
- 1/2 tsp Lemon Zest (optional) Why this? The oils in the zest cut through the richness of the roasted beans.
Hardware for Maximum Crunch
You don't need a professional kitchen, but a few specific tools make this process seamless. A large, rimmed baking sheet is the most critical piece. You want something with enough surface area so the chickpeas can roam free.
I prefer a heavy duty aluminum pan because it conducts heat evenly and won't warp at the 400°F (200°C) temperature we're using.
A clean, lint free kitchen towel is also non negotiable. Paper towels tend to fall apart when you're vigorously rubbing the chickpeas to dry them. If you have a salad spinner, that's a great way to start the drying process, but it doesn't replace the towel rubbing step.
Finally, a large stainless steel mixing bowl gives you the room to toss the hot beans with the spices without losing half of them to the floor.
Executing the Roast Perfectly
- Rinse the chickpeas thoroughly under cold water until the aquafaba is gone. Spread them onto a clean kitchen towel and rub gently to dry. Note: This friction often loosens the skins; you can discard the loose ones if you like a cleaner look.
- Let them air dry on the counter for 15 minutes to 20 minutes until the skins feel matte and papery.
- Preheat your oven to 400°F (200°C). In a large mixing bowl, toss the dried chickpeas with the 2 tbsp olive oil and 1 tsp sea salt until evenly coated.
- Spread the chickpeas in a single layer on a parchment lined rimmed baking sheet. Ensure there is enough space for air circulation to prevent steaming.
- Roast for 20 minutes to 25 minutes, shaking the pan halfway through. Note: Shake vigorously so they rotate and brown on all sides.
- Check for doneness: they should be golden brown and sound 'clinky' when rolled against the pan.
- Remove the pan from the oven. Immediately toss the hot chickpeas with the smoked paprika, garlic powder, dried oregano, dried thyme, and black pepper.
- Add lemon zest if using and toss one final time to distribute the aromatics.
- Allow the chickpeas to cool completely on the baking sheet for at least 30 minutes. Note: This is when they reach their final, most satisfying texture.
Managing Common Textural Hurdles

The most frustrating outcome is a chickpea that's crispy on the outside but unpleasantly soft or "mealy" on the inside. This almost always comes down to two things: trapped moisture or insufficient roasting time.
If you find your batch isn't hitting that "clink" sound after 25 minutes, don't be afraid to give them another 5 minutes. Every oven is a little different, and the humidity in your kitchen can actually play a role in how fast they dry out.
Fixing Soggy Centers
If your chickpeas feel chewy once they've cooled, it means the internal steam didn't have an exit strategy. The air drying step before roasting is your first line of defense. If you skip this, the oil essentially traps the water inside.
If they come out soft, you can actually pop them back into a 350°F (180°C) oven for 10 minutes to "re crisp" them, though this risks browning the spices too much.
Preventing Burnt Seasonings
If your snack tastes bitter, your spices likely scorched. This is why we add everything except the salt after the beans come out of the oven. The residual heat is plenty to wake up the oils in the dried herbs and garlic powder without burning them to a crisp in the 400°F (200°C) environment.
| Problem | Root Cause | Solution |
|---|---|---|
| Leathery texture | Not enough oil | Ensure every bean has a glossy coat of olive oil before roasting. |
| Uneven browning | Overcrowded pan | Use two baking sheets if needed; beans must be in a single layer. |
| Bitter flavor | Spices burnt | Always add paprika and garlic powder after the roasting is complete. |
Common Mistakes Checklist
- ✓ Rub the chickpeas until the towel comes away dry to the touch.
- ✓ Wait the full 20 minutes for air drying; patience equals crunch.
- ✓ Never use a silicone mat; parchment or a bare pan allows for better moisture evaporation.
- ✓ Shake the pan at the 12 minute mark to prevent "flat spots" on the beans.
- ✓ Let them cool uncovered; trapping them in a bowl while warm creates instant sogginess.
Adjusting for Different Batches
If you're cooking for a crowd, it's tempting to just throw four cans on one tray. Don't do it! For a 2x batch, you'll need two separate baking sheets and should rotate them between the top and bottom racks halfway through the cook time.
I usually keep the salt at 1.5x rather than a full double, as the concentrated flavor of the spices can sometimes make a doubled salt portion feel overwhelming.
When scaling down for a solo snack session (using just one can), reduce the roasting time by about 5 minutes and keep a close eye on them. Smaller volumes tend to lose their moisture much faster, and the window between "perfectly roasted" and "burnt" narrows significantly. If you're looking for more ways to use your pantry staples, this technique is a great precursor to making a vegan chickpea salad with any leftovers that might have lost their crunch.
Precision Control Checkpoints
- The 20 Minute Mark: At this point, the chickpeas should have shifted from a pale yellow to a distinct golden tan. If they still look "wet," increase your oven temp by 15 degrees.
- Internal Temp Check: While we don't usually probe a bean, the surface temperature should be hovering around 390°F (199°C) right as they come out of the oven.
- Weight Loss Goal: A perfectly roasted chickpea loses about 40% of its weight during the process. If your 850g batch feels heavy, it needs more time to dehydrate.
Debunking Traditional Preparation Myths
One major myth is that you must peel every single chickpea skin to get them crispy. Honestly, life is too short for that. While peeling technically allows moisture to escape faster, the towel rubbing method we use achieves 90% of the same result with 5% of the effort.
The skins that do stay on actually provide a lovely, blistered texture that holds onto the spices much better than a naked bean would.
Another misconception is that soaking dried chickpeas from scratch is always better. In my experience, canned chickpeas actually produce a more consistent "shatter" because they have been processed in a way that softens the starch uniformly.
Dried beans can sometimes remain too dense in the center, leading to a snack that feels more like a gravel pit than a light, airy treat.
Preservation and Waste Reduction
To keep these at their peak, store them in a glass jar with a loose fitting lid or a brown paper bag. Plastic containers tend to trap any remaining micro moisture, which will turn your hard earned crunch into a soft disappointment within hours. In a dry environment, they’ll stay satisfying for about 3 days.
If you do end up with a few "duds" or skins that fell off during the rubbing process, don't toss them! Those loose skins crisp up like tiny crackers and are incredible when tossed into a grilled chicken bowl for extra texture. Any chickpeas that have truly lost their crunch can be pulsed in a food blender to create a savory, high protein breading for baked fish or chicken.
Dynamic Serving Styles
While these are a standalone powerhouse of a snack, I love using them as a "flavor forward" garnish. They add a nutrient dense punch to creamy soups think of them as the Mediterranean version of a crouton.
I often sprinkle them over a bowl of Greek yogurt with a drizzle of honey and some fresh cucumber for a savory sweet breakfast that keeps me full until dinner.
If you're hosting a gathering, try serving them alongside a variety of olives and some sharp feta cheese. The contrast between the dry, spicy crunch of the chickpeas and the salty, creamy cheese is absolutely sustainable for a long evening of grazing.
They are also the perfect travel companion; unlike chips, they won't crush into a million pieces in your bag, making them the ultimate road trip fuel.
Recipe FAQs
What to eat with roasted chickpeas as a snack?
Serve them alongside fresh, crunchy vegetables or creamy dips. They add a satisfying, nutty crunch to grazing boards and provide a protein rich contrast when tossed into salads or yogurt bowls.
Are roasted chickpeas a healthy snack for weight management?
Yes, they are an excellent option for satiety. Because they are high in fiber and plant based protein, they help keep you full longer compared to processed crackers or chips.
Can you eat chickpeas if you have diabetes?
Yes, they are generally considered a blood sugar-friendly food. Their low glycemic index and high fiber content help prevent rapid spikes in blood glucose levels.
Are chickpeas good for fatty liver?
Yes, they are a beneficial addition to a liver friendly diet. Legumes like chickpeas provide essential plant protein and fiber without the saturated fats found in animal based snacks.
How to ensure my roasted chickpeas stay crispy?
Dry the chickpeas thoroughly using a clean kitchen towel and air-dry them for 20 minutes before roasting. Removing external moisture is the secret to getting that satisfying snap; if you enjoyed this moisture removal technique, see how it improves the base for our Tuscan Chickpea Soup.
How to avoid soggy chickpeas in the oven?
Spread the chickpeas in a single layer with enough space for air circulation. Crowding the pan causes them to steam rather than roast, preventing the golden brown crust from forming.
Is it true I must roast them at a very high heat to get them crunchy?
No, this is a common misconception. A temperature of 400°F is sufficient to achieve a perfect, shatter crisp texture when the chickpeas are dried properly and shaken halfway through the 25-minute roast.
Roasted Chickpea Snacks