Cannoli Filling: Authentic Sicilian
- Time: Active 20 minutes, Passive 24 hours, Total 24 hours 20 mins
- Flavor/Texture Hook: A velvety, citrus scented cream studded with dark chocolate.
- Perfect for: Sunday family feasts, holiday dessert tables, or filling pre bought shells.
- Secrets for Creating Perfect Cannoli Filling
- Important Yield and Timing Specs
- High Quality Ingredients and Swaps
- Essential Tools for Simple Prep
- Mixing the Silky Sweet Cream
- Troubleshooting Texture and Consistency Issues
- Delicious Flavor Variations to Try
- Storage and Freshness Preservation Tips
- Serving Suggestions for Your Cream
- Common Kitchen Myths
- Recipe FAQs
- 📝 Recipe Card
Secrets for Creating Perfect Cannoli Filling
Walking into a proper Italian bakery is a sensory overload, isn't it? There is that distinct hiss and sizzle of dough hitting hot oil, the smell of toasted flour, and then the sight of those golden tubes waiting to be stuffed.
For years, I tried to replicate that magic at home, but my first few attempts at making cannoli filling were, frankly, a disaster. I remember serving a batch to my book club where the cream was so thin it practically ran off the plate.
It was a humbling moment, but it taught me the single most important rule of Italian desserts: moisture is the enemy of the crunch.
That experience sent me on a mission to find a way to make cannoli filling that actually stays put. I realized that the "secret" isn't a fancy ingredient or a professional grade mixer. It is actually much simpler than that. It is all about how you treat the cheese before it ever meets the sugar.
We want a texture that is thick enough to hold its shape when piped, but smooth enough that it feels like silk on your tongue. Trust me, once you nail this technique, you will never look at those watery supermarket versions the same way again.
We are going to focus on a minimal tool approach because you shouldn't need a pantry full of gadgets to make something this iconic. This recipe relies on basic physics and a bit of patience.
By the time we are done, you will have a filling that is sturdy, sweet, and perfectly balanced with a hint of cinnamon and orange. It is the kind of recipe that makes people stop talking and start reaching for seconds before they've even finished their first bite.
Important Yield and Timing Specs
Success with this recipe depends on your willingness to wait. While the active work takes less than half an hour, the passive time is where the real transformation happens. If you skip the draining phase, you'll end up with a sweet soup rather than a pipeable cream.
The Physics of Osmotic Draining: Gravity and time work together to pull excess whey out of the cheese through the porous barrier of a cheesecloth. This increases the fat to water ratio, which is essential for a stable, stand up texture.
| Item | Requirement | Goal |
|---|---|---|
| Drain Time | 24 hours | Remove 20-25% of total water weight |
| Chill Temp | 4°C (40°F) | Keep fats solid for better emulsification |
| Sifting | 100% of sugar | Ensure a smooth, lump free mouthfeel |
Right then, let's talk about the cost of these ingredients. Mascarpone can be a bit of a splurge depending on where you shop, so it is good to know where you can save and where you should spend.
| Premium Ingredient | Budget Alternative | Flavor Impact | Savings |
|---|---|---|---|
| Mascarpone Cheese | Cream Cheese + Heavy Cream | Tangier, slightly less silky | Save $3-5 |
| Pure Vanilla Extract | Vanilla Bean Paste | More visual "specks", same flavor | Save $2 |
| Fresh Orange Zest | Dried Orange Peel | Muted citrus notes, less bright | Save $1 |
Choosing the budget alternative for mascarpone works well, but keep in mind that cream cheese has a sharper tang. If you go that route, add a tiny bit more sugar to balance the acidity.
High quality Ingredients and Swaps
The magic happens when simple items are prepared with precision. We are using whole milk ricotta because low-fat versions simply don't have the structural integrity to hold up once the sugar is added.
Sugar acts as a liquefier, so we need that high fat content from the 850g of ricotta and 225g of mascarpone to act as a stabilizer.
| Ingredient | Science Role | Pro Secret |
|---|---|---|
| Whole Milk Ricotta | Structural Base | Always use "Impastata" style if found; it's naturally drier. |
| Mascarpone | Fat Emulsifier | Fold this in last to prevent the cream from breaking. |
| Powdered Sugar | Sweetener/Texture | Sifting twice removes the cornstarch clumps that cause grittiness. |
- 8 oz (225g) Mascarpone Cheese
- Why this? Adds the necessary fat for a velvety, luxurious finish. (Substitute: Full fat Greek yogurt, strained for 48 hours).
- 1 tsp (5ml) Pure Vanilla Extract
- Why this? Rounds out the dairy notes. (Substitute: Almond extract for a nutty twist).
- 0.25 tsp (1g) Ground Cinnamon
- Why this? This is the "secret" bakery scent. (Substitute: Nutmeg or cardamom).
- 1 tsp (2g) Orange Zest
- Why this? Cuts through the heavy fat of the cheeses. (Substitute: Lemon zest).
Essential Tools for Simple Prep
You really don't need a stand mixer for this. In fact, using one often over works the cheese, making it runny. I prefer a "low tech" approach because it gives you much more control over the final consistency. A sturdy spatula and a fine mesh sieve are your best friends here.
Chef's Tip: Freeze your metal mixing bowl for 10 minutes before you start. Keeping the ingredients cold prevents the fats in the mascarpone from melting while you incorporate the sugar.
If you don't have cheesecloth for the draining step, a clean, lint free tea towel or even high-quality paper towels (layered thickly) can work in a pinch. Just make sure whatever you use hasn't been washed with heavily scented fabric softener, or your cannoli will taste like "Spring Meadow" laundry soap.
Trust me, I've made that mistake so you don't have to.
The only other thing you'll want is a microplane. Using a box grater for the orange zest usually results in big, bitter chunks of white pith. We want just the very outer layer of the skin the part that holds the fragrant oils. It should smell like a sunny grove the second you start grating.
Mixing the Silky Sweet Cream
- Drain the ricotta. Place the 850g of ricotta in a sieve lined with cheesecloth over a bowl. Note: Cover with plastic wrap and weight it down with a heavy jar.
- Wait 24 hours. Let the cheese sit in the fridge until a pool of yellow liquid collects in the bottom bowl.
- Discard the whey. Throw away the liquid and pat the top of the ricotta with a dry paper towel to remove any lingering surface beads.
- Sift the sugar. Pass your 180g of powdered sugar through a fine mesh sieve into a clean bowl. Note: This prevents those tiny white lumps that never seem to stir out.
- Cream the ricotta. Place the drained ricotta in a large bowl and use a spatula to smear it against the sides until it looks uniform and matte.
- Add the aromatics. Stir in the 5ml vanilla, 1g cinnamon, and 2g orange zest until the scent fills the air.
- Incorporate the sugar. Add the sifted sugar in three batches, folding gently. Note: The mixture will loosen slightly as the sugar dissolves; this is normal.
- Fold the mascarpone. Gently fold in the 225g of mascarpone. Do not beat it; just use a figure eight motion until no white streaks remain.
- Add the crunch. Toss in the 90g of mini chocolate chips and give it one final, gentle stir.
- Final chill. Cover and refrigerate for at least 1 hour until the mixture feels firm and cold.
Troubleshooting Texture and Consistency Issues
Even when we follow the steps perfectly, sometimes things go sideways. The temperature of your kitchen or the brand of ricotta you bought can change how the ingredients behave. Most issues are fixable if you catch them before you start filling the shells.
Why Your Filling Is Runny
The most common culprit is skipped draining time. If you didn't wait the full 24 hours, the sugar will draw out the remaining water and turn your cream into a syrup. Another cause is over mixing. If you beat the cheese too hard, you break the fat structures that hold the air and volume.
| Problem | Root Cause | Solution |
|---|---|---|
| Runny/Thin Cream | High water content or over beating | Whisk in 2 tbsp of instant pudding mix or extra sifted sugar. |
| Grainy Texture | Large sugar crystals or cold mascarpone | Pass the ricotta through a fine sieve before adding other items. |
| Bland Flavor | Lack of acidity or salt | Add a tiny pinch of salt or an extra 1/2 tsp of orange zest. |
Aside from these common fixes, keeping a checklist of "dos and don'ts" helps prevent these issues before they start. It is much easier to do it right the first time than to try and save a broken cream.
Common Mistakes Checklist
- ✓ Always buy "Whole Milk" ricotta; skim versions lack the fat needed for stability.
- ✓ Never skip sifting the powdered sugar it is the difference between silky and sandy.
- ✓ Pat the drained ricotta dry with paper towels to remove every last drop of moisture.
- ✓ Ensure the mascarpone is slightly softened (but still cool) so it integrates without lumps.
- ✓ Do not fill your cannoli shells until right before serving to prevent them from softening.
Delicious Flavor Variations to Try
Once you have mastered the traditional base, you can start playing with the profile. I often change the mix ins based on the season. In the winter, I might lean more into the spices, and in the summer, I'll go heavy on the citrus.
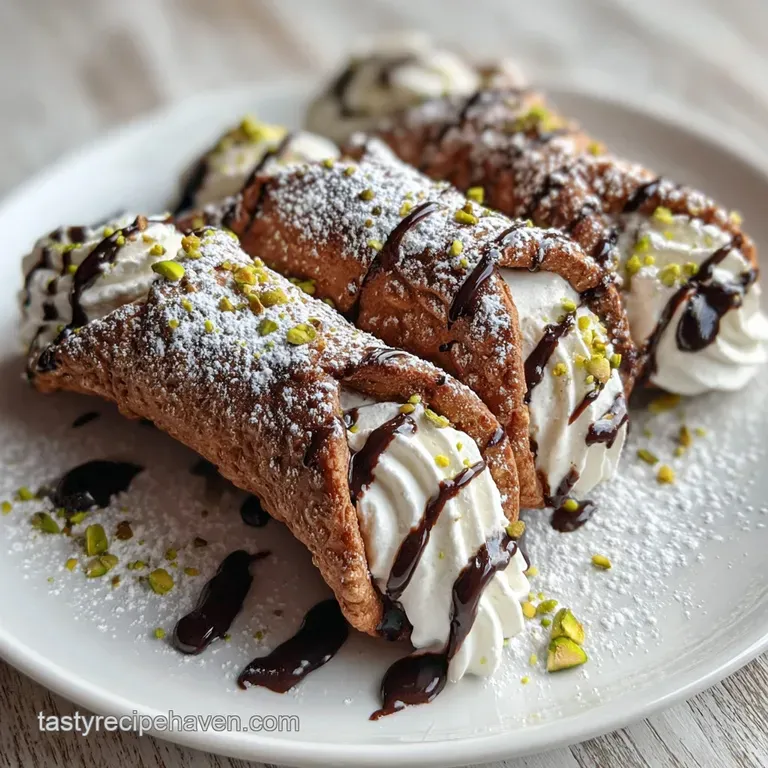
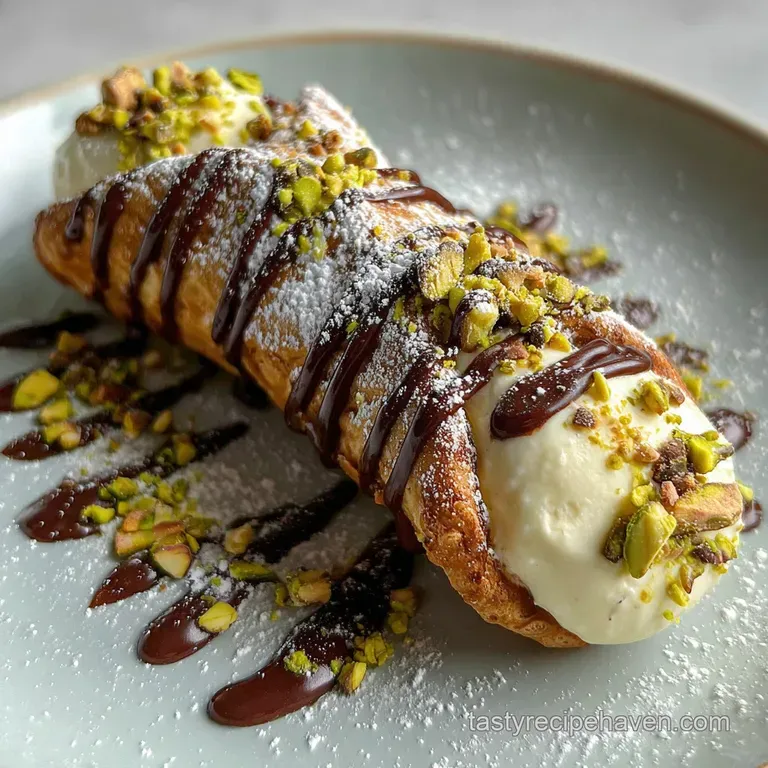
If you want a Nutty Crunch, swap the chocolate chips for toasted, crushed pistachios. This is very common in Sicily and adds a beautiful green hue to the ends of the cannoli. Just be sure to toast the nuts first to bring out their oils, then let them cool completely before folding them in.
For a Dark Mocha Twist, add 1 teaspoon of espresso powder to the sugar before sifting. The bitterness of the coffee cuts through the richness of the cheese and makes the chocolate chips taste even deeper. It is a fantastic variation for an after dinner treat with actual coffee.
If you are looking for Dietary Swaps, you can actually use a high-quality vegan cream cheese and strained almond milk yogurt. However, be aware that these substitutes usually have a higher water content and lower fat, so you will need to increase the "passive draining" time to at least 48 hours to get a similar thickness.
Storage and Freshness Preservation Tips
Cannoli filling is a bit of a "living" thing. Because it is dairy based, it will continue to release moisture over time, even after it's been mixed. For the best experience, you want to use it within a specific window.
- Fridge: Store in an airtight container for up to 3 days. After day 3, the sugar starts to break down the proteins in the cheese, and it may become "weepy." If you see liquid at the bottom, just give it a very gentle stir before piping.
- Freezer: You can freeze the filling for up to 1 month, but be warned: the texture will change slightly. It won't be quite as velvety once thawed. To thaw, leave it in the fridge overnight. Do not microwave it or use heat, or the mascarpone will melt into oil.
- Zero Waste: If you have leftover filling that's too soft for piping, don't throw it out! It makes an incredible dip for graham crackers or fruit. You can also dollop it onto pancakes or use it as a stuffed French toast filling. The whey you drained off earlier? It's packed with protein save it for your morning smoothie or use it as the liquid in a bread recipe.
Serving Suggestions for Your Cream
The classic way to serve this is, of course, inside a crispy cannoli shell. But let's be honest, sometimes we don't have the time to fry or even buy shells. This filling is versatile enough to stand on its own as a dip or a component in a larger dessert spread.
If you are going the traditional route, only pipe the filling into the shells about 15 minutes before you plan to eat them. This preserves that "shatter" effect when you bite in. If they sit for an hour, the shells absorb the moisture from the cream and become chewy. Not exactly what we're going for!
For a more modern presentation, try serving the filling in small glass cups. Top with a few extra chocolate chips, a dusting of cocoa powder, and a broken piece of a waffle cone. It gives you all the flavor and texture of a cannoli without the stress of piping into narrow tubes.
It's a total winner for parties where people want to mingle and eat with a small spoon.
| Serving Style | Best For | Prep Time |
|---|---|---|
| Classic Shells | Traditional dinner parties | 5 minutes (last minute) |
| Ricotta Dip | Casual gatherings | 2 minutes |
| Parfait Layers | Fancy plated desserts | 10 minutes |
Common Kitchen Myths
There is a big misconception that you need "Fresh Ricotta" from the deli counter for this. Actually, the super fresh, wet ricotta is the hardest to work with for cannoli. The stabilized, tub style whole milk ricotta from the grocery store is often better because it’s more consistent.
The key isn't how fresh it is, but how well you drain it.
Another myth is that adding more sugar will make the filling thicker. It’s actually the opposite! Sugar is hygroscopic, meaning it pulls moisture out of the cheese cells. The more sugar you add, the more liquid is released, and the runnier your filling becomes.
If you want a stiffer cream, use less sugar or more mascarpone, not more powdered sugar.
Finally,, some people think you have to use a piping bag. While it looks pretty, a simple sandwich bag with the corner snipped off works perfectly fine for filling shells at home. You don't need fancy equipment to get that professional look; you just need a steady hand and a cold filling.
Right then, I think you're ready to tackle this! Remember: drain that cheese, sift that sugar, and don't over mix. You'll be the hero of the next family dinner, I promise. Enjoy every velvety, sweet bite!
Recipe FAQs
What is a cannoli filling made of?
Primarily ricotta cheese and sugar. Traditional cannoli filling is a sweet cream made from whole milk ricotta cheese, sifted powdered sugar, and often includes mascarpone cheese for added richness. Flavorings like vanilla extract, cinnamon, and citrus zest are common additions.
What is the best ricotta filling for cannolis?
Use well drained whole milk ricotta. The key to a perfect cannoli filling is starting with whole milk ricotta and draining it thoroughly for at least 24 hours to remove excess moisture. This ensures a thick, pipeable consistency and a rich flavor.
Is mascarpone or ricotta better for cannoli?
A combination is often best. While ricotta is the traditional base, adding mascarpone cheese contributes significant fat content, creating a smoother, more luxurious, and less likely to weep filling. Many find the blend superior for both texture and flavor.
Is ricotta cheese the only cannoli filling?
No, but it is the most traditional. While ricotta is the classic and most common base, some variations might use cream cheese (often balanced with cream) or even chocolate based fillings. However, for authentic cannoli, ricotta is the standard.
How do I make my cannoli filling thicker?
Drain the ricotta longer and use mascarpone. The primary cause of runny filling is excess moisture in the ricotta; draining for 24-48 hours is crucial. Adding mascarpone also increases the fat content, which helps stabilize the filling and make it thicker.
Can I use low-fat ricotta for cannoli filling?
No, stick with whole milk. low-fat ricotta has a much higher water content and less fat, which is essential for creating a stable, thick cannoli filling. Using low-fat versions will almost certainly result in a runny, unmanageable cream.
How long does cannoli filling last?
Up to 3 days in the refrigerator. Once made, store the cannoli filling in an airtight container in the fridge. It's best consumed within this timeframe, as the sugar can start to break down the cheese proteins and release moisture over longer periods.
Cannoli Filling

