Valentines Day Recipe with Chocolate Lava
- Time: Active 15 minutes, Passive 12 minutes, Total 27 minutes
- Flavor/Texture Hook: A shatter crisp outer shell giving way to a warm, molten core of liquid chocolate.
- Perfect for: Romantic date nights and high impact, low effort entertaining.
- Master This Valentines Day Recipe with Chocolate Lava
- Molecular Magic for a Molten Heart
- Precision Specs for Two Servings
- Quality Components for Velvety Texture
- Essential Tools for Seamless Baking
- Step-by-Step Flow for Liquid Gold
- Solving Common Baking Texture Hurdles
- Flexible Options for Every Lifestyle
- Smart Methods for Making Ahead
- Visual Artistry for Date Night
- Culinary Truths Debunked
- Recipe FAQs
- 📝 Recipe Card
Master This Valentines Day Recipe with Chocolate Lava
Imagine the scene: the lights are low, the table is set, and you bring out two unassuming little cakes. As your spoon breaks through the outer crust, a velvety river of dark chocolate spills out onto the plate. That moment of "wow" is exactly what we are going after here.
This Valentine's Day, express your love with a decadent chocolate lava cake. I've spent years obsessing over getting that center just right, and honestly, the secret isn't a magic trick it's just simple science.
I remember my first attempt at this years ago; I was so nervous I overbaked them until they were basically just dry muffins. It was heartbreaking! Since then, I've learned that the "jiggle" is your best friend.
This recipe is designed to be foolproof so you can spend more time enjoying the evening and less time hovering anxiously over the oven. We are focusing on quality ingredients that speak for themselves, using a rich 70% dark chocolate that provides a deep, sophisticated sweetness without being cloying.
You don't need a professional pastry kitchen to pull this off. We’re keeping things accessible and sweet, using standard tools you likely already have in your cupboard. The beauty of this dish is its simplicity; it looks like you spent hours in the kitchen, but the actual hands on time is less than it takes to watch a sitcom.
Let's get into how we make that molten magic happen.
Molecular Magic for a Molten Heart
The success of a molten cake relies on two specific scientific principles that ensure the outside sets while the inside stays liquid.
Thermal Momentum: The high fat content in the butter and chocolate conducts heat quickly through the exterior, while the short bake time prevents the center from reaching the temperature required for protein coagulation.
Starch Gelatinization: A minimal amount of almond flour provides just enough structure to hold the "walls" together without turning the entire mass into a solid sponge.
| Cook Method | Time | Texture | Best For |
|---|---|---|---|
| Standard Oven | 12 minutes | Shatter crisp exterior, fluid core | Traditional presentation |
| Air Fryer | 8 minutes | Denser crust, very hot center | Speed and convenience |
| Convection | 10 minutes | Evenly browned, silky middle | Professional consistency |
Choosing the right method depends on how much time you have, but I always lean toward the standard oven for that classic crust. If you're looking for other ways to round out your romantic evening, this pairs beautifully with a Valentine's Day Charcuterie recipe to start the night.
Precision Specs for Two Servings
Getting the measurements right is vital because we are working with such small volumes. A gram or two really does make a difference when you're only making two cakes.
Chef's Tip: Freeze your butter for 10 minutes before melting it with the chocolate; the slight temperature delay during the initial mixing phase helps create a more stable emulsion before it hits the oven.
| Component | Science Role | Pro Secret |
|---|---|---|
| 70% Dark Chocolate | Structural base | Chop it into dust sized pieces for an even, lump free melt. |
| Large Organic Egg | Emulsifier and binder | Use room temperature eggs to prevent the butter from seizing during mixing. |
| Almond Flour | gluten-free structure | Sift it twice to avoid "clumping" which causes dry pockets in the lava. |
Quality Components for Velvety Texture
- 115g high-quality dark chocolate (70% cacao or higher): Use a bar you'd actually enjoy eating on its own. Why this? High cacao content ensures the cake sets firmly while remaining liquid inside.
- Substitute: Semi sweet chocolate chips (note: will be significantly sweeter and less intense).
- 55g unsalted grass fed butter: Adds a silky mouthfeel and carries the chocolate flavor. Why this? Grass fed butter has a lower melting point, contributing to the molten texture.
- Substitute: Coconut oil (solidified). Note: adds a distinct tropical aroma and slightly oilier finish.
- 1 large organic egg + 1 yolk: The extra yolk provides richness and helps the center stay fluid. Why this? Lecithin in the yolks acts as a stabilizer for the chocolate fat emulsion.
- Substitute: 2 medium eggs (texture will be slightly more "cake like" and less custardy).
- 30g coconut sugar or monkfruit sweetener: Keeps the glycemic index lower while adding caramel notes. Why this? Fine grain sweeteners dissolve faster, preventing a grainy texture in the lava.
- Substitute: Regular granulated sugar (provides a cleaner sweetness but lacks the depth of coconut sugar).
- 0.5g fine sea salt: Essential to balance the bitterness of the dark chocolate.
- 2.5ml pure vanilla extract: Rounds out the flavor profile.
- 15g almond flour: Just enough to bind the ingredients.
- 1 tbsp unsweetened cocoa powder: For dusting the ramekins.
- 15g fresh raspberries: To provide a tart contrast to the rich chocolate.
Essential Tools for Seamless Baking
You won't need anything fancy here, but the right vessel is non negotiable. I recommend using two 175ml ceramic ramekins. Ceramic is a poor conductor of heat compared to metal, which is actually a good thing here! It allows the edges to cook gently while the middle stays protected from the direct heat.
You will also need a small heat proof glass bowl for melting the chocolate. I usually just set it over a small saucepan of simmering water (a bain marie), which is much safer than the microwave. Microwaves can easily scorch the chocolate, and once that happens, there is no saving it.
A balloon whisk and a flexible silicone spatula are your best friends for folding the flour in without deflating the air we’ve worked so hard to whisk into the eggs.
Step-by-step Flow for Liquid Gold
Phase 1: The Base Emulsion
- Prep the vessels. Generously grease two ramekins with butter and dust with 1 tbsp cocoa powder, tapping out the excess. Note: This ensures the cake slides out onto the plate without tearing.
- Melt the fats. Place 115g chopped dark chocolate and 55g butter in a heat proof bowl over simmering water.
- Whisk until silky. Stir the chocolate and butter until completely melted and glossy. Remove from heat and let cool for 2 minutes.
Phase 2: Aerating the Proteins
- Whip the eggs. In a separate bowl, whisk 1 egg, 1 yolk, 30g coconut sugar, salt, and 2.5ml vanilla.
- Achieve volume. Whisk vigorously for about 2 minutes until the mixture is pale and slightly frothy.
- Combine the mixtures. Slowly pour the cooled chocolate into the egg mixture, folding gently with a spatula.
Phase 3: Folding and The "Jiggle Test" Bake
- Incorporate the flour. Fold in 15g almond flour until no white streaks remain. Note: Over mixing here will make the cake tough.
- Divide the batter. Pour the mixture evenly into the prepared ramekins.
- Bake with precision. Place in a preheated 200°C oven for 12 minutes until the edges are firm but the center still jiggles.
- Rest and release. Let the cakes sit for 2 minutes, then run a thin knife around the edge and invert onto plates. Garnish with 15g fresh raspberries.
Solving Common Baking Texture Hurdles
Why the Center Is Solid
The most common heartbreak is a lava cake that isn't lava. This usually happens because of two things: the oven was too cold, or it stayed in too long. If your oven temperature is low, the cake takes longer to set on the outside, which gives the heat more time to reach the center and cook it through.
Always use an oven thermometer to verify the heat.
The Cake Collapses on the Plate
If the cake falls apart the second you flip it, it’s likely underbaked on the exterior. The "walls" weren't strong enough to hold the weight of the molten center. Next time, try adding an extra minute to the bake time or ensure your ramekins were properly greased so the cake doesn't snag on its way out.
| Problem | Root Cause | Solution |
|---|---|---|
| Grainy texture | Sugar didn't dissolve | Whisk eggs and sugar longer before adding chocolate. |
| Greasy surface | Emulsion broke | Ensure chocolate isn't too hot when adding to eggs. |
| Cake stuck to cup | Improper greasing | Use softened butter and a heavy coat of cocoa powder. |
Common Mistakes Checklist
- ✓ Use a kitchen scale for the 15g of almond flour (it's very easy to over measure with spoons).
- ✓ Don't skip the 2 minute cooling period for the melted chocolate.
- ✓ Room temperature eggs are a must; cold eggs will cause the butter to clump.
- ✓ Watch the clock even 60 seconds of extra baking can turn a molten center solid.
- ✓ Let the cakes rest for exactly 2 minutes before inverting to let the structure stabilize.
Flexible Options for Every Lifestyle
If you are looking to change things up, this recipe is surprisingly adaptable. For a lower carb version, stick with the monkfruit sweetener mentioned in the ingredients. It provides the same volume and sweetness without the sugar spike.
The Keto/Low Carb Twist
Using monkfruit and almond flour already puts you on the right path. To keep it strictly keto, ensure your chocolate is at least 85% cacao or sweetened with stevia/erythritol. If you find the high cacao content too bitter, a tiny pinch of extra salt can help mask that.
The Vegan Variation
While the eggs are crucial for the lift and structure in this specific version, you can experiment with a flax egg, though the texture will be significantly denser and less "custardy." For a guaranteed winner that's already plant based, you might prefer my Vegan Dessert recipe, which hits those same decadent chocolate notes.
| Original Ingredient | Substitute | Why It Works |
|---|---|---|
| Coconut Sugar | Maple Sugar | Similar caramel notes. Note: Slightly higher moisture content; bake 1 min longer. |
| Unsalted Butter | Ghee | Removes milk solids. Note: Results in a much richer, nuttier flavor profile. |
| Almond Flour | Oat Flour | Similar density. Note: Will not be grain free, but provides a softer crumb. |
For a fruitier take on a romantic dessert, you could also try the Delightful Valentines Day Cake recipe which uses raspberry and white chocolate to create a completely different vibe.
Smart Methods for Making Ahead
One of the best things about this recipe is that it actually benefits from a little "fridge time." You can prepare the batter, fill the ramekins, and keep them in the refrigerator for up to 24 hours.
This is a total lifesaver for a romantic dinner because it means no messy kitchen prep after the main course.
Storage: If you have leftovers (rare, I know!), they will keep in the fridge for 3 days. They won't be "molten" once cold, but they turn into a very dense, fudge like truffle cake that is honestly quite spectacular.
Reheating: To get that lava flowing again, microwave for 15-20 seconds on medium power. Don't overdo it, or you'll just have a cooked cake.
Zero Waste: If you find yourself with extra raspberries that are starting to look a bit sad, don't toss them! Simmer them with a teaspoon of sugar and a splash of water to make a quick coulis to pour over the cake.
You can also save any leftover egg whites from the extra yolk we used and toss them into your morning omelet.
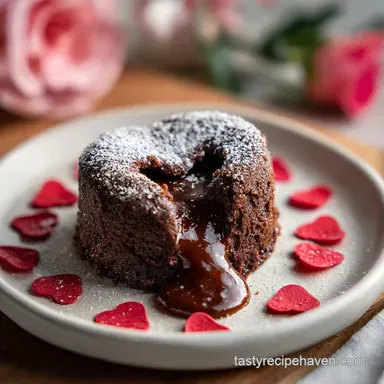
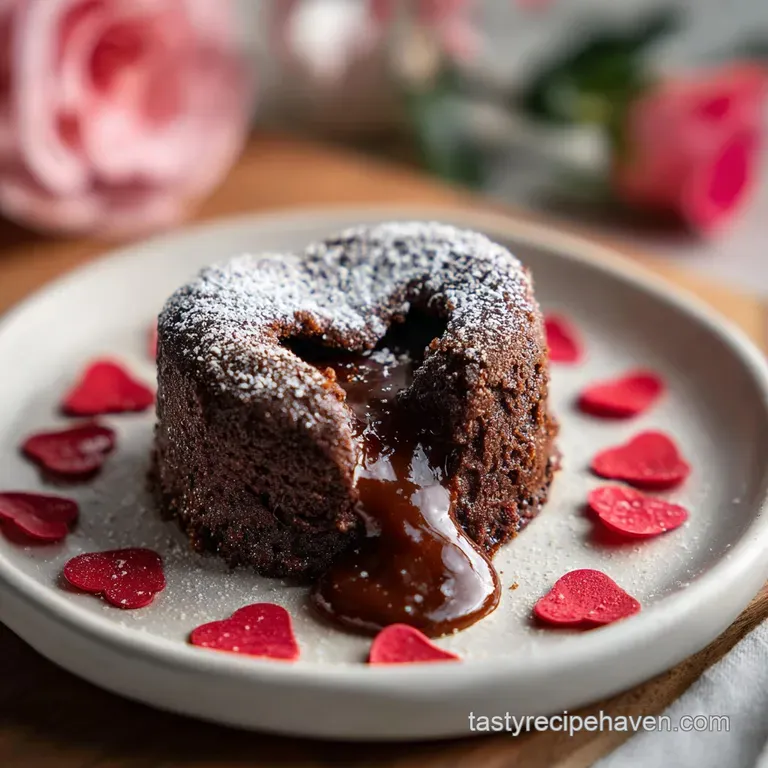
Visual Artistry for Date Night
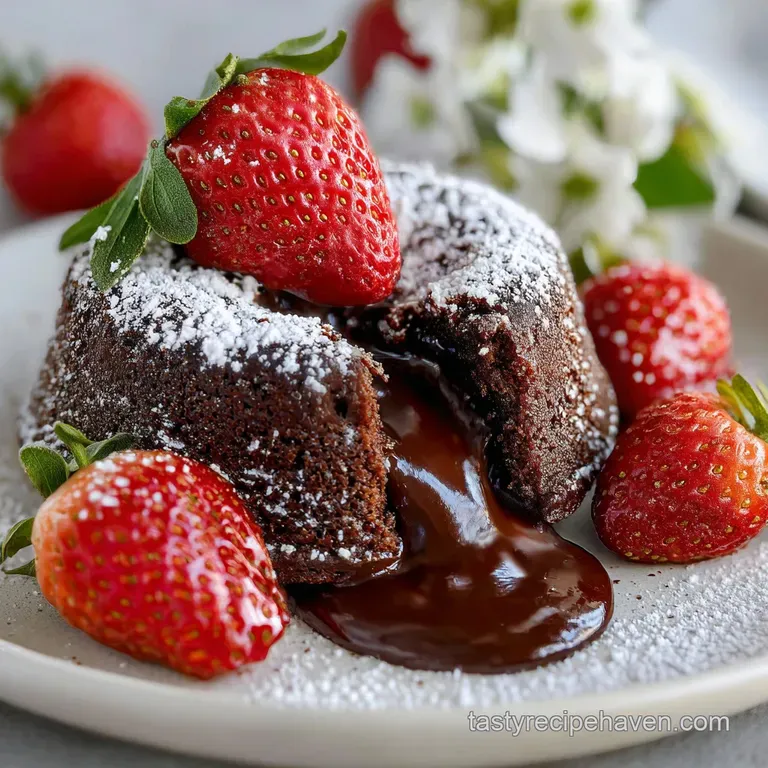
Presentation is half the battle on Valentine's Day. Since the cake itself is quite dark, you want high contrast garnishes. A simple dusting of powdered sugar looks like fallen snow against the deep mahogany of the chocolate.
Place the fresh raspberries in a small cluster on one side of the cake rather than scattering them. This looks more intentional and professional. If you want to go the extra mile, a small sprig of mint adds a pop of green that makes the red of the berries sing.
Another cute idea is to serve these alongside a Valentine Chocolate Heart recipe for a "chocolate on chocolate" experience that feels truly indulgent.
Chef's Note: Add a half teaspoon of instant espresso powder to the dry ingredients. It won't make the cake taste like coffee, but it significantly deepens the chocolate flavor, making it taste more "expensive."
If you want a thicker crust, use a metal tin.If you want a gooier center, bake at 215°C for only 9 minutes. If you want a salted caramel twist, push a soft caramel candy into the center of the batter before baking.
Searing the memory of this dessert into your partner's mind is all about that first cut. Make sure the plates are slightly warmed so the lava doesn't seize up the moment it hits the ceramic. It's these tiny details that turn a simple home cooked meal into a restaurant quality experience.
Culinary Truths Debunked
Many people believe you need to put a frozen ball of ganache in the center of the batter to get the lava effect. While that is one way to do it, it's a "cheat" method. A true molten cake relies on the timing of the batter itself.
The "ganache core" method often results in a center that is a different temperature than the cake, whereas our method ensures a seamless, warm transition from cake to sauce.
Another myth is that you can't make these without gluten. As you can see from our use of almond flour, the gluten in traditional flour isn't actually doing much of the heavy lifting here; the eggs and the chocolate structure are the real stars.
This makes it one of the easiest desserts to adapt for different dietary needs without sacrificing that velvety, luxurious mouthfeel.
Recipe FAQs
Can I use store-bought chocolate chips instead of a chocolate bar?
Yes, but be mindful of the sugar content. store-bought chocolate chips often contain more sugar and stabilizers, which can make the cake sweeter and slightly alter the texture compared to using a quality chocolate bar.
How do I ensure the center stays molten and doesn't cook through?
Bake until the edges are set and the center still jiggles. This "jiggle test" is crucial; it indicates the outside has formed a crust while the inside remains liquid. Overbaking by even a minute can turn a molten cake into a regular chocolate cake.
Can I make the batter for chocolate lava cake ahead of time?
Yes, the batter can be made up to 24 hours in advance. Simply prepare the batter, portion it into your greased ramekins, and store them covered in the refrigerator. They may require an extra minute or two of baking time when taken directly from the fridge.
What is the secret to achieving a rich, velvety texture?
Use high-quality dark chocolate and an extra egg yolk. The higher cacao content provides a superior flavor and structure, while the extra yolk contributes richness and ensures the center remains fluid, much like the emulsification principles in our Vanilla Mousse: The Silkiest Classic Crème Anglaise Recipe.
Is it possible to make chocolate lava cakes gluten-free?
Yes, this recipe is naturally gluten-free. We use almond flour for structure, which makes it suitable for those avoiding gluten. If you enjoyed mastering gluten-free baking here, you might also appreciate the techniques in 20 MustTry New Years Dessert Recipes for a Festive Finish.
How long should I bake chocolate lava cakes?
Typically 10-12 minutes at 200°C (400°F). However, oven temperatures can vary, so the visual cue of a set edge with a jiggly center is more reliable than strict timing.
What can I serve with chocolate lava cake for a complete dessert?
Fresh berries and a dollop of whipped cream or vanilla ice cream are classic pairings. The tartness of berries like raspberries cuts through the richness of the chocolate, offering a balanced flavor profile.
Chocolate Lava Valentines