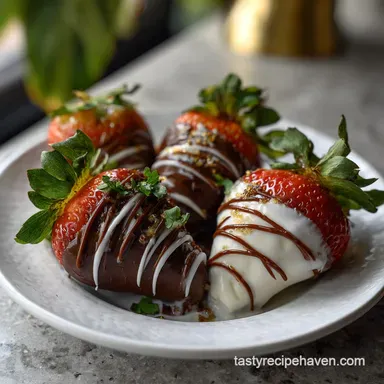
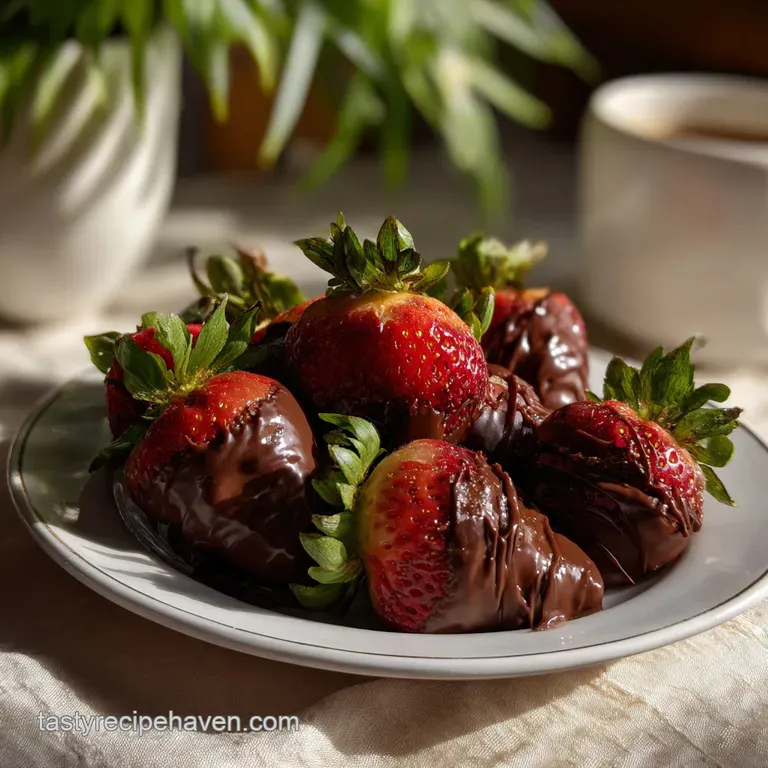
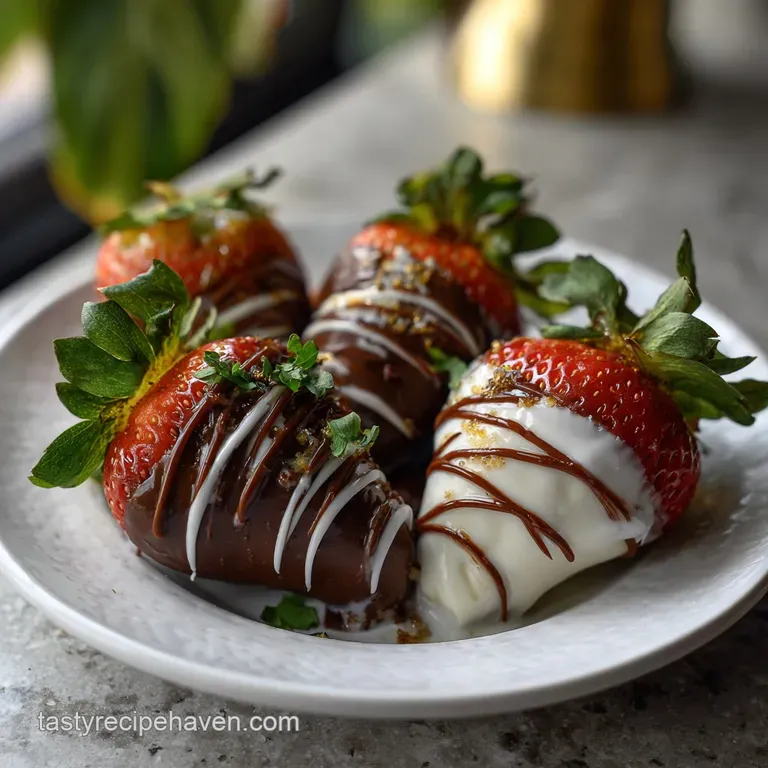
Chocolate Covered Strawberries: Glossy Finish
- Time: Active 20 minutes, Passive 30 minutes, Total 50 minutes
- Flavor/Texture Hook: Velvety chocolate shell with a crisp, juicy center
- Perfect for: Romantic dates, party platters, or a sweet midnight snack
- Crafting the Best Chocolate Covered Strawberries Ever
- Why This Simple Method Succeeds
- Precision Planning for Flawless Results
- Sourcing the Perfect Coating Components
- Basic Tools for Chocolate Work
- Steps for a Velvety Finish
- Strategies for Fixing Common Errors
- Flavor Variations and Dietary Swaps
- Scaling the Recipe for Crowds
- Debunking Some Chocolate Myths
- Preservation and Using Every Scrap
- Pairing Your Treats for Parties
- Recipe FAQs
- 📝 Recipe Card
Crafting the Best Chocolate Covered Strawberries Ever
That first snap of a cold chocolate shell giving way to a gush of sweet berry juice is something I never get tired of. Honestly, for the longest time, I thought this was one of those things you just had to buy at a fancy shop.
My early attempts at home were a total mess think watery puddles and chocolate that flaked off in sad, dull chunks. But after a lot of trial and error (and eating many "failed" berries), I’ve figured out the few tiny details that make all the difference.
We are making 20 servings of these beauties today, and trust me, they go fast. Whether you're doing this for a holiday or just because it's Tuesday, the goal is a glossy, smooth finish that doesn't melt the second you touch it.
It's about more than just melting a bar and dipping fruit; it’s about the science of how fat and water interact.
You’ll see that we aren't using anything fancy here no tempering machines or professional pastry kits. Just some good chocolate, fresh fruit, and a bit of patience. If you’ve ever felt intimidated by working with chocolate, don't be.
Once you understand why it behaves the way it does, it becomes one of the most relaxing things to do in the kitchen. Let's get into the "how" so you can start dipping!
Why This Simple Method Succeeds
Surface Adhesion: Removing every trace of moisture from the berry skin allows the fats in the chocolate to bond directly to the fruit rather than slipping off on a layer of water.
Viscosity Control: Adding a tiny amount of refined coconut oil thins the melted chocolate, creating a "flow" that coats the berry evenly without being too thick or clumpy.
Thermal Stabilization: A slow melt prevents the cocoa butter from separating, ensuring that your (with Tips!) | Downshiftology result has a consistent, velvety texture rather than a grainy one.
| Method | Total Time | Shell Texture | Best Usage |
|---|---|---|---|
| Microwave | 25 minutes | Slightly thicker | Quick weeknight cravings |
| Double Boiler | 45 minutes | Thin and silky | Gift boxes and parties |
| Cold Dip | 60 minutes | Very firm snap | Hot summer outdoor events |
Choosing the right method depends on how much time you have and how "pro" you want the finish to look. If you're in a rush, the microwave is your best friend, but for a truly glossy finish, the double boiler is the way to go.
Just remember that chocolate is sensitive to direct heat, so we always want to be gentle with it.
Precision Planning for Flawless Results
Before we even touch a berry, we need to talk about the plan. Working with chocolate is all about the "prep flow." If you're scrambling for a tray while your chocolate is cooling, you're going to have a hard time.
I like to set up a little assembly line: washed and dried berries on the left, dipping station in the middle, and a parchment lined tray on the right.
| Component | Science Role | Pro Secret |
|---|---|---|
| Dark Chocolate | Structural Base | Use bars, not chips, for a better melt |
| Coconut Oil | Emulsifier | Refined oil ensures no coconut flavor |
| Fresh Berries | Moisture Source | Keep stems on for a natural "handle" |
Using high-quality chocolate makes a massive difference here. While chocolate chips are convenient, they often contain stabilizers that prevent them from melting as smoothly as a baking bar. If you're feeling adventurous later, this technique is very similar to what I use for my Valentine Chocolate Heart recipe.
Sourcing the Perfect Coating Components
- 1 lb fresh strawberries: Look for firm berries with bright green stems. Soft spots are a no go here. Why this? Firmness ensures the berry doesn't collapse under the weight of the chocolate.
- Substitute: Large raspberries or even segments of mandarin orange.
- 8 oz high-quality dark or semi sweet chocolate: Chopped finely for even melting. Why this? Higher cocoa butter content results in a much better "snap" once set.
- Substitute: high-quality milk chocolate (just skip the extra oil if it's very soft).
- 1 tsp refined coconut oil: This is our secret to that professional shine. Why this? It thins the chocolate just enough for a perfectly smooth coat.
- Substitute: 1 tsp of cocoa butter or a tiny knob of vegetable shortening.
- 2 oz white chocolate: For the decorative drizzle. Why this? The contrast makes the dark chocolate pop visually.
- Substitute: Crushed nuts, toasted coconut, or even a sprinkle of sea salt.
Basic Tools for Chocolate Work
You don't need a lab, but a few specific things make this easier. A heat proof glass bowl is essential for the double boiler method. You'll also want a small, deep bowl for the actual dipping the narrower and deeper the bowl, the easier it is to submerge the berries without needing pounds of chocolate.
I always suggest using parchment paper or a silicone mat on your baking sheet. Wax paper works in a pinch, but parchment is the gold standard for easy release. If the chocolate sticks, you'll leave half the shell on the paper, which is heartbreaking after all that work.
Steps for a Velvety Finish
- Wash the fruit. Rinse the 1 lb of Strawberries (with Tips!) | Downshiftology in cold water. Note: Do this at least 2 hours before dipping to ensure they are 100% dry.
- Dry meticulously. Pat each berry with a paper towel and let them air dry on a clean cloth until the skin feels completely matte.
- Chop the chocolate. Break down the 8 oz of dark chocolate into uniform, small pieces. Note: Smaller pieces melt faster and more evenly, preventing hot spots.
- Create a double boiler. Set your glass bowl over a pot of simmering water until the bowl is warm but not hot. Ensure the water doesn't touch the bottom of the bowl.
- Melt the base. Add the chopped chocolate and 1 tsp of refined coconut oil to the bowl. Stir gently until the mixture is glossy and smooth.
- Prepare the dip. Remove the chocolate from the heat. Hold a berry by the green stem and dip it into the chocolate until nearly the entire fruit is submerged.
- Remove excess. Lift the berry and give it a little swirl or a gentle shake until the heavy drips stop falling.
- Set the berries. Place them on a parchment lined tray. Let them sit at room temperature for 15 minutes until the chocolate starts to look dull.
- Drizzle decorations. Melt the 2 oz of white chocolate and use a fork or piping bag to zig zag over the berries until you reach your desired pattern.
- Final chill. Place the tray in the fridge for 30 minutes until the shells are completely firm.
Chef's Tip: If your chocolate starts to thicken while dipping, don't just keep going. Set the bowl back over the warm water for 30 seconds to loosen it up. Cold chocolate leads to thick, clumpy shells.
Strategies for Fixing Common Errors
One of the biggest heartbreaks is "seizing" your chocolate. This happens when even a single drop of water gets into your melting bowl. The chocolate goes from silky to a gritty, clumpy mess in seconds. If this happens, you usually can't save it for dipping, but you can stir in some warm cream and turn it into a ganache for a Vanilla Mousse recipe later.
Solving the Seizing Problem
If your chocolate turns grainy, it’s likely due to moisture or overheating. Always use a dry spoon and keep the steam away from the inside of the bowl. If it overheats, the proteins clump together, and the texture is ruined.
Stopping the Berry Sweat
"Sweating" is when little beads of moisture form on the outside of the chocolate after you take them out of the fridge. This is just condensation from the temperature change. To minimize this, don't leave them in the fridge for hours just long enough to set.
Fixing Messy Chocolate Puddles
If your berries have a big "foot" of chocolate at the bottom, you didn't shake off enough excess. You can use a sharp paring knife to carefully trim away the excess chocolate once they are fully set and cold.
| Problem | Root Cause | Solution |
|---|---|---|
| Chocolate is falling off | Wet berries | Ensure fruit is bone dry before dipping |
| White streaks (Bloom) | Temperature shock | Let chocolate cool slightly before dipping |
| Chocolate is grainy | Water contamination | Keep all tools bone dry; avoid steam |
Common Mistakes Checklist
- ✓ Never cover the bowl of melting chocolate with a lid (condensation will drop in).
- ✓ Avoid using frozen berries - the moisture release as they thaw is too much.
- ✓ Don't skip the coconut oil; it provides that essential (with Tips!) | Downshiftology shine.
- ✓ Ensure the berries are at room temperature when dipping to prevent the chocolate from seizing too fast.
- ✓ Check that your white chocolate drizzle isn't too hot, or it will melt the dark layer beneath it.
Flavor Variations and Dietary Swaps
If you want to change things up, the possibilities are endless. I love doing a "Tuxedo" look by dipping the berry in white chocolate first, letting it set, and then dipping the sides in dark chocolate at an angle. It looks incredibly fancy but only takes an extra ten minutes of waiting.
If you are looking for a dairy-free option, simply use a high-quality vegan dark chocolate bar. Most dark chocolates with 70% cocoa or higher are naturally dairy-free, but always check the label. The refined coconut oil we use in this recipe is already vegan friendly!
For a bit of texture, try rolling the wet chocolate covered berries in crushed pistachios or freeze dried raspberry dust. If you want something even more festive, you might enjoy trying this Valentine Chocolate Heart recipe which uses a similar chocolate work technique but in a different form.
Scaling the Recipe for Crowds
Scaling this recipe is pretty straightforward, but there are some rules to follow. If you are doubling it to 40 berries, don't just double the chocolate in one go. It’s easier to work in batches of 8 oz of chocolate at a time. This keeps the chocolate at the ideal dipping temperature.
When halving the recipe for a quiet night in, you can use a very small bowl for the chocolate. Just remember that you still need enough depth to submerge the berry, so don't use a flat plate.
For the white chocolate drizzle, even if you only need 1 oz, it’s easier to melt 2 oz to ensure it flows properly in the bag or on the fork.
Debunking Some Chocolate Myths
One common myth is that you must use "melting wafers" for a good result. While they are easy, they often taste like wax because they swap cocoa butter for vegetable fats. Using real chocolate bars provides a much better flavor and a more natural melt.
Another misconception is that you should store these in the freezer. Freezing Chocolate Covered Strawberries actually ruins the texture of the fruit. When the berry thaws, the cell walls break down, and you'll end up with a mushy mess inside a hard shell.
Keep them in the fridge or a cool spot on the counter if you're eating them the same day.
Finally,, some people think you need to add butter to make the chocolate shiny. Butter contains water, which can cause the chocolate to seize. Stick to refined coconut oil or cocoa butter for that gloss without the risk.
Preservation and Using Every Scrap
Storage: These are best eaten within 24 hours. Keep them in a single layer in a container lined with paper towels to absorb any condensation. If you have to stack them, put parchment paper between the layers.
They will stay good in the fridge for up to 2 days, but the berries will start to release juice after that.
Zero Waste: Don't throw away that leftover melted chocolate! Pour it onto a piece of parchment, sprinkle with some nuts or dried fruit, and let it set into a quick chocolate bark. You can also stir it into warm milk for the richest hot chocolate you've ever had.
If you have stems or scraps from the berries, they can go right into your compost or be used to infuse water for a subtle fruity hint.
Pairing Your Treats for Parties
These berries are the stars of the show on a dessert charcuterie board. I love serving them alongside some sharp cheddar cheese or salty pretzels to balance the sweetness. If you're hosting a brunch, they look beautiful next to a pile of fresh croissants.
For a more formal vibe, pair them with a dry sparkling wine. The acidity of the wine cuts through the richness of the dark chocolate beautifully. Honestly, even a simple glass of cold milk makes these feel like a "total shift" from a regular dessert into something special.
Enjoy your (with Tips!) | Downshiftology creation you've earned it!
Recipe FAQs
What is the secret to perfect chocolate covered strawberries?
Yes, meticulous drying and temperature control. Ensuring the berries are bone dry prevents the chocolate from seizing, and adding a touch of refined coconut oil helps achieve a glossy, smooth coating. This attention to detail transforms a simple treat into something professional looking and delicious, similar to the precision needed for our Chocolate Chip Cookies: Ultimate Chewy Crispy Recipe.
What should I NOT do when making chocolate covered strawberries?
Never use wet berries or add water directly to your chocolate. Wetness causes chocolate to seize, becoming grainy and unusable. Also, avoid using frozen berries as they release too much moisture upon thawing. If you're enjoying the process of careful ingredient preparation here, you might also like mastering the techniques in our Snickerdoodle Cookies Recipe: The Ultimate Crinkly Soft Classic.
How far in advance can I prep chocolate covered strawberries?
Ideally, within 24 hours. For the best texture and freshest taste, chocolate covered strawberries are best consumed the day they are made. They can last up to 48 hours if stored properly in a single layer with paper towels in the fridge, but the berries may start to release juices.
Why do you have to eat chocolate covered strawberries within 24 hours?
The fruit's moisture content is the main culprit. Fresh strawberries are naturally juicy, and over time, their moisture can seep through the chocolate coating, making the shell soft and the berry mushy.
This is why a quick preparation to consumption window ensures the perfect crisp chocolate shell and juicy berry contrast.
Can I use chocolate chips instead of bars for covering strawberries?
It's not ideal, but possible with adjustments. Chocolate chips contain stabilizers that prevent them from melting as smoothly as baking bars, often resulting in a thicker, less glossy coating.
If you must use chips, you might need a little extra coconut oil to thin them out, similar to how you'd adjust fats for desired texture in other baked goods.
Why does my chocolate have white streaks after chilling?
This is likely fat bloom, caused by temperature fluctuations. When chocolate is subjected to rapid temperature changes, the cocoa butter can separate and rise to the surface, creating the white streaks.
To minimize this, ensure the berries are at room temperature before dipping and avoid drastic temperature shifts during chilling and storage.
How do I get a perfectly smooth, glossy chocolate shell?
Melt your chocolate gently and add a small amount of refined coconut oil. Use a double boiler or microwave on low heat to avoid scorching. The coconut oil acts as an emulsifier, thinning the chocolate for a more fluid coating and contributing to that professional looking shine. If you appreciate this level of detail and texture control, you might also enjoy perfecting the chewiness in our Peanut Butter Blossom Cookies: Soft, Chewy, and Easy Recipe.
Chocolate Covered Strawberries