Classic Crispy Chicken Parmesan
- Time: Active 20 minutes, Passive 25 minutes, Total 45 minutes
- Flavor/Texture Hook: Mahogany crisp crust meets silky mozzarella
- Perfect for: High impact weeknight dinners or impressing guests
- The Ultimate Chicken Parmesan Recipe
- Why These Crispy Techniques Work
- Precise Specs for Success
- Choosing the Best Ingredients
- Tools for Maximum Efficiency
- From Prep to Plated Dish
- Troubleshooting Your Cooking Process
- Making This Dish Your Own
- Myths About This Classic
- Storage and Reheating Tips
- Best Sides for Pairing
- Very High in Sodium
- Recipe FAQs
- 📝 Recipe Card
The Ultimate Chicken Parmesan Recipe
There is a specific sound that happens when a fork hits a truly great piece of breaded chicken. It is a sharp, distinct shatter that tells you the crust has survived the sauce. I remember the first time I actually got this right, standing in my cramped apartment kitchen, the air thick with the smell of toasted garlic and frying oil.
Before that, my attempts usually ended up as a soggy, steaming mess where the breading slid off the meat like a wet blanket. It was frustrating, but it taught me that the secret isn't just in the frying, it is in the preparation of the meat itself.
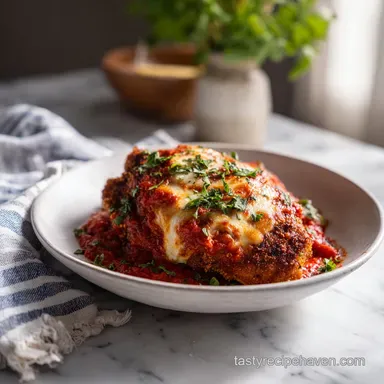
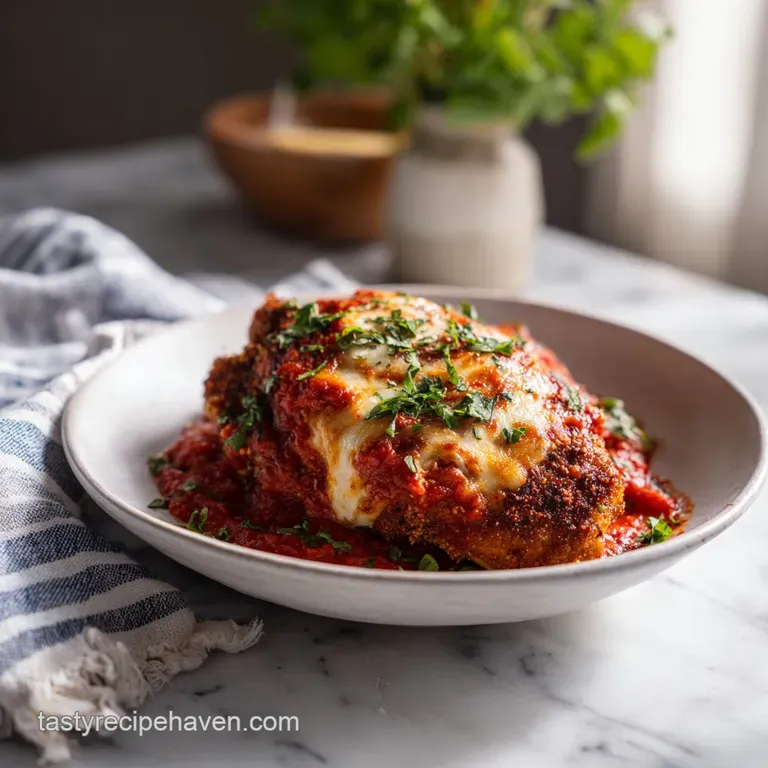
This version is all about the contrast between that mahogany colored, crunchy exterior and the tender, juicy interior of the chicken. We are going for maximum flavor with minimum cleanup by using a smart dredging station and a two stage cooking process.
You get the sear from the stovetop and the cheese melt from the oven. It is pure comfort food that feels much more expensive than it actually is. If you have been looking for a reliable way to get that bistro style finish at home, this is the method that finally worked for me after years of soggy bottoms and bland breading.
We are focusing on efficiency here. By the time the chicken hits the oven, you have already done the heavy lifting. The payoff is a plate of food that looks like it took hours but actually fits into a 45 minutes window.
It is about working smarter in the kitchen, focusing on the techniques that actually change the outcome, like the thickness of the meat and the temperature of the oil. Let’s get into why this specific approach beats the traditional "toss it in a pan and hope for the best" method every single time.
Why These Crispy Techniques Work
- Uniform Heat Transfer: Pounding the chicken to a consistent 1/2 inch thickness ensures the entire cutlet reaches the safe internal temperature of 165°F at the exact same moment. This prevents the thin edges from turning into leather while the center stays raw.
- The Hybrid Barrier: Using a mix of Panko and Italian breadcrumbs creates a multi layered shield. The Panko provides the airy crunch, while the finer Italian crumbs fill the gaps, creating a "velcro" effect that keeps the coating attached to the meat.
- Steam Management: Flash frying at medium high heat sets the crust immediately. This creates a waterproof seal that keeps the natural juices inside the chicken rather than letting them leak out and steam the breading from the inside out.
- Moisture Control: Patting the chicken bone dry before the flour stage is the most ignored step. It allows the flour to bond directly to the protein fibers, creating a dry foundation that the egg wash can actually grip onto for the long haul.
| Thickness | Internal Temp | Rest Time | Visual Cue |
|---|---|---|---|
| 1/2 inch | 165°F (74°C) | 3 minutes | Cheese is bubbly and golden |
| 3/4 inch | 165°F (74°C) | 5 minutes | Crust is deep mahogany brown |
| 1/4 inch | 165°F (74°C) | 2 minutes | Sides are crisp and opaque |
Choosing the right thickness is the first step toward a successful outcome. If the meat is too thick, the outside will burn before the inside is safe to eat. If it is too thin, you lose that juicy contrast that makes this dish so satisfying.
Pounding the meat also helps tenderize the fibers, making the final bite much more delicate and easier to cut with just a fork.
Precise Specs for Success
When we talk about component analysis in this chicken parmesan recipe, we are looking at how each element survives the heat of the skillet and the oven. It is not just about putting things together; it is about how they interact under pressure. The flour isn't just for coating; it is the primer.
The egg isn't just a liquid; it is the glue that hardens as it cooks.
| Component | Science Role | Pro Secret |
|---|---|---|
| All Purpose Flour | Starch Primer | Shake off every bit of excess or the breading will slip |
| Beaten Eggs | Protein Binder | Add a teaspoon of water to thin the proteins for a lighter coat |
| Panko & Italian Mix | Texture Shield | Press the chicken into the crumbs with your full body weight |
| Neutral Oil | Heat Conductor | Use an oil with a high smoke point like Avocado or Grapeseed |
The role of the flour is often misunderstood. It is there to absorb any lingering surface moisture that your paper towel missed. If there is a layer of water between the meat and the flour, the breading will puff up and detach during frying, creating a "bubble" of steam.
This is why the "shake off the excess" instruction is so vital. You want a microscopic layer of starch, not a thick paste.
For the breading itself, the combination of Panko and Parmigiano Reggiano is where the magic happens. The cheese actually melts slightly into the breadcrumbs as they fry, creating a savory, salty lace that binds everything together. It adds a depth of flavor that you just can't get from plain crumbs alone. If you're looking for another way to use these crispy techniques, you might enjoy my creamy chicken bake which uses a similar focus on texture.
Choosing the Best Ingredients
- 2 large boneless skinless chicken breasts: Aim for about 500g (1.1 lbs) total.
- Substitute: Chicken thighs (boneless) for a juicier, though less traditional, result.
- Why this? Breasts provide the wide surface area needed for that classic bistro presentation.
- 1/2 cup all purpose flour (65g): This is your foundation.
- Substitute: Cornstarch for an even crispier, slightly lighter crust.
- 2 large eggs, beaten: The essential binder.
- Substitute: Heavy cream or buttermilk, though the breading may be slightly more fragile.
- 1/2 cup Panko breadcrumbs (30g): For the big crunch.
- Substitute: Crushed crackers if you are in a pinch for texture.
- 1/2 cup Italian seasoned breadcrumbs (60g): For the flavor and gap filling.
- Substitute: Plain breadcrumbs with an extra teaspoon of dried oregano and basil.
- 1/2 cup freshly grated Parmigiano Reggiano (45g): high-quality cheese is non negotiable here.
- Substitute: Pecorino Romano for a sharper, saltier punch.
- Why this? Real Parmigiano has a high melting point that survives the frying process.
- 1 tsp garlic powder: To season the flour.
- Substitute: Onion powder or a pinch of smoked paprika.
- 1/4 cup neutral oil for frying (Avocado or Grapeseed): High smoke point is key.
- Substitute: Refined olive oil (not extra virgin, which burns too fast).
- 1.5 cups high-quality Marinara sauce (350ml): Look for a brand with no added sugar.
- Substitute: Crushed tomatoes seasoned with garlic and salt.
- 1.5 cups shredded low moisture mozzarella (170g): Do not use fresh "wet" mozzarella.
- Substitute: Provolone for a deeper, smokier flavor profile.
- 1/4 cup fresh basil, chiffonade: For the bright finish.
- Substitute: Fresh parsley if you prefer a more earthy tone.
Tools for Maximum Efficiency
To keep this a minimum cleanup operation, you need the right gear. A heavy bottomed skillet is your best friend here. I personally swear by a large cast iron or a heavy stainless steel pan. These materials hold heat better, which means when you drop the cold chicken into the oil, the temperature doesn't plummet.
If the oil gets too cool, the breading starts absorbing it instead of searing, and that is how you get greasy chicken.
You also need a wire rack set over a baking sheet. This is a trick I learned from professional kitchens. If you put the fried chicken directly onto a plate or a paper towel, the bottom side will sit in its own steam and turn soft within seconds.
Elevating it on a rack allows air to circulate around the entire cutlet, keeping it shatter crisp while you get the sauce and cheese ready.
Finally, a meat mallet or even a heavy rolling pin is necessary. Pounding the chicken isn't just about thickness; it is about evening out the surface. Chicken breasts are naturally lopsided, with a thick "head" and a thin "tail." If you don't level them out, the tail will be dry as a bone by the time the head is cooked through.
If you don't have a mallet, the bottom of a heavy saucepan works perfectly. Just be sure to use plastic wrap to prevent a mess.
From Prep to Plated Dish
- Butterfly the chicken breasts by slicing them horizontally almost all the way through, then open them like a book and cut into four even cutlets. Place these cutlets between two sheets of plastic wrap and pound them firmly with a mallet to a uniform 1/2 inch thickness. Note: This ensures every bite cooks at the exact same rate.
- Pat the chicken bone dry using several paper towels until no moisture remains on the surface, then season both sides liberally with salt and black pepper.
- Set up your dredging station with three shallow bowls: Bowl 1 with the all purpose flour and garlic powder; Bowl 2 with the beaten eggs; Bowl 3 with the combined Panko, Italian breadcrumbs, and 1/2 cup of grated Parmigiano Reggiano.
- Coat one cutlet in the flour mixture, shaking it vigorously to remove every bit of excess. Dip it into the egg wash to coat completely, then press it firmly into the breadcrumb mixture, using your palms to ensure a thick, even coating.
- Heat 1/4 cup of neutral oil in your heavy bottomed skillet over medium high heat. Flash fry the cutlets for 3-4 minutes per side until the crust is mahogany colored and crisp.
- Transfer the fried cutlets immediately to a wire rack set over a baking sheet. This stops them from steaming on the bottom. Top each cutlet with a few spoonfuls of marinara sauce and a generous portion of shredded mozzarella.
- Bake the cutlets in a preheated 400°F (200°C) oven for 10-12 minutes until the cheese is molten and bubbly and the internal temperature of the chicken reaches 165°F (74°C).
- Remove from the oven carefully and garnish with the fresh basil chiffonade and the remaining 1/4 cup of Parmigiano Reggiano before serving.
Troubleshooting Your Cooking Process
| Issue | Solution |
|---|---|
| Why Your Breading Falls Off | One of the most common issues with this chicken parmesan recipe is the breading detaching from the meat like a loose skin. This usually happens because of moisture. If the chicken wasn't dried properl |
| Why the Chicken is Dry | If your chicken feels like sawdust despite being covered in sauce, it was likely overcooked before it even hit the oven. Remember that the "flash fry" stage is only meant to brown the outside, not coo |
| How to Prevent a Soggy Bottom | The interaction between the sauce and the crust is a battle against time. To keep the bottom of the chicken crisp, don't drow it in sauce. Apply the marinara only to the center top of the cutlet, leav |
Making This Dish Your Own
If you are looking for a variation, consider the "Melt" style. Instead of a full plate of pasta, you can serve these cutlets on toasted ciabatta rolls for an incredible sandwich experience. The principles remain the same, but the delivery is much more casual. For a similar poultry focused comfort meal, my chicken lasagna offers a different way to layer these classic Italian flavors without the frying step.
Scaling this recipe is straightforward. If you are cooking for two, simply halve the ingredients but keep the pan size the same so you have plenty of room to fry without overcrowding. If you are scaling up for a crowd, the biggest challenge is the stovetop stage.
Work in batches and keep the finished cutlets on the wire rack in a warm oven (around 200°F) until all the chicken is fried. Then, top them all with sauce and cheese and do one big bake at 400°F.
| Goal | Adjustment | Effect |
|---|---|---|
| gluten-free | Use Almond flour and GF Panko | Slightly nuttier flavor, very crisp |
| Lighter Version | Air fry at 400°F for 12 mins | Less fat, but the crust is less "shatter crisp" |
| Spicy Kick | Add 1 tsp red pepper flakes to sauce | Adds a bright, heat forward contrast to the cheese |
Myths About This Classic
One huge misconception is that you need "wet" or fresh mozzarella for the best flavor. While fresh mozz is great on a margherita pizza, it is a disaster for a chicken parmesan recipe. Fresh mozzarella has a very high water content.
As it melts in the oven, it releases that water directly onto your carefully fried chicken crust, turning it into mush. Always use low moisture, part skim shredded mozzarella for that iconic "cheese pull" and a dry, bubbly finish.
Another myth is that you need to deep fry the chicken for it to be crispy. Shallow frying in just 1/4 cup of oil is actually superior here. Deep frying can sometimes lead to a "heavy" crust that feels greasy.
Shallow frying allows you to monitor the browning more closely and uses the weight of the chicken against the bottom of the pan to create a more even, hard seared crust. It is more efficient and creates much less waste.
Finally,, people often think the sauce needs to be cooked for hours. Because the marinara is going into a 400°F oven for 12 minutes, it will actually "finish" cooking there.
A bright, fresh tasting sauce is actually better because it cuts through the richness of the fried breading and the heavy cheese. Don't over reduce your sauce on the stovetop before adding it to the chicken, or it will become too salty and thick in the oven.
Storage and Reheating Tips
Leftover chicken parmesan is a gift, but only if you reheat it correctly. In the fridge, it will stay good for up to 3 days. However, do not use the microwave. The microwave is where crispy things go to die; it will turn the breading into a soggy paste and make the chicken rubbery.
Instead, put the cutlets on a baking sheet and pop them back into a 350°F (180°C) oven for about 10 minutes. This will re crisp the edges and melt the cheese without drying out the meat.
For freezing, you can actually freeze the breaded, fried cutlets before you add the sauce and cheese. Wrap them individually in plastic wrap and then foil. They will last for 2 months.
When you're ready to eat, bake them from frozen at 400°F for 15 minutes, then add the sauce and cheese and bake for another 10. It’s the ultimate homemade TV dinner.
Zero Waste Tip: Don't throw away the leftover dredging flour or breadcrumbs if they haven't touched the raw meat! Actually, usually, they have, so throw them away BUT, if you have leftover fresh basil stems, toss them into your marinara jar.
They infuse the sauce with incredible aroma while it sits in the fridge. Also, any leftover mozzarella can be frozen and used for a quick garlic bread topping later in the week.
Best Sides for Pairing
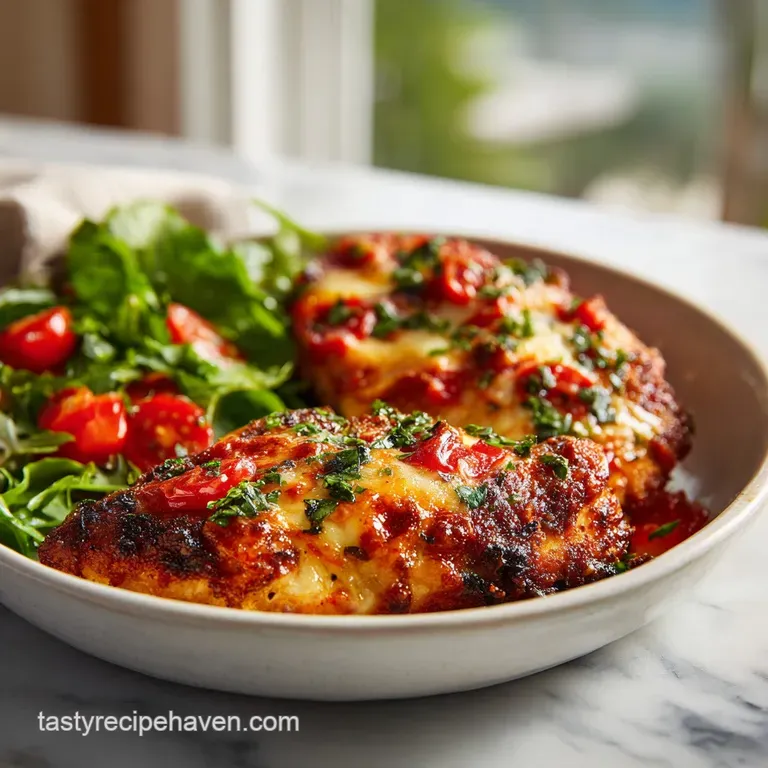
To balance the richness of this dish, I always suggest a "Bistro" style side. A simple arugula salad with a sharp lemon vinaigrette is perfect. The bitterness of the greens and the acidity of the lemon cut right through the fried crust and cheese, cleansing your palate between bites.
It makes the whole meal feel lighter and more balanced.
If you are going the traditional route with a chicken parmesan with pasta recipe, go for a long, thin noodle like spaghetti or thin linguine. Toss the pasta in just a little bit of the marinara and a splash of pasta water to create a silky coating.
Avoid drowning the pasta in sauce; the star of the show should always be the chicken. A side of charred broccolini with a hit of red pepper flakes also adds a nice textural contrast and a pop of color to the plate.
Whether you're serving this for a cozy Sunday dinner or a quick Wednesday night win, the key is the timing. Get your sides ready while the chicken is in its final 10 minute bake. By the time the timer dings and the cheese is bubbly, everything else should be on the table.
Trust me, the effort of that three bowl dredging station is worth it the moment you hear that first crunch. It is the kind of meal that makes everyone at the table go quiet for a second, and that is the best compliment a home cook can get.
Right then, you've got the secrets. Get your dredging station ready, pound that chicken thin, and don't skip the wire rack. You're about to make the best version of this classic you've ever had. Let's crack on!
Very High in Sodium
980 mg 980 mg of sodium per serving (43% 43% of daily value)
The American Heart Association recommends limiting sodium intake to less than 2,300mg per day, with an ideal limit of about 1,500mg for most adults.
Tips to Reduce Sodium
-
Choose Low-Sodium Marinara-20%
Select a low-sodium or no-salt added marinara sauce. This is often the biggest contributor of sodium in this dish. Look for labels that explicitly state 'low sodium' or check the nutrition facts for significantly less sodium per serving.
-
Reduced Sodium Parmigiano Reggiano-15%
Use reduced sodium Parmigiano Reggiano for both the breading and the finishing. While cheese naturally contains sodium, opting for a reduced sodium version can make a noticeable difference.
-
Omit Added Salt-10%
Eliminate the added salt entirely. The Parmigiano Reggiano cheese and Italian seasoned breadcrumbs already contribute a significant amount of sodium. Taste the dish before considering any additional salt.
-
Boost with Herbs and Spices
Enhance flavor with fresh herbs and additional spices like onion powder, smoked paprika, or red pepper flakes. These can add depth without adding sodium.
-
Use Unseasoned Breadcrumbs-8%
Substitute the Italian seasoned breadcrumbs with plain, unseasoned breadcrumbs. You can then add your own blend of herbs and garlic powder to control the sodium content.
Recipe FAQs
What's the secret to a great chicken Parmesan?
Bone dry chicken and the perfect fry. You must pat the chicken completely dry before dredging so the breading adheres perfectly, then flash fry until the crust is a deep mahogany color before baking.
What ingredients do you need for chicken Parmesan?
You need chicken breasts, a three part breading station, and finishing toppings. Gather boneless skinless chicken breasts, flour, garlic powder, eggs, Panko, Italian breadcrumbs, Parmigiano Reggiano, neutral oil, marinara sauce, mozzarella, and fresh basil.
What is the best breading for chicken parm?
A blend of Panko and Italian seasoned breadcrumbs. Mixing these provides the ideal balance of a light, extra crunchy exterior and uniform, classic flavor.
When making chicken parm, what do you dip it in first?
Dip the chicken into the flour mixture first. Ensure you shake off any excess flour before moving to the egg wash so the final coating remains crisp rather than gummy.
How to prevent the breading from falling off?
Remove all surface moisture with paper towels before starting the dredge. If you enjoyed mastering the crust development here, you can apply similar moisture control techniques to our ground turkey recipe to ensure perfect searing every time.
Is it true I should use the microwave to reheat leftovers?
No, this is a common misconception. The microwave turns the crust into a soggy paste, so you should always reheat in a 350°F oven for 10 minutes to maintain texture.
How to ensure the chicken stays juicy?
Limit the flash fry stage to 3-4 minutes per side. This browns the exterior for flavor without overcooking the meat before it enters the oven for the final melt.
Classic Crispy Chicken Parmesan