Chocolate Covered Strawberries: Foolproof Coating
- Time: Active 15 minutes, Passive 30 minutes, Total 45 minutes
- Flavor/Texture Hook: Velvety dark chocolate shell with a crisp, juicy berry burst
- Perfect for: Last minute gifts, romantic dates, or a simple weekend treat
- Making Perfect Chocolate Covered Strawberries
- Simple Science Behind the Snap
- Essential Quick Recipe Details
- Buying the Best Ingredients
- Minimal Tools Required
- Detailed Step by Step Instructions
- Common Dipping Problems Solved
- Simple Diet Friendly Swaps
- Storing Your Berry Treats
- Fun Serving and Pairing
- Recipe FAQs
- 📝 Recipe Card
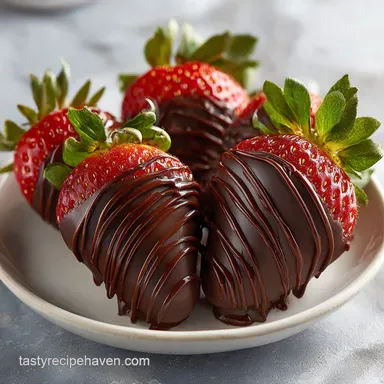
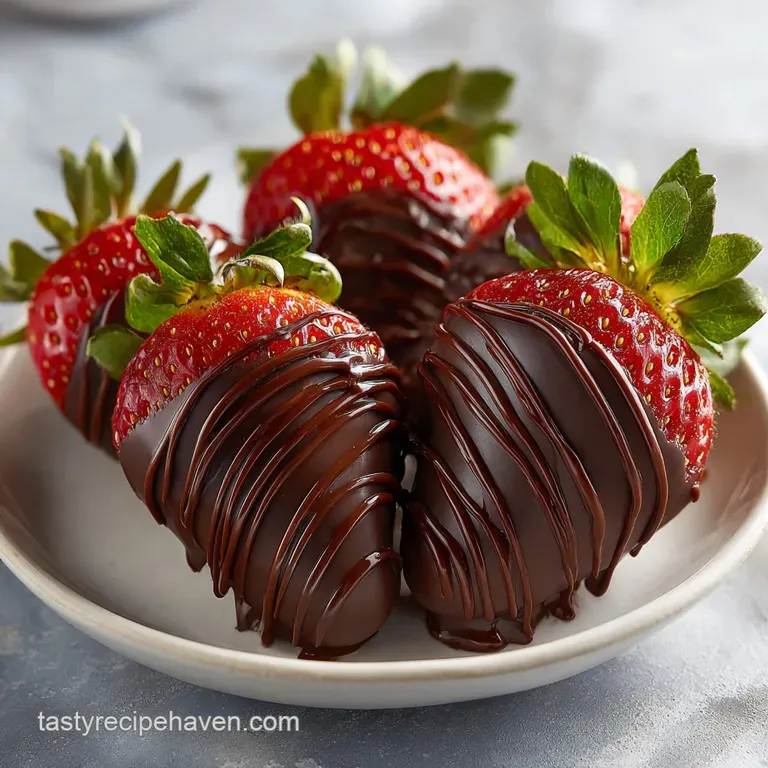
Making Perfect Chocolate Covered Strawberries
You know that specific sound? That little shatter of the chocolate shell just before your teeth sink into the cold, juicy berry center? I spent years trying to get that right. My first attempt was a total disaster I washed the berries and dipped them while they were still slightly damp.
The chocolate seized into a grainy, muddy mess, and by the next morning, the berries were sitting in a puddle of their own juices. It was heartbreaking, but it taught me the golden rule of dipping: moisture is the enemy of gloss.
Since then, I've simplified everything. We don't need fancy marble slabs or professional tempering thermometers to make Chocolate Covered Strawberries that look like they came from a high end boutique. It's all about the temperature of the fruit and the specific type of fat we add to the chocolate.
I've found that a tiny bit of coconut oil is the secret weapon for that silky, easy to dip consistency that sets up beautifully in the fridge.
We're going to walk through the exact steps I use now. No fluff, no complicated gear, just the tricks that actually work in a real kitchen. Whether you're making these for a party or just because it's a Tuesday and you deserve a treat, you'll get that velvety finish every single time.
Trust me, once you nail the drying process, the rest is just pure, delicious fun.
Simple Science Behind the Snap
Getting that professional finish isn't luck, it's chemistry. When we melt chocolate, we're basically managing how the cocoa butter crystals realign. If they align correctly, you get a gloss; if they don't, you get a dull, soft coating.
- Fat Stabilization: The refined coconut oil lowers the melting point slightly, creating a more fluid consistency that coats the berry in a thin, even layer.
- Thermal Shock Prevention: Using room temperature berries prevents the chocolate from seizing instantly, allowing it to flow smoothly over the fruit's surface.
- Crystalline Structure: Allowing the chocolate to set slowly in a cool environment, rather than a freezing one, helps maintain a matte free, glossy shine.
- Surface Tension: Completely dry skin on the strawberry allows the fats in the chocolate to bond directly to the fruit rather than slipping off on a layer of water.
| Berry Temperature | Set Time | Texture Result | Best Use |
|---|---|---|---|
| Cold (from fridge) | 2 minutes | Thick, dull shell | Immediate eating |
| Room Temp (68°F) | 5 minutes | Thin, glossy shell | Gifts and display |
| Warm (sun ripened) | 10+ minutes | Streaky, thin coat | Not recommended |
It is much easier to work with berries that aren't sweating. If you pull them straight from the fridge and the kitchen is warm, they'll develop condensation, which is the fastest way to ruin your Chocolate Covered Strawberries recipe.
Essential Quick Recipe Details
Before you start melting anything, we need to look at the components. I've learned that not all chocolate is created equal for this job. You want something with a decent fat content chips can work, but a high-quality bar that you chop yourself will always melt into a more velvety pool.
| Ingredient | Science Role | Pro Secret |
|---|---|---|
| Semi sweet Chocolate | Structural Base | Chop finely for even, fast melting |
| Refined Coconut Oil | Viscosity Modifier | Use refined to avoid any coconut scent |
| Fresh Strawberries | Acidic Contrast | Keep stems on for a natural handle |
When you're choosing your fruit, look for "long stem" varieties if you can find them. They make the dipping process so much cleaner. If you can't find them, don't worry, we can use a toothpick trick that works just as well. If you find yourself with extra berries, you can always pivot and try a Cheesecake Stuffed Strawberries recipe for a different vibe.
Buying the Best Ingredients
- 1 lb fresh strawberries: Look for firm, bright red berries with green, perky leaves. If they feel soft, they'll leak juice under the chocolate.
- 8 oz semi sweet chocolate: Use a bar like Ghirardelli or Guittard. Why this? Bars have fewer stabilizers than chips, meaning they melt much smoother.
- 1 tsp refined coconut oil: This is our "flow agent." Why this? It adds a beautiful sheen and makes the chocolate less brittle.
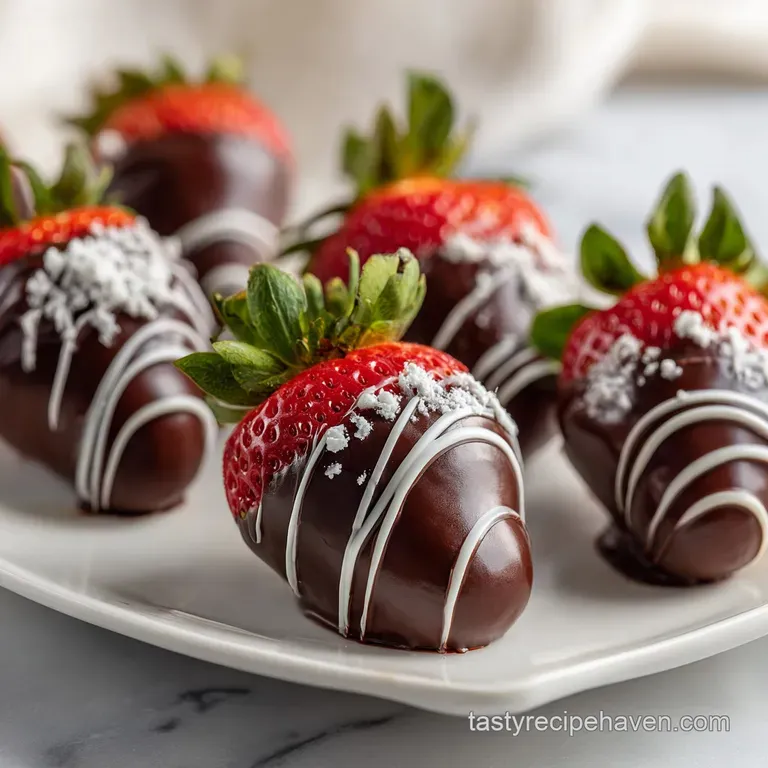
- 2 oz white chocolate: This is for the decorative drizzle. Why this? The color contrast makes the berries look professionally finished.
Chef's Tip: Grate your chocolate with a coarse cheese grater instead of chopping it with a knife. It creates uniform pieces that melt at the exact same rate, preventing hot spots that can burn the chocolate.
Minimal Tools Required
You don't need a double boiler if you're careful. A simple microwave safe glass bowl works wonders. I prefer glass over plastic because it holds heat more consistently, which keeps your chocolate fluid for longer while you're working through the whole pound of berries.
You'll also need a sheet of parchment paper or a silicone baking mat. Never use foil; the chocolate will stick to it like glue, and you'll end up breaking the shells when you try to lift them. A small fork or a toothpick can help if your strawberry stems are too short to grab.
Detailed step by step Instructions
- Wash and dry. Rinse the 1 lb fresh strawberries under cold water. Note: This is the most critical step.
- Air dry thoroughly. Lay berries on a clean kitchen towel for 30 minutes until the skin feels completely matte and bone dry.
- Chop the chocolate. Break the 8 oz semi sweet chocolate into very small, uniform pieces.
- Melt gently. Place chocolate and 1 tsp refined coconut oil in a bowl. Microwave in 20 second bursts until mostly melted with a few small lumps remaining.
- Stir to finish. Use a spatula to stir the chocolate until it becomes perfectly silky and glossy. Note: Residual heat will melt the remaining lumps without burning the rest.
- Prep the dip. Grab a berry by the stem and pull the leaves back.
- Submerge and swirl. Dip the strawberry into the chocolate, swirling until it is coated three quarters of the way up.
- Drain the excess. Lift the berry and shake it gently over the bowl until the heavy dripping stops.
- Place and set. Lay the berry on parchment paper.
- Add the drizzle. Melt the 2 oz white chocolate, put it in a small zip top bag, snip a tiny corner, and zig zag until a delicate pattern forms.
| Original Ingredient | Substitute | Why It Works |
|---|---|---|
| Semi sweet Chocolate | Dark Chocolate (70%) | Provides a deeper, less sweet flavor profile. |
| Refined Coconut Oil | Vegetable Shortening | Provides the same thinning effect without any flavor. |
| White Chocolate | Melted Peanut Butter | Adds a salty sweet twist. Note: Won't set as hard. |
If you want a different look, you can also use this same dipping method for a Chocolate Covered Strawberry recipe where you incorporate the berries into a larger dessert display.
Common Dipping Problems Solved
Why Your Chocolate Is Grainy
If even a single drop of water gets into your melting bowl, the chocolate will "seize." This happens because the water bonds with the sugar and cocoa solids, turning a smooth liquid into a gritty paste.
If this happens, you can sometimes save it by adding a teaspoon of boiling water and stirring vigorously, though it will no longer be suitable for dipping.
Why Your Berries Are Leaking
This usually happens if the berries were bruised or if they sat in the fridge for too long after being dipped. As the strawberry sits, the sugar in the chocolate draws moisture out of the fruit through osmosis. This is why I always suggest serving these within 12 hours of making them.
| Problem | Root Cause | Solution |
|---|---|---|
| Chocolate falling off | Moisture on berry skin | Use a hair dryer on "cool" to dry berries faster |
| Thick, gloopy coating | Chocolate is too cold | Re warm in the microwave for 5-10 seconds |
| Dull, greyish finish | Temperature was too high | Melt slower and stir more to keep it tempered |
Common Mistakes Checklist
- ✓ Never dip berries that are still cold from the fridge (condensation will form).
- ✓ Avoid over heating the chocolate; stop when there are still small lumps.
- ✓ Don't skip the coconut oil; it provides the "give" needed for a clean bite.
- ✓ Use a deep, narrow bowl rather than a wide one to make dipping easier.
- ✓ Let the berries sit at room temperature for 15 minutes before putting them in the fridge to set.
Simple Diet Friendly Swaps
If you're watching your sugar, you can easily swap the semi sweet chocolate for a sugar-free version like Lily's. Because sugar-free chocolate often has different emulsifiers, you might need to add an extra half teaspoon of coconut oil to get that same "river like" flow when dipping. It’s a great way to enjoy this recipe without the sugar spike.
For a vegan version, simply ensure your dark chocolate is dairy-free. Most high-quality dark chocolates are naturally vegan, but always double check the label for "milk solids." Since we are already using coconut oil as our fat source, the recipe is naturally dairy friendly if the chocolate is pure.
| Target Goal | Ingredient Adjustment | Result Change |
|---|---|---|
| Ultra Rich | Use 60% Cacao Bittersweet | Less sweet, more intense cocoa flavor |
| Kid Friendly | Use Milk Chocolate | Much sweeter and softer shell |
| Festive Look | Add Crushed Nuts | Adds crunch and hides dipping imperfections |
Storing Your Berry Treats
Don't even think about freezing these! Strawberries are about 90% water. When that water freezes, it expands and breaks the cell walls of the fruit. When it thaws, you'll be left with a mushy, weeping mess inside a chocolate shell.
Keep your finished berries in a single layer in an airtight container lined with paper towels. The paper towels will absorb any minor moisture that escapes. They are best kept in a cool, dry spot in your kitchen if you're eating them the same day.
If your house is warm, put them in the fridge but take them out 20 minutes before serving so the chocolate isn't too hard to bite through.
To reduce waste, don't throw away the strawberry tops you might trim off. I toss mine into a pitcher of water for a subtle "spa water" flavor, or even into a blender for a morning smoothie. Any leftover chocolate can be poured onto parchment, allowed to harden, and saved for your next batch of cookies.
Fun Serving and Pairing
These berries are the stars of any dessert board. I love serving them alongside some salty elements like pretzels or Marcona almonds to balance out the sweetness. If you're feeling fancy, a glass of cold Prosecco or a dry Rosé is the ultimate partner for the acidity of the berries and the richness of the chocolate.
If you want to go all out, try making a "Deconstructed Berry Board." Put your dipped berries in the center and surround them with small bowls of extra toppings like shredded coconut, crushed pistachios, or sea salt flakes. It lets people customize their bite and looks incredibly impressive for very little extra effort.
Just remember, the best part of this recipe is the contrast between the snap of the shell and the soft fruit, so keep those textures front and center!
Recipe FAQs
What is the secret to chocolate covered strawberries?
Completely dry berries and using refined coconut oil. Moisture causes the chocolate to seize immediately, creating a grainy texture rather than a smooth dip. The coconut oil thins the chocolate, ensuring a glossy, thin coating that sets beautifully.
What kind of chocolate is best for dipping strawberries?
A high-quality chocolate bar, chopped finely. Bars contain fewer stabilizers than standard chocolate chips, melting into a much smoother and silkier pool ideal for coating.
If you're looking for a recipe with a similar technique for smooth texture, check out the [Chocolate Cream Pie recipe] for tips on managing melted chocolate viscosity.
How to get strawberries to stick to chocolate?
Ensure the strawberry skin is perfectly matte and dry before dipping. You should allow the washed fruit to air dry for at least 30 minutes, or even use a cool hairdryer. A dry surface allows the melted cocoa butter fats to adhere directly to the fruit.
Do strawberries need to be cold before dipping in chocolate?
No, berries should be room temperature, around 68°F. Dipping cold fruit into warm chocolate immediately creates condensation, which seizes the chocolate and ruins the coating. Letting them warm up slightly prevents this thermal shock.
Is it true I must use a double boiler to melt chocolate for this?
No, this is a common misconception. A microwave set to 50% power works perfectly fine for melting, provided you stir frequently in short intervals. This method is faster, but you must stop melting when small lumps remain, stirring until residual heat finishes the job.
How to make the chocolate coating thin and glossy instead of thick?
Stir in 1 teaspoon of refined coconut oil for every 8 ounces of chocolate you melt. This acts as a flow agent, lowering the overall viscosity of the chocolate. If you master this fat stabilization technique, you'll get great results for many applications, similar to how fat ratios control spread in baking; see how we apply similar logic in our [Strawberry Smoothie Recipe With Yogurt in 5 Minutes] for flavor balance.
How to store finished chocolate covered strawberries?
Store them in a single layer in an airtight container lined with paper towels at room temperature for up to 6 hours, or refrigerated for up to 24 hours. Do not freeze the finished product; the berry's high water content will cause it to weep once thawed.
Easy Chocolate Covered Strawberries 2