Easy Red Velvet Cake Truffles: Cake Mix Recipe
- Time: Active 20 minutes, Passive 25 minutes, Total 45 minutes
- Flavor/Texture Hook: A velvety, crimson center encased in a crisp white chocolate shatter.
- Perfect for: Valentine's Day parties, holiday gift boxes, or beginner friendly dessert platters.
- Secrets to Making Easy Red Velvet Cake Truffles
- Understanding the Science of the Velvet Crumb
- Choosing the Right Ingredients for Velvety Centers
- Essential Kitchen Tools for Effortless Truffle Making
- Master the Simple Process of Rolling Truffles
- Expert Fixes for Common Cake Ball Mistakes
- Creative Flavor Variations and Easy Ingredient Swaps
- Proper Storage to Keep Truffles Freshly Made
- Beautiful Decorating Tips for Professional Looking Results
- The Science of the "Red" in Red Velvet
- Myth: Red Velvet is Just Chocolate Cake
- Recipe FAQs
- 📝 Recipe Card
Secrets to Making Easy Red Velvet Cake Truffles
The kitchen always smells best when there is a red velvet cake in the oven. It is that specific, nostalgic aroma of sweet vanilla mixed with a subtle, earthy hint of cocoa. I remember the first time I tried making these; I was so impatient that I crumbled the cake while it was still steaming. Total disaster.
It turned into a gummy ball of red dough that looked nothing like the elegant truffles I had seen in bakery windows.
That mistake taught me the most important lesson in this process: patience is the secret ingredient. Once you let that cake cool completely and mix it with just the right amount of tangy cream cheese, magic happens. You get a center that feels like truffle ganache but with the lightness of cake.
It is incredibly satisfying to feel the cool, crimson crumbs between your fingers as you prep the filling.
These Easy Red Velvet Cake Truffles are my go to when I want a high impact dessert without spending four hours over a double boiler. We are using a few clever shortcuts here, but with a couple of pro additions that make them taste completely from scratch.
Whether you are prepping for a party or just want something sweet to keep in the fridge, this method works every single time. Let's get into the details of how to make these beauties.
Understanding the Science of the Velvet Crumb
The Emulsification Bond: When we mix the fats in the cream cheese with the pre baked starch of the cake, it creates a stable emulsion that mimics the texture of fudge. This prevents the truffles from feeling dry or crumbly when you bite into them.
The Snap Mechanism: Adding refined coconut oil to the white chocolate wafers alters the fat crystal structure. This ensures the coating sets firmly enough to shatter when bitten but stays thin enough to melt quickly on the tongue.
The Cocoa Bloom: Adding extra Dutch processed cocoa to the boxed mix doesn't just deepen the flavor; it introduces more solids that help the cake maintain a tight, moist structure during the crumbling phase.
| Preparation Method | Time Required | Texture Result | Best Occasion |
|---|---|---|---|
| Boxed Mix Shortcut | 45 minutes | Uniform and Fudgy | Weeknights or large parties |
| From Scratch Cake | 1 hours 30 mins | Denser and Richer | Small, high end gift boxes |
| No Bake Method | 20 minutes | Doughy and Heavy | Last minute cravings |
Using a high-quality boxed mix is actually my preferred way to do this because the leavening agents are perfectly balanced for a light crumb. This lightness is exactly what we need to absorb the cream cheese frosting without becoming a heavy, leaden ball of sugar.
It keeps the center feeling like a cloud rather than a dense lump of dough.
Choosing the Right Ingredients for Velvety Centers
The quality of your coating chocolate is what defines the final look. I always suggest using melting wafers rather than a standard white chocolate bar. Wafers are specifically formulated with a higher ratio of cocoa butter and vegetable fats, which helps them flow smoothly over the round cake balls.
If you use a regular bar, it often stays too thick, leading to a clumpy finish that looks messy.
- 1 box (15.25 oz) Red Velvet Cake Mix: The reliable foundation for our crimson center.
- 1 cup water: Hydrates the dry mix to create a tender sponge.
- 1/3 cup vegetable oil: Provides the essential moisture and fat for a soft crumb.
- 3 large eggs: These act as the structural binder during the baking process.
- 1 tbsp Dutch processed cocoa powder: Adds a sophisticated depth to the standard mix flavor.
- 4 oz full fat cream cheese, softened: The tangy glue that turns cake into a truffle.
- 1/2 cup powdered sugar: Ensures the filling has a silky, sweet finish.
- 1 tsp pure vanilla extract: Rounds out the cocoa notes with a warm floral scent.
- 16 oz white chocolate melting wafers: Creates that signature crisp outer shell.
- 1 tbsp refined coconut oil: Helps the chocolate flow and adds a professional sheen.
| Original Ingredient | Substitute | Why It Works |
|---|---|---|
| Cream Cheese | Mascarpone | Provides a richer, more buttery flavor with less tang. |
| White Chocolate | Dark Chocolate | Same melting properties but adds a bitter, sophisticated contrast. |
| Refined Coconut Oil | Cocoa Butter | High fat content ensures a crisp snap. Note: Adds a slight chocolate scent. |
Using refined coconut oil is a trick I learned years ago to keep the chocolate from seizing. Unlike virgin coconut oil, the refined version has no coconut flavor, so it won't interfere with the red velvet taste. It just makes the dipping process a thousand times easier.
Essential Kitchen Tools for Effortless Truffle Making
You don't need a professional pastry kitchen to pull this off, but a few simple items make the workflow much smoother. I highly recommend using a standard 9x13 inch baking pan for the cake. Since we are just going to crumble it anyway, we want maximum surface area for the cake to bake quickly and evenly.
A stand mixer like a KitchenAid is great for the frosting, but a hand mixer works just as well.
The one "pro" tool I swear by is a small cookie scoop. Trust me on this: trying to roll 40 identical balls by hand is a nightmare. A scoop ensures every truffle is exactly the same size, which means they will all chill and set at the same rate.
This is the difference between a tray of truffles that looks professional and one that looks like a school bake sale project.
Finally,, grab some parchment paper. White chocolate is notorious for sticking to everything. If you set your dipped truffles on a wire rack, they will tear when you try to move them. Parchment paper allows them to slide right off once the chocolate has hardened into that beautiful shell.
Master the Simple Process of Rolling Truffles
- Bake the base. Combine the cake mix, water, oil, eggs, and cocoa powder in a bowl. Bake at 350°F (180°C) for 25 minutes until a toothpick comes out clean and the center is set.
- Cool completely. Leave the cake in the pan for at least 30 minutes. Note: Crumbling a warm cake results in a greasy, gummy texture.
- Crumble the cake. Use your hands or a fork to break the cake into fine, sandy crumbs in a large bowl. Ensure there are no large chunks left behind.
- Prepare the binder. In a separate bowl, beat the softened cream cheese, powdered sugar, and vanilla until the mixture is silky and free of lumps.
- Combine into dough. Fold the cream cheese mixture into the cake crumbs. Use a spatula to press them together until a cohesive, playdough like ball forms.
- Shape the truffles. Use a small scoop to portion the dough, then roll between your palms into 1 inch rounds. Place them on a lined baking sheet.
- Chill the balls. Place the tray in the freezer for 15 minutes. Check that they are firm to the touch and hold their shape.
- Melt the coating. Microwave the white chocolate wafers and coconut oil in 30 second bursts, stirring in between until the liquid is glossy and flows like honey.
- Dip and coat. Use a fork to submerge each ball into the chocolate. Lift it out and tap the fork against the bowl until the excess chocolate stops dripping.
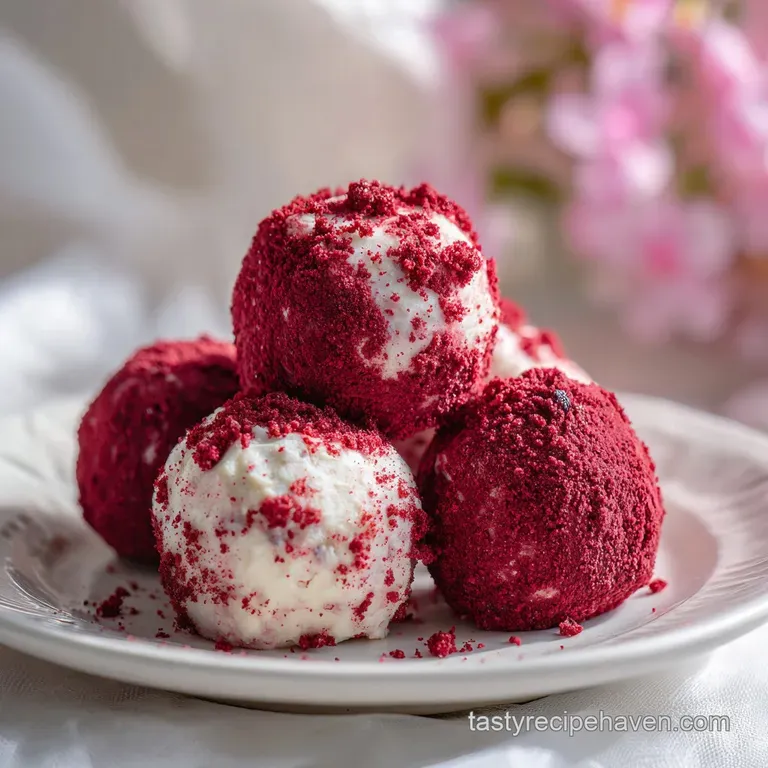
- Set and decorate. Place back on the parchment paper and immediately add sprinkles if using. Let them sit at room temperature for 10 minutes until the shell is hard and matte.
Chef's Tip: If your cake balls start to get too soft while you are dipping, pop them back in the freezer for 5 minutes. A cold center is the only way to get a clean, thick chocolate coating without the ball falling apart in the bowl.
Expert Fixes for Common Cake Ball Mistakes

Why Your Chocolate Shell Is Cracking
If your chocolate coating develops hairline fractures after setting, the temperature difference between the cake and the chocolate was too extreme. When the cold cake ball expands slightly as it warms up, it puts pressure on the brittle chocolate.
To fix this, let your chilled cake balls sit on the counter for 5 minutes before dipping, and make sure your chocolate isn't boiling hot.
Why the Filling Feels Gritty
Gritty centers usually happen if the powdered sugar wasn't sifted or if the cream cheese was too cold when you started mixing. If the cream cheese is lumpy, it won't distribute evenly through the crumbs.
Next time, make sure the cream cheese is truly "room temperature" it should yield easily when you press it with your thumb.
| Problem | Root Cause | Solution |
|---|---|---|
| Chocolate is too thick | Overheated or no fat added | Stir in 1 tsp of coconut oil to thin it out. |
| Truffles are sweating | Condensation from the fridge | Store in a cool room or use a paper towel in the container. |
| Crumbs in the coating | Cake balls weren't chilled enough | Freeze for an extra 10 minutes before dipping. |
Common Mistakes Checklist
- ✓ Always remove the brown "skin" from the top of the cake if you want a purely crimson interior.
- ✓ Pat the cake balls with a paper towel if they look moist before dipping.
- ✓ Don't skip the extra cocoa powder; it cuts through the sweetness of the white chocolate.
- ✓ Use a deep, narrow bowl for dipping to make submerging the balls easier.
- ✓ Use a toothpick to slide the truffle off the fork to avoid leaving a large mark on the bottom.
Creative Flavor Variations and Easy Ingredient Swaps
If you want to take this HeartShaped Red Velvet recipe vibe to the next level, try adding a tablespoon of espresso powder to the cake mix. It won't make the truffles taste like coffee; instead, it acts as a flavor booster that makes the chocolate notes much more intense. It is a total pro move that makes people ask, "What is in this?"
For a festive twist, you can swap the white chocolate for dark chocolate. This creates a much richer, less sweet experience that pairs perfectly with a glass of red wine. If you are making these for a kids' party, you can even use different colored candy melts for the drizzle on top. If you enjoy the flavor profile but want something faster for breakfast, my Baked Red Velvet Donuts recipe is a great alternative.
Scaling Your Batch:To Half (20 truffles): Use half the cake mix, half the oil, and 1.5 eggs (beat one egg and use half of it). Reduce bake time by 5 minutes.
To Double (80 truffles): Bake two separate cakes rather than one giant one to ensure even texture. Keep the salt and vanilla at 1.5x the original amount to avoid over seasoning.
Proper Storage to Keep Truffles Freshly Made
Storage is where most people trip up. Because these contain cream cheese, they absolutely need to be kept cool. You can store them in an airtight container in the refrigerator for up to 7 days.
If you need to stack them, always place a sheet of parchment paper between the layers to prevent the chocolate shells from sticking or scuffing each other.
For long term prep, these freeze beautifully. You can freeze the undipped cake balls for up to 2 months. When you are ready to serve, thaw them in the fridge overnight and then dip them in fresh chocolate.
If you freeze them after dipping, just be aware that the chocolate might lose a bit of its shine or develop some condensation "beads" when thawing.
Zero Waste Tip: If you have leftover cake crumbs that didn't make it into the balls, don't toss them! Toast them in a dry pan for a few minutes until they are slightly crispy and use them as a "red velvet soil" topping for vanilla ice cream or yogurt.
Any leftover melted chocolate can be drizzled over pretzels for a quick salty sweet snack.
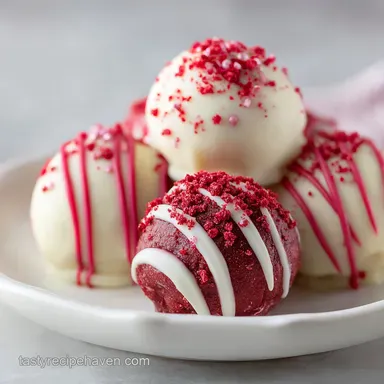
Beautiful Decorating Tips for Professional Looking Results
The secret to a "high end bakery" look is all in the drizzle. Once your truffles are dipped and set, take a small spoonful of the remaining melted chocolate and move it rapidly back and forth over the truffles. This creates those fine, elegant lines you see in chocolate shops.
If the chocolate has cooled too much, pop it back in the microwave for 10 seconds to get that fluid motion back.
For a Valentine's Day look, I love to crush up a few freeze dried raspberries and sprinkle the dust over the wet chocolate. It adds a natural pop of bright red and a sharp tang that cuts right through the creamy white chocolate shell. It looks much more sophisticated than standard sprinkles and adds a lovely texture.
The Science of the "Red" in Red Velvet
Historically, the red color in this cake wasn't from a bottle of food coloring. It was a chemical reaction between non alkalized cocoa powder and acidic ingredients like buttermilk or vinegar. The anthocyanins in the cocoa would turn a reddish hue when exposed to acid.
While modern cake mixes rely on dye for that vibrant punch, adding that extra tablespoon of cocoa powder actually helps stabilize the crumb structure by adding more solids to the mix, which results in a better "chew."
Myth: Red Velvet is Just Chocolate Cake
A common misconception is that red velvet is just chocolate cake with red dye. In reality, red velvet has a much lower cocoa content than a standard chocolate cake. It relies on the balance of vanilla and the slight tang of the binder (usually buttermilk in cakes, or cream cheese in our truffles) to create its unique flavor profile.
If you treat it like a chocolate cake and add too much cocoa, you lose that signature "velvet" identity. The dye is for the eyes, but the acidity is for the soul.
| Feature | Red Velvet Truffle | Chocolate Truffle |
|---|---|---|
| Primary Flavor | Vanilla & Tangy Cream | Deep Cocoa & Cream |
| Texture | Fudgy Cake Crumb | Solid Ganache |
| Sweetness Level | High | Moderate to Low |
The tang from the cream cheese is the MVP here. It mimics the traditional buttermilk flavor found in the classic cake, providing the necessary counterpoint to the sugary white chocolate. This balance is why you can eat three of these in a row without feeling overwhelmed by sugar.
Well, at least that is what I tell myself!
Recipe FAQs
Do I need to bake the cake from scratch for these truffles?
No, using a boxed mix is recommended. Boxed mixes provide a reliable, light crumb structure that perfectly absorbs the cream cheese binder without becoming dense or heavy.
How to ensure the white chocolate coating sets up hard and shiny?
Stir in one tablespoon of refined coconut oil before melting. This lowers the viscosity of the chocolate, ensuring a smooth dip and a thin, crisp shell when it hardens.
Why is my truffle filling too dry and crumbly?
The cream cheese binder was likely too cold when mixed. Ensure the cream cheese is fully softened so it fully emulsifies with the cake crumbs, creating the necessary fudgy texture.
Can I freeze the cake truffles before dipping them in chocolate?
Yes, freezing the balls is highly encouraged. Chilling the balls until they are firm prevents them from softening or falling apart when submerged in the melted chocolate coating.
Is it true that red velvet is just chocolate cake with red dye?
No, this is a common misconception. Traditional red velvet relies on a subtle interaction between low cocoa powder and acidic ingredients for a distinct tang that is different from standard chocolate cake.
What is the trick to getting perfectly uniform truffle sizes?
Use a small, standardized cookie scoop for portioning. This ensures consistent sizing, which helps all the truffles chill and set evenly during the preparation stages.
How should I store leftover red velvet truffles?
Store them in an airtight container in the refrigerator for up to one week. Because they contain cream cheese, they must be kept cool, but line layers with parchment paper to protect the chocolate shell.
Easy Red Velvet Truffles