Chicken Thigh Recipe with Garlic and Herbs
- Time: Active 10 minutes, Passive 20 minutes, Total 30 minutes
- Flavor/Texture Hook: Shatter crisp skin with velvety herb butter finish
- Perfect for: Weeknight comfort food or impressing dinner guests
- Making a Flavorful Chicken Thigh Recipe with Garlic and Herbs
- Reasons This Chicken Stays Juicy
- The Essential Cooking Details
- Quality Elements for Success
- Tools for the Best Result
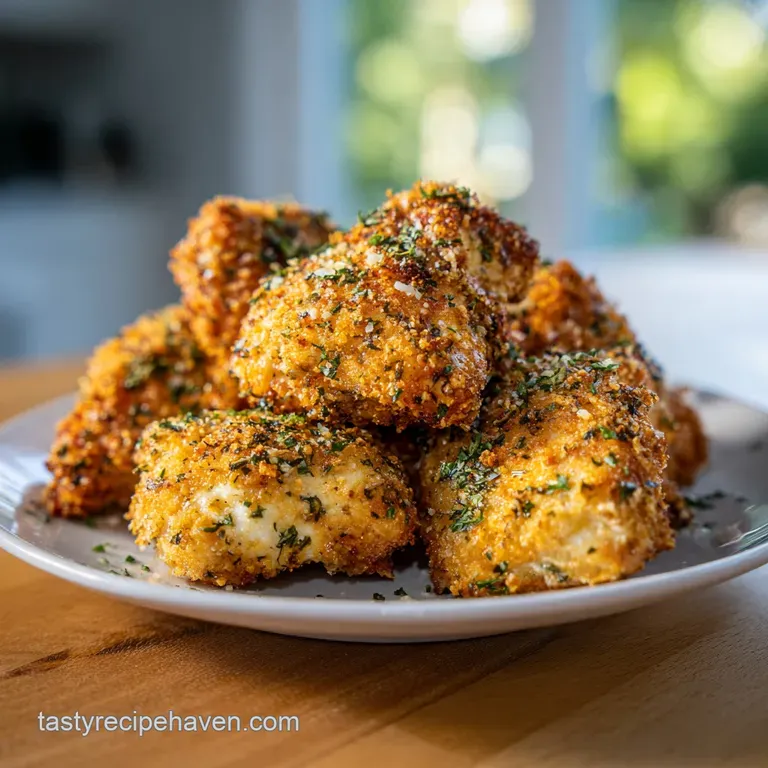
- The Steps for Perfect Skin
- Fixing Common Cooking Errors
- Creative Tweaks and Variations
- Cooking Myths Debunked
- Keeping Leftovers Tasting Fresh
- Sides to Serve Tonight
- Very High in Sodium
- Recipe FAQs
- 📝 Recipe Card
Making a Flavorful Chicken Thigh Recipe with Garlic and Herbs
Listen, you can hear the difference before you even taste it. When you drop a bone in chicken thigh into a cold cast iron skillet and slowly crank the heat, the sound isn't an immediate splashy roar. It’s a gentle, rhythmic sizzle that builds into a crackling crescendo.
This article features one unforgettable Chicken Thigh Recipe with Garlic and Herbs that you'll want to make again and again. It is the kind of meal that fills your kitchen with the scent of woodsy rosemary and toasted garlic, making everyone suddenly appear in the doorway asking, "When do we eat?"
I used to think the secret to great chicken was a screaming hot pan and a prayer. I was wrong. The real magic happens when we let the fat render out slowly, like melting wax, until the skin becomes a golden, savory cracker.
It is all about the contrast that sharp crunch followed by the rich, savory silkiness of a garlic butter baste. This isn't just a meal; it's a sensory experience that proves the simplest ingredients are often the best when you treat them with a little bit of technique.
This dish has become my go to when I want maximum flavor with minimum cleanup. We are talking one pan, a handful of fresh herbs, and enough garlic to ward off a legion of vampires. It’s hearty, honest food that hits the soul.
Whether you are serving it over a pile of mashed potatoes or just eating it straight from the pan standing over the sink (we've all been there), it is a winner every single time.
Reasons This Chicken Stays Juicy
Understanding why this method works will change the way you cook protein forever. Most people treat chicken thighs like breasts, but they are completely different animals. Thighs have connective tissue and higher fat content, which means they can handle and actually need more heat and time to become tender.
- Cold Start Rendering: Starting in a cold pan allows the skin to heat up at the same rate as the metal. This liquefies the thick layer of subcutaneous fat slowly so it can escape, rather than trapping it under a seared surface which leads to rubbery skin.
- Thermal Mass Efficiency: Using a heavy skillet, like a cast iron, maintains a steady temperature even when the meat is added. This prevents the temperature "dip" that causes meat to steam in its own juices instead of browning.
- Aromatic Fat Infusion: Herbs like rosemary and thyme are fat soluble. By adding them to the foaming butter at the end, we create a flavored oil that penetrates the meat as we baste it.
- Deglazing Stability: The dry white wine doesn't just add acidity; it lifts the "fond" (those browned bits on the bottom) and creates a stable emulsion with the remaining butter and chicken juices.
Chicken Flavor Map
- Bright/Rich: The acidity of white wine cutting through the decadent butter.
- Crisp/Tender: The glass like skin sitting atop the buttery, falling apart meat.
- Sweet/Savory: Smashed garlic becomes mellow and sweet as it roasts in the chicken fat.
| Thickness | Internal Temp | Rest Time | Visual Cue |
|---|---|---|---|
| 1 inch | 165°F | 5 mins | Juices run clear, skin is mahogany |
| 1.5 inches | 165°F | 7 mins | Bone is no longer pink at the joint |
| 0.75 inch | 165°F | 3 mins | Skin releases easily from the pan |
While this recipe is built for the stovetop, it is worth noting that one pan roasted chicken techniques often share these same principles of fat rendering to ensure the meat stays succulent while the exterior crisps up perfectly.
The Essential Cooking Details
When we talk about efficiency in the kitchen, we are looking for that sweet spot where prep time is low but the result feels like a five star dinner. This recipe hits that mark perfectly. You spend ten minutes getting things ready, and the rest of the time is just managing the sizzle in the pan.
It's a low stress, high reward situation.
| Metric | Value |
|---|---|
| Active Prep | 10 minutes |
| Cooking Time | 20 minutes |
| Total Investment | 30 minutes |
| Servings | 4 people |
| Skill Level | Beginner Friendly |
Quality Elements for Success
The components of this dish are simple, so the quality of what you use really matters. We aren't hiding behind heavy sauces or complex spices. It is just the chicken, the aromatics, and the fat. If you want to dive deeper into how these pieces fit together, looking at a creamy chicken garlic pasta can show you how these same aromatics behave in a more sauce heavy environment.
| Component | Role | Pro Secret |
|---|---|---|
| Chicken Thighs | Main Protein | Bone in thighs act as a heat conductor, cooking from the inside out. |
| Fresh Garlic | Aromatic | Smashed (not minced) cloves infuse the oil without burning or becoming bitter. |
| Unsalted Butter | Fat/Flavor | Provides the "baste" that carries herb flavor into every crevice of the meat. |
The Specific Ingredients
- 1.5 lb bone in, skin on chicken thighs: Approx. 4-6 thighs. Why this? Bone in stays juicier and the skin is essential for the texture contrast.
- 6 cloves fresh garlic: Smashed. Why this? Mashing releases the oils but keeps the garlic from burning during the long sear.
- 3 sprigs fresh rosemary: Whole sprigs. Why this? Rosemary is a hardy herb that can stand up to the high heat of the skillet.
- 5 sprigs fresh thyme: Whole sprigs. Why this? Thyme adds a subtle earthy sweetness that balances the sharp garlic.
- 3 tbsp unsalted butter: high quality. Why this? We want to control the salt ourselves; the butter adds the velvety finish.
- 1 tbsp extra virgin olive oil: For the pan. Why this? Helps the chicken fat render and prevents initial sticking.
- 2 tsp kosher salt: For seasoning. Why this? Larger grains are easier to distribute and draw out moisture from the skin.
- 1 tsp cracked black pepper: Freshly ground. Why this? Pre ground pepper loses its floral notes; fresh adds a necessary bite.
- 0.25 cup dry white wine: Or chicken stock. Why this? The acidity cuts through the fat and creates a quick pan sauce.
| Original Ingredient | Substitute | Why It Works |
|---|---|---|
| Dry White Wine | Chicken Stock + 1 tsp Lemon Juice | Provides the liquid base with the necessary acidic bite. |
| Fresh Rosemary | Dried Rosemary (1 tsp) | Concentrated flavor. Note: Add earlier as it needs moisture to soften. |
| Unsalted Butter | Ghee or Clarified Butter | Higher smoke point but still provides that rich, nutty dairy flavor. |
Tools for the Best Result
You don't need a kitchen full of gadgets for this, but the right pan makes all the difference. A cast iron skillet is the gold standard here because it holds onto heat like a champ.
When you put cold chicken in a thin stainless steel pan, the temperature drops instantly, and you end up boiling the meat instead of searing it.
- 12 inch Cast Iron Skillet: Provides even heat and excellent heat retention for rendering fat.
- Meat Thermometer: The only way to ensure the chicken is 165°F without cutting into it and losing juices.
- Fish Spatula or Tongs: To flip the thighs without tearing the precious skin.
- Small Spoon: Specifically for basting that hot butter over the chicken.
- Paper Towels: Absolutely vital for drying the skin before it ever touches the pan.
The Steps for Perfect Skin

- Drying the Surface: Pat the chicken thighs extremely dry using paper towels to ensure a crispy crust. Note: Moisture is the enemy of crispiness; any water on the skin will turn to steam.
- Seasoning: Season both sides generously with kosher salt and cracked black pepper.
- The Cold Start: Place the thighs skin side down in a cold 12 inch cast iron skillet with the olive oil.
- Heat Application: Turn the heat to medium high.
- The Long Render: Sear undisturbed for 8–10 minutes until the skin is mahogany colored and releases easily. Note: If it sticks, it isn't ready. Let the fat do the work.
- The Flip: Flip the chicken thighs over.
- Adding Aromatics: Add the smashed garlic cloves, rosemary, thyme, and unsalted butter to the pan.
- The Butter Baste: As the butter foams, use a small spoon to continuously baste the herb infused butter over the skin for 2 minutes.
- Deglazing: Pour in the white wine or chicken stock.
- Finishing: Continue cooking until the internal temperature reaches 165°F on a meat thermometer.
Fixing Common Cooking Errors
Cooking chicken seems straightforward, but small mistakes can lead to soggy skin or dry meat. The most common heartbreak is "The Sticking." If you try to flip that chicken too early, the skin will stay stuck to the pan, and you'll be left with a naked thigh and a mess.
Why Your Chicken Skin Is Soggy
This usually happens because of moisture. If the chicken wasn't dried properly with paper towels, it's going to steam. Another culprit is overcrowding. If you pack six large thighs into a small pan, the steam has nowhere to go but up, softening the skin you're trying to crisp.
Why the Garlic Tastes Bitter
Garlic turns bitter when it burns. In this recipe, we smash the cloves instead of mincing them. Smashed cloves have less surface area exposed to the heat, allowing them to brown slowly and release their sugars.
If you notice the garlic getting too dark during the baste, simply push it on top of one of the chicken thighs to get it out of the direct heat.
| Problem | Root Cause | Solution |
|---|---|---|
| Skin sticks to pan | Heat is too high or flipped too soon | Wait for the fat to render; the chicken will release itself when ready. |
| Butter burns instantly | Pan is too hot before adding butter | Reduce heat slightly before dropping the butter in to keep it foaming, not smoking. |
| Meat is dry/tough | Overcooked past 175°F | Use a thermometer and pull the chicken at 165°F exactly. |
- ✓ Pat chicken completely dry before seasoning (prevents steaming)
- ✓ Start in a cold pan to render maximum fat from the skin
- ✓ Use fresh herbs instead of dried for a more vibrant, aromatic oil
- ✓ Let the meat rest for at least 5 minutes before serving to redistribute juices
- ✓ Don't move the chicken during the first 8 minutes of searing
Creative Tweaks and Variations
While I love the classic garlic and herb combo, this technique is a canvas for whatever flavors you're feeling that night. The method rendering, flipping, basting remains the same even if the aromatics change.
- Spiced Version: Swap the rosemary for smoked paprika and a pinch of cumin. Use lime juice instead of white wine for deglazing.
- Citrus Garlic: Add thin slices of lemon into the pan during the basting phase. The lemon rinds will caramelize in the chicken fat and become edible, jammy treats.
- Mushroom Infusion: Add 4 ounces of sliced cremini mushrooms when you flip the chicken. They will soak up the herb butter and add a massive hit of umami.
| Method | Time | Texture | Best For |
|---|---|---|---|
| Stovetop (Classic) | 30 mins | Ultimate crispy skin | Deep flavor and pan sauce |
| Air Fryer | 20 mins | Very crispy but less "rich" | Hands off quick weeknight |
| Oven Only | 45 mins | Tender but skin can be hit or-miss | Large batches (10+ thighs) |
Scaling This Recipe
If you are cooking for a crowd, don't try to fit 10 thighs in one skillet. Work in batches. Sear the skin of the first 5, move them to a plate, and then do the next 5. Once all skins are crispy, return all thighs to the pan (or a larger baking dish) to finish the internal cooking.
For scaling the salt and spices, only increase by 1.5x for every double batch of meat to avoid over seasoning.
Cooking Myths Debunked
One of the biggest myths in home cooking is that you need a "screaming hot pan" to sear meat. While that works for a thin steak, it’s a disaster for skin on chicken. High heat will burn the surface before the fat underneath has a chance to melt, leaving you with burnt skin and a greasy, flabby layer underneath.
Another common misconception is that you shouldn't use butter because it has a low smoke point. While true, we aren't using the butter for the whole cook. We add it at the very end specifically for the flavor and the basting process.
By that point, the chicken has released its own fat, which actually helps stabilize the butter and prevents it from burning too quickly.
Keeping Leftovers Tasting Fresh
If you have leftovers (lucky you!), you want to avoid the microwave. Microwaving chicken thighs is the fastest way to get "warmed over flavor" and rubbery skin. Instead, put them back in a dry skillet over medium heat, skin side down. This will re crisp the skin while the meat warms through gently.
Storage: Fridge: Keep in an airtight container for up to 4 days. Freezer: You can freeze cooked thighs for up to 3 months. Thaw in the fridge overnight before reheating.
Zero Waste Tip: Don't you dare throw away the fat left in the pan or the bones from the thighs. Save the pan drippings (schmaltz) to roast potatoes the next day. Save the bones in a freezer bag; once you have 10-12, throw them in a pot with some veggie scraps to make the best chicken stock you've ever tasted.
Sides to Serve Tonight
This chicken is the star of the show, but it needs a supporting cast that can handle the rich garlic butter sauce. Since we have that beautiful pan sauce made from the wine and butter, you want something that can soak it up.
A simple mound of Broccoli Casserole recipe or even just some crusty sourdough bread is perfect. If you're feeling fancy, creamy polenta or mashed potatoes are the classic choices. The earthy herbs in the chicken play really well with root vegetables, so roasted carrots or parsnips are also a fantastic shout. Whatever you choose, make sure you spoon that extra pan sauce over everything. Trust me, you don't want to leave a single drop of that liquid gold behind.
Very High in Sodium
950 mg 950 mg (41% 41%)
The American Heart Association recommends limiting sodium intake to less than 2,300mg per day, ideally striving for about 1,500mg for most adults.
Tips to Reduce Sodium in Your Chicken Thighs
-
Halve the Kosher Salt-25%
Reduce the 2 tsp of kosher salt by half, using only 1 tsp. Kosher salt is less dense than table salt, so this is a significant reduction.
-
Choose Low-Sodium Stock-30%
If using chicken stock instead of white wine, opt for a low-sodium or no-salt added variety. This will drastically cut down on added sodium.
-
Amplify Herbs and Aromatics
Lean heavily on the fresh garlic, rosemary, and thyme. Their potent flavors can compensate for reduced salt, adding depth and complexity.
-
Boost Black Pepper-5%
Increase the cracked black pepper slightly to add a bit more punch to the flavor profile without adding sodium.
Recipe FAQs
How do you cook chicken thighs with garlic and herbs?
Start by patting your chicken thighs extremely dry to guarantee a crispy crust, then season them with salt and pepper. Place them skin side down in a cold 12 inch cast iron skillet with olive oil, turn the heat to medium high, and sear for 8 10 minutes until the fat renders and the skin is mahogany colored.
Flip, add the smashed garlic, rosemary, thyme, and butter, and baste the skin for 2 minutes before deglazing the pan with your liquid of choice and cooking until the meat reaches 165°F.
Are chicken thighs good for diabetics?
Yes, they are an excellent protein dense choice. Chicken thighs provide high-quality protein and healthy fats without carbohydrates, making them a staple for blood sugar management when paired with non-starchy vegetables.
What herbs are good with chicken thighs?
Fresh rosemary and thyme are the gold standard here. These woody herbs hold up beautifully to the high heat searing and butter basting process, infusing the chicken with deep, earthy aromas.
What's the secret to flavorful chicken thighs?
The secret is the cold skillet start and active butter basting. Starting cold allows the fat to render slowly for a glass like skin, while the butter baste builds a rich, savory glaze. If you loved the savory depth created by this searing and basting technique, notice how similar flavor building principles are applied in other high protein recipes to ensure consistent results.
Is it true I must use high heat from the beginning to get crispy skin?
No, this is a common misconception. A cold skillet start is actually superior because it gently renders the fat out of the skin before the flesh begins to toughen, resulting in a much crispier, uniform finish.
Can I prepare the chicken ahead of time?
Yes, you can season the chicken up to 24 hours in advance. Doing this allows the salt to penetrate the meat for better flavor and draws out surface moisture, which makes achieving that final, perfect crust even easier.
How do I know when the chicken is fully cooked?
Always use a meat thermometer to check for an internal temperature of 165°F (74°C). Because chicken thighs vary in size, visual cues can be deceptive, so checking the thickest part of the meat is the only way to ensure it is juicy and safe to eat.
Garlic Herb Chicken Thighs