Homemade Apple Pie Filling: Failure-Proof
- Time:10 minutes prep + 15 minutes cook = 25 minutes total
- Flavor/Texture Hook: Silky, translucent glaze with apples that hold their shape
- Perfect for: Quick dessert fills, galettes, or batches for canning
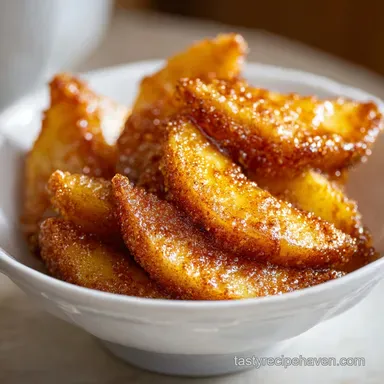
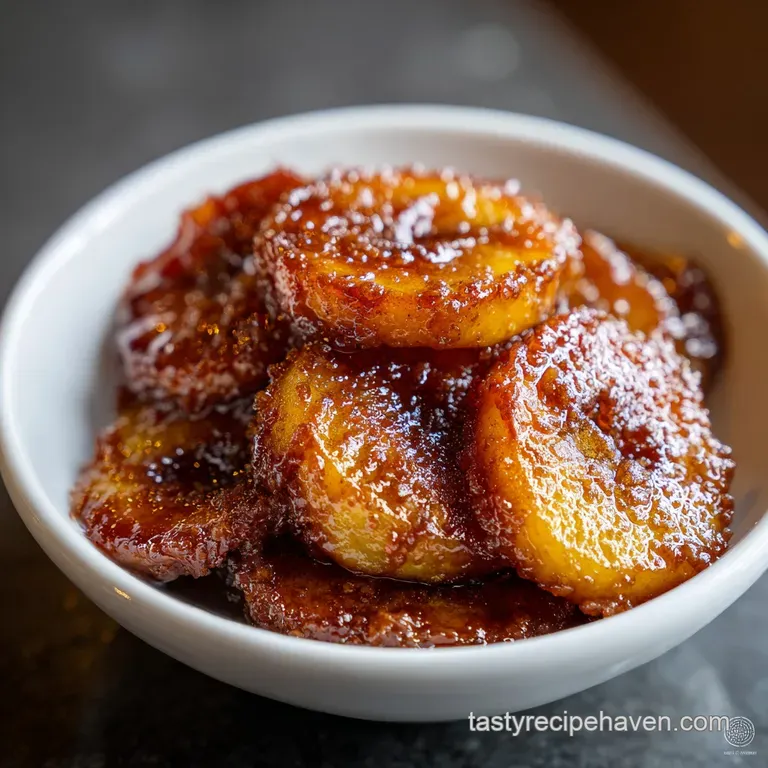
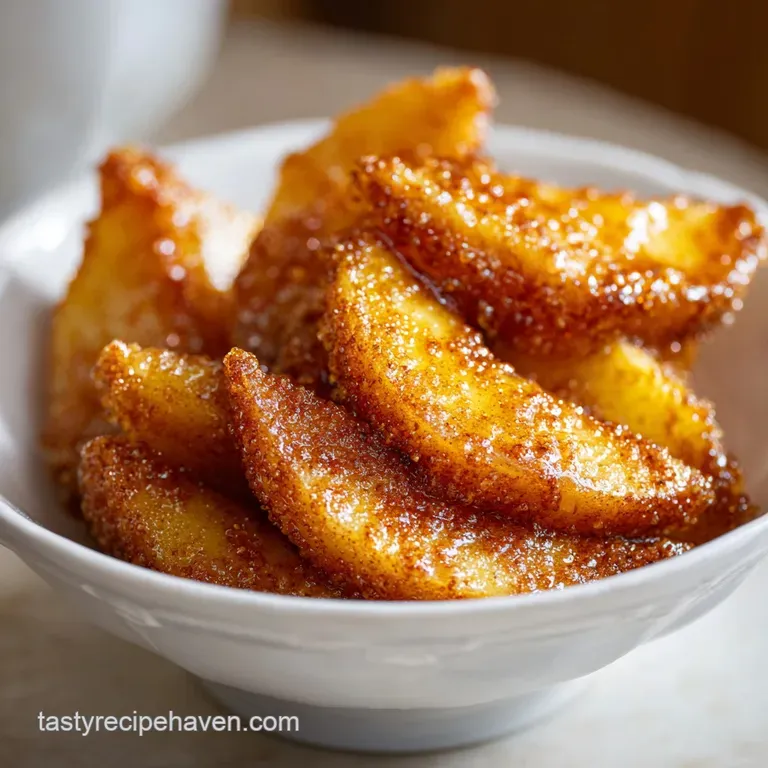
Easy Velvety homemade apple pie filling
The first thing that hits you is that scent, that deep, warm cinnamon punch that fills the whole kitchen the second the butter hits the pan. I remember my first attempt at a fruit pie years ago. I just tossed raw apples and sugar into a crust and hoped for the best. The result?
A watery, soupy mess that made the bottom crust a soggy, pale disaster. I spent a whole afternoon staring at that pie, wondering why my crust wouldn't crisp up.
That's when I realized the secret isn't in the oven, it's in the pan. By making a homemade apple pie filling on the stove first, you control the moisture. You get to see the sauce transform from a thin syrup into a thick, glossy coating.
It's the difference between a pie that falls apart when you slice it and one that holds a clean, beautiful wedge.
Trust me, once you see the way the apples glisten in that brown sugar glaze, you'll never go back to the "toss and bake" method. This approach is about precision and patience, ensuring every slice of fruit is perfectly tender but still has a bit of a bite.
It's the absolute safest bet for anyone who's terrified of the dreaded "soggy bottom."
The Secrets to Thick Sauce
To get that professional texture, you have to understand how the ingredients interact under heat. It's not just about adding a thickener, but about when and how you add it.
Starch Activation: Cornstarch needs to reach a specific temperature to "burst" and thicken the liquid. If you add it too early or not enough, the sauce stays runny.
Sugar Syruping: The sugars draw moisture out of the apples, creating a natural syrup. By simmering this first, we reduce the excess water before the final thickening.
Fat Emulsion: Adding butter at the end creates a silky, glossy finish. The fat coats the fruit and the starch, preventing the sauce from looking like a gelatinous blob.
| Method | Time | Texture | Best For |
|---|---|---|---|
| Stovetop | 25 minutes | Glossy & Stable | Pies and Tarts |
| Raw Fill | 60 minutes | Softer & Juicier | Rustic Galettes |
| Slow Cook | 4 hours | Very Soft/Jammy | Apple Crisp |
The stovetop method is my favorite because it's predictable. You aren't guessing if the inside of the pie is cooked; you know it is because you've already seen the sauce thicken on the burner.
The Best Apple Elements
Getting the right apple blend is where most people trip up. If you use only one type, you either get a pie that's too tart or one that turns into applesauce the moment it hits the heat.
| Ingredient | Science Role | Pro Secret |
|---|---|---|
| Granny Smith | Acid/Structure | Prevents the filling from becoming too sweet |
| Honeycrisp | Sweetness/Firmness | Keeps a crisp "snap" even after cooking |
| Cornstarch | Thickening Agent | Always mix with cold water first to avoid clumps |
| Lemon Juice | pH Balance | Brightens the flavor and stops browning |
Smart Ingredient Swaps
When you're in the middle of a bake, you might realize you're out of a key item. Most of these have easy workarounds, but keep in mind that the texture might shift slightly.
- 6 cups peeled, cored, and sliced apples (mix of Granny Smith and Honeycrisp) Why this? Balance of tartness and firm structure
- 1/2 cup granulated sugar Why this? Provides a clean, sweet base
- 1/4 cup light brown sugar, packed Why this? Adds a deep, molasses like richness
- 1 tbsp lemon juice Why this? Cuts through the sugar and preserves color
- 3 tbsp cornstarch Why this? Creates a stable, translucent glaze
- 2 tbsp ground cinnamon Why this? The essential warm aromatic
- 1/4 tsp ground nutmeg Why this? Adds a subtle, earthy complexity
- 1/4 tsp salt Why this? Enhances all the other flavors
- 2 tbsp unsalted butter Why this? Creates a velvety mouthfeel
- 2 tbsp cold water Why this? Dissolves starch for a smooth slurry
| Original Ingredient | Substitute | Why It Works |
|---|---|---|
| Cornstarch (3 tbsp) | Flour (4 tbsp) | Thickens well. Note: Makes a cloudier, matte sauce |
| Brown Sugar | Coconut Sugar | Similar depth. Note: Slightly more caramel flavor |
| Lemon Juice | Apple Cider Vinegar | Similar acidity. Note: More pungent, use slightly less |
| Unsalted Butter | Coconut Oil | Same fat content. Note: Adds a slight coconut hint |
If you're looking for a way to use this, it's the heart of a Dutch Apple Pie, where the crumb topping balances the sweetness of the fruit.
Essential Kitchen Tools
You don't need a fancy lab, but the right pot makes a huge difference. A heavy bottomed pot is non negotiable here. If you use a thin pan, the sugars will scorch at the bottom before the apples are even warm.
I always reach for a Dutch oven. The thick walls distribute heat evenly, which means your apples cook at a steady pace. You'll also want a sturdy whisk for that slurry. If you try to stir cornstarch into hot liquid with a spoon, you'll end up with little "starch pearls" that never dissolve, and nobody wants that in their pie.
Finally, a sharp chef's knife or a mandoline is key. You want your apple slices to be uniform. If some are thick and some are thin, the thin ones will vanish into the sauce while the thick ones stay raw.
Step by step Cooking
Right then, let's get into the actual process. Follow these steps closely to ensure the texture stays silky.
- Place the sliced apples, lemon juice, granulated sugar, brown sugar, cinnamon, nutmeg, and salt into a large heavy bottomed pot or Dutch oven. Toss well to ensure every slice is coated.
- Set the heat to medium and cook for 5–7 minutes until the apples release their juices and become aromatic, while still holding their shape.
- Add the unsalted butter to the center of the pot. Stir gently until the butter is completely melted and emulsified with the apple juices, creating a glossy coating.
- In a small bowl, whisk the cornstarch with 2 tbsp of cold water to create a smooth slurry. Note: Cold water prevents the starch from clumping
- Pour the slurry into the simmering apples. Stir constantly for 2–3 minutes until the sauce transforms into a thick, translucent glaze that coats the back of a spoon.
- Remove from heat immediately.
Solving Common Filling Fails
Even with a foolproof recipe, things can go sideways if you aren't paying attention to the visual cues. The most common issues usually stem from heat management or apple choice.
The Apple Mush Trap
This happens when you overcook the apples in step 2. If you simmer them for too long before adding the slurry, the pectin breaks down completely, and you're left with applesauce. The apples should be "tender crisp," meaning they give way but don't collapse.
The Watery Bottom
If your sauce is still runny after the slurry has cooked, you likely didn't reach the activation temperature. The sauce must actually simmer for those 2–3 minutes to "set." If you pull it off the heat too early, the cornstarch won't bond with the liquid.
The Chalky Aftertaste
This is a classic sign of undercooked starch. If you taste a raw, floury flavor in your homemade apple pie filling, it means the slurry didn't boil enough. Keep it on the heat for another minute.
| Problem | Root Cause | Solution |
|---|---|---|
| Runny Sauce | Under boiled slurry | Simmer for 2 more minutes |
| Mushy Fruit | Too much heat/time | Reduce initial cook to 5 mins |
| Clumpy Glaze | Added dry starch | Always use a cold water slurry |
Common Mistakes Checklist
- ✓ Use a mix of tart and sweet apples to maintain structure
- ✓ Stir the slurry immediately before pouring it into the pot
- ✓ Keep heat at medium to avoid scorching the sugars
- ✓ Remove from heat the moment the glaze is translucent
- ✓ Ensure apple slices are a uniform thickness
Smart Ingredient Swaps
For those who need a different approach, this recipe is very flexible. If you're avoiding dairy, you can swap the butter for a vegan butter alternative or a neutral oil like grapeseed. The gloss will be slightly different, but the flavor remains punchy.
If you want to skip the cornstarch, you can use a reduction method, but it takes much longer. You'd have to simmer the apples for 30–40 minutes until the water evaporates, which often results in softer fruit. For most of us, the cornstarch slurry is the best trade off for speed and texture.
You can also play with the spices. While cinnamon is the star, adding a pinch of ground cloves or ginger can give the filling a more "old world" feel. Just be careful cloves are powerful and can easily overwhelm the delicate apple flavor.
Fresh Storage Guidelines
This filling is actually better when made a day in advance. It gives the flavors time to meld, and the thickened sauce stabilizes even more as it cools.
Store any leftover filling in an airtight glass container in the fridge for up to 5 days. When you're ready to use it, you can stir it cold into a crust or gently warm it on the stove over low heat.
For long term storage, this is a great candidate for the freezer. It stays fresh for up to 3 months. I recommend freezing it in freezer bags, flattened out to save space. Thaw it in the fridge overnight before using it in a pie.
To avoid waste, don't throw away those apple peels! Toss them in a pot with water, a cinnamon stick, and a few cloves to simmer for an hour. You'll have a light, fragrant apple tea that makes the house smell like a bakery.
Creative Serving Ideas
While this was designed as a homemade apple pie filling, it's far too versatile to only use in pies. I love spooning it over vanilla bean ice cream or using it as a topping for fluffy pancakes on a Sunday morning.
If you're feeling fancy, try filling a puff pastry square with a dollop of this mixture and a pinch of cinnamon sugar to make Apple Turnovers. It's a brilliant way to use up a small batch of leftovers.
You can also layer it in a parfait with Greek yogurt and granola for a breakfast that feels like dessert. Because the sauce is pre thickened, it won't soak into the granola and make it soggy, keeping that satisfying crunch in every bite.
Recipe FAQs
What do I need for apple pie filling?
Combine sliced Granny Smith and Honeycrisp apples, granulated and brown sugar, lemon juice, cornstarch, cinnamon, nutmeg, salt, and unsalted butter. You will also need a small amount of cold water to create the thickening slurry.
Should you cook your apples before putting them in pie?
Yes, pre-cooking the filling prevents a soggy bottom crust. Sautéing the apples on medium heat for 5 7 minutes allows them to release excess moisture and develop aroma before baking.
Is apple pie ok for diabetics?
No, this recipe is high in sugar. The combination of granulated and light brown sugar creates a high glycemic load that is generally not suitable for diabetic diets.
Is it better to thicken fruit pie with flour or cornstarch?
Cornstarch is the superior choice for a glossy, translucent glaze. Unlike flour, which can leave a cloudy appearance or a raw taste, cornstarch creates a professional, clear finish.
How to stop apple pie filling from being too runny?
Whisk cornstarch with 2 tbsp of cold water to create a smooth slurry. Stir this into the simmering apples for 2 3 minutes until the sauce is thick enough to coat the back of a spoon.
How to store leftover apple pie filling?
Place the cooled filling in an airtight container and refrigerate for up to 5 days. Gently reheat it on the stovetop over medium heat to restore its glossy texture.
Is it true that any apple variety works for pie filling?
No, this is a common misconception. A mix of Granny Smith and Honeycrisp is ideal to ensure the slices hold their shape and provide a balanced sweet tart flavor. If you enjoyed balancing flavors here, see how we handle sweetness in our pumpkin bars.
Homemade Apple Pie Filling