Slow Cooker Korean Beef: Tender Gochujang Shredded Beef
- Time: Active 15 minutes, Passive 480 minutes, Total 495 minutes
- Flavor/Texture Hook: Glossy, umami rich glaze with melt in-your mouth tender beef
- Perfect for: Stress free hosting, big batch meal prep, or weeknight comfort food
- Create a Delicious Slow Cooker Korean Beef Recipe for Cozy Dinners
- The Secret Behind the Meltingly Tender Beef Texture
- Component Analysis of the Savory Glaze
- Selecting Your Elements and Smart Substitutions
- Required Tools for Kitchen Efficiency
- The Low and Slow Cooking Process
- Fixing Common Texture and Flavor Issues
- Adjusting the Recipe for Different Crowds
- Debunking Common Slow Cooker Myths
- Storage Guidelines and Zero Waste Ideas
- Serving and Presentation Strategies
- Very High in Sodium
- Recipe FAQs
- 📝 Recipe Card
Create a Delicious Slow Cooker Korean Beef Recipe for Cozy Dinners
The moment that heavy cast iron skillet hits the heat and the first chunk of beef touches the oil, you hear it that sharp, aggressive sizzle that promises a deep, mahogany crust. It is a sound that signals a transformation is beginning.
My kitchen currently smells like a dream, a heady mix of toasted sesame oil and spicy gochujang that has been swirling through the hallways for the last seven hours. There is something truly magical about walking through the door after a long day and being greeted by a scent so rich it feels like a warm hug.
We have all had those slow cooker meals that turn out like a bland, watery stew, but this is different. This is about that sharp contrast between the salty soy sauce and the bright, floral sweetness of an Asian pear.
I remember the first time I tried this without searing the meat first; it was okay, but it lacked that savory punch that makes you want to lick the spoon. Now, I never skip that step.
It is the secret to getting a sauce that tastes like it spent all day in a high end restaurant kitchen instead of a ceramic pot on your counter.
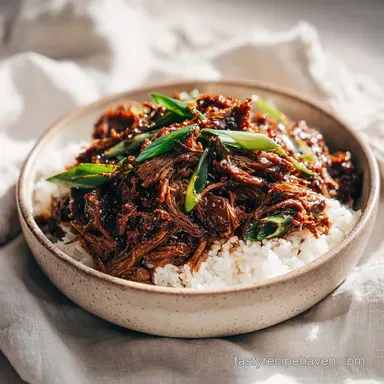
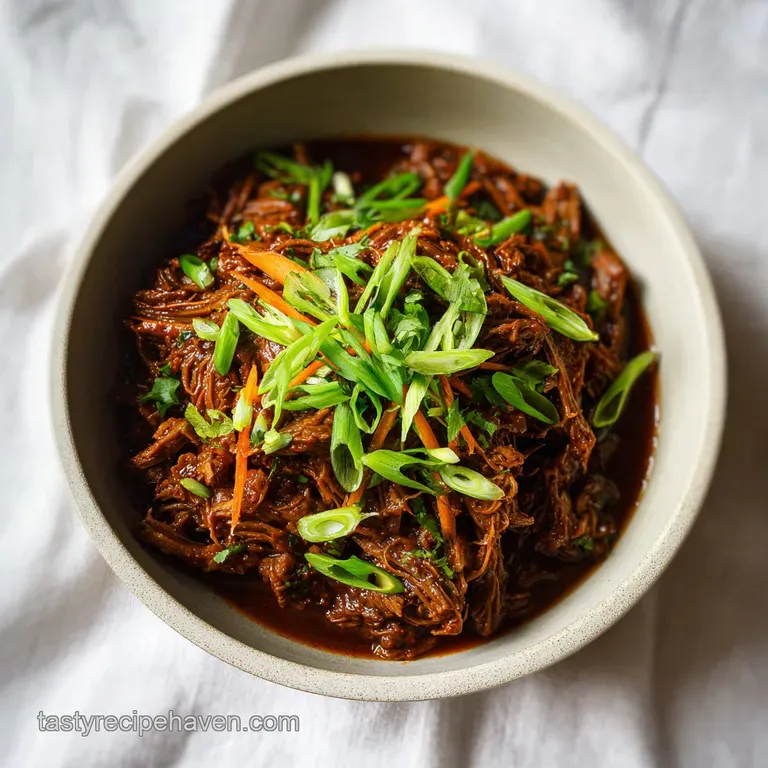
You'll find that the beef doesn't just fall apart; it surrenders. It becomes these beautiful, silky strands that soak up every drop of that thickened, glossy glaze. It is the ultimate low effort, high reward meal that makes the whole house feel like a sanctuary.
Whether you are tucking this into a warm bowl of rice or stuffing it into charred tortillas for a fusion taco night, the payoff for those fifteen minutes of morning prep is massive.
The Secret Behind the Meltingly Tender Beef Texture
The chemistry of this dish is a beautiful thing, even if we don't usually think about science while we're hungry. We are essentially performing a long form magic trick on a tough cut of meat.
- Proteolytic Breakdown: The Asian pear contains a natural enzyme called calpain that acts like a microscopic tenderizing crew, softening the muscle fibers before the heat even starts to work.
- Collagen Conversion: Eight hours of low heat slowly melts the tough, white connective tissue into rich, silky gelatin, which provides that luxurious mouthfeel.
- The Maillard Foundation: Searing the meat initially creates complex flavor compounds that the slow cooker simply cannot produce on its own due to the moist environment.
- Osmotic Balance: The salt in the soy sauce penetrates the meat over several hours, seasoning it all the way to the center rather than just on the surface.
| Thickness of Cut | Internal Temperature | Rest Time | Visual Finished Cue |
|---|---|---|---|
| 2 cm Chunks | 95°C | 5 mins | Separates easily with a dull fork |
| 5 cm Large Cubes | 95°C | 10 mins | Connective tissue appears translucent |
| Whole 1.4 kg Roast | 98°C | 15 mins | Meat sags and shreds under its own weight |
When you are choosing your beef, keep in mind that the fat is your friend here. A lean cut like round roast will end up stringy and dry after eight hours. You want that marbled chuck roast because the fat renders down, essentially confit ing the beef in its own juices while it mingles with the rice vinegar and ginger.
Component Analysis of the Savory Glaze
Understanding why we use these specific ingredients helps you become a more intuitive cook. We aren't just throwing things in a pot; we are building layers of flavor that hit every part of your palate.
| Ingredient | Science Role | Pro Secret |
|---|---|---|
| Beef Chuck Roast (1.4 kg) | Primary protein and fat source | Pat it bone dry before searing to ensure a crust instead of steam |
| Gochujang (2 tbsp) | Fermented depth and gentle heat | Whisk it into the soy sauce first so it doesn't clump in the pot |
| Asian Pear (1 small) | Natural sugar and enzymatic tenderizer | Grate it finely to release the juice which contains the active enzymes |
| Cornstarch (2 tbsp) | Thickening agent for the final glaze | Always mix with cold water first to prevent "flour lumps" in your sauce |
The combination of the fermented chili paste and the toasted sesame oil creates a flavor map that moves from deep umami to a nutty, aromatic finish. It is a balance of rich fats and sharp acids that keeps the dish from feeling too heavy.
Selecting Your Elements and Smart Substitutions
Here is exactly what you need to gather. I’ve included my favorite swaps for when the local grocery store decides to be difficult.
- 1.4 kg Beef Chuck Roast: Trimmed and cut into 4 large chunks. Why this? High fat/collagen content ensures tenderness.
- Substitute: Beef brisket (point cut). It is equally fatty but may take an extra hour.
- 15 ml Neutral Oil: Like canola or vegetable oil. Why this? High smoke point for the initial sear.
- Substitute: Grapeseed oil. It is clean tasting and handles high heat perfectly.
- 120 ml Low Sodium Soy Sauce: Why this? Provides the salty backbone without being overwhelming.
- Substitute: Tamari. It is naturally gluten-free and has a slightly richer flavor.
- 65 g Brown Sugar: Packed. Why this? Adds sweetness and helps create a sticky glaze.
- Substitute: Honey. Note: This will result in a more floral, thinner sauce.
- 2 tbsp Gochujang: Why this? The signature Korean fermented funk and spice.
- Substitute: Sriracha mixed with a teaspoon of miso paste for that fermented kick.
- 1 Small Asian Pear: Grated with juice. Why this? The secret weapon for tenderizing and subtle sweetness.
- Substitute: A Bosc pear or even a sweet Fuji apple works in a pinch.
- 4 Cloves Garlic: Minced. Why this? Essential aromatic base.
- Substitute: 1 teaspoon of garlic powder if you are in a total rush.
- 1 tbsp Fresh Ginger: Grated. Why this? Provides a sharp, bright counterpoint to the heavy beef.
- Substitute: Frozen ginger cubes are a great shortcut that keep the flavor fresh.
- 30 ml Rice Vinegar: Why this? Cuts through the fat with a mild acidity.
- Substitute: Apple cider vinegar. It is slightly more aggressive but works well.
- 15 ml Toasted Sesame Oil: Why this? Provides the nutty, aromatic finish.
- Substitute: Perilla oil, if you want to be super traditional.
- 2 tbsp Cornstarch & 45 ml Cold Water: Why this? Creates the slurry for that velvety, glossy coating.
- Substitute: Arrowroot powder. It gives an even shinier finish to the sauce.
| Fresh Ingredient | Shortcut Alternative | Flavor Impact |
|---|---|---|
| Fresh Grated Ginger | Ginger Paste from a tube | Slightly more muted, less "zing" |
| Whole Garlic Cloves | Jarred Minced Garlic | Less pungent, adds a slight acidic note |
| Fresh Asian Pear | Unsweetened Applesauce | Adds sweetness but lacks the enzymatic tenderizing power |
If you are looking for a different texture entirely, you might enjoy my Korean Ground Beef Bowl which uses similar flavors but cooks in a fraction of the time.
Required Tools for Kitchen Efficiency
You don't need a lot of gear, but the right tools make the 15 minutes of prep feel like five.
- Slow Cooker (Crockpot): A 6 quart model is ideal for this amount of beef.
- Large Cast Iron Skillet: For getting that deep sear. A stainless steel pan also works, but avoid non stick if you want a real crust.
- Box Grater: Use the fine side for the pear and ginger.
- Whisk: To ensure the gochujang and cornstarch are fully integrated.
- Tongs: To flip those heavy chunks of beef safely.
Chef's Tip: Freeze your knob of ginger for 10 minutes before grating. It makes the fibers stiff so it grates into a snowy powder instead of a stringy mess.
The Low and Slow Cooking Process

- Pat the beef chunks dry with paper towels. Heat neutral oil in a large skillet over medium high heat. Sear the beef for 2-3 minutes per side until a dark, mahogany colored crust forms.
- In the slow cooker insert, whisk together the soy sauce, brown sugar, gochujang, grated Asian pear, minced garlic, grated ginger, rice vinegar, and toasted sesame oil.
- Place the seared beef chunks into the slow cooker, turning them once to coat every surface in the braising liquid.
- Cover and cook on Low for 8 hours (or High for 4 hours) until the beef is fork tender and falling apart. Note: Low heat is always preferred for chuck roast to ensure the fat renders slowly.
- Remove the beef from the slow cooker and shred with two forks, removing any large pieces of unrendered fat.
- In a small bowl, whisk cornstarch and cold water to create a slurry.
- Stir the slurry into the liquid remaining in the slow cooker pot.
- Return the shredded beef to the pot and toss to coat.
- Let sit for 10 minutes on the 'Warm' or 'High' setting until the sauce thickens into a glossy, velvety glaze.
- Give it one final stir to ensure every shred of beef is saturated with that dark sauce.
Chef's Tip: If you have the time, sear the beef the night before and store it in the fridge. The cold meat actually sears better, and it saves you time in the morning rush.
Fixing Common Texture and Flavor Issues
Sometimes things don't go exactly as planned, usually because of the specific cut of meat or the age of your slow cooker.
Why Your Beef Feels Tough
Even after 8 hours, beef can occasionally feel "chewy." This usually means the collagen hasn't quite finished converting to gelatin. Some slow cookers run cooler than others. Simply give it another 45 minutes on "High" and it should yield.
Why the Sauce is Too Salty
If you used regular soy sauce instead of low sodium, the salt can become concentrated as the liquid evaporates. Don't panic. You can balance this by adding a small splash of water or a little extra rice vinegar and sugar to round it out.
| Problem | Root Cause | Solution |
|---|---|---|
| Thin/Watery Sauce | Slurry didn't activate | Turn slow cooker to "High" for the final 10 minutes |
| Dry Meat | Meat wasn't submerged | Shred the meat and let it soak in the sauce for 20 mins before serving |
| Greasy Glaze | Too much rendered fat | Skim the surface with a wide spoon before adding the cornstarch slurry |
Common Mistakes Checklist
- ✓ Don't crowd the skillet: Sear the beef in batches if needed. If they are too close, they will steam instead of brown.
- ✓ Skip the "High" setting if possible: Low and slow for 8 hours results in a much more delicate fiber structure.
- ✓ Cold water for the slurry: Never add dry cornstarch to hot liquid; it will clump instantly.
- ✓ Trim the big stuff: Remove the very large, hard pieces of fat before shredding so the final dish isn't oily.
- ✓ Check your pear: If the Asian pear is rock hard, it won't have as much juice or enzyme activity. Let it ripen on the counter for a day.
Adjusting the Recipe for Different Crowds
Scaling this recipe is fairly straightforward because the slow cooker is forgiving, but there are a few rules to follow to keep the flavor balanced.
If you are cutting the recipe in half, use a smaller 3 quart slow cooker. If you use a large 6 quart pot for a half batch, the liquid will be too shallow and may burn around the edges. Reduce the cook time by about 20%, checking the meat at the 6 hour mark on Low.
To double the recipe for a party, you’ll need an extra large slow cooker or two standard ones. When doubling, do not double the salt or spices linearly. Use 1.5x the amount of soy sauce and gochujang first, then taste at the end. You can always add more, but you can't take it out. If you're looking for more inspiration for a crowd, this Slow Cooker Balsamic Beef is another fantastic option that scales beautifully.
Debunking Common Slow Cooker Myths
Many people believe you can just "dump and go" for everything. While you can, you shouldn't. Searing meat is not about "sealing in juices" that's a myth. It's actually about the Maillard reaction, which creates hundreds of new flavor compounds that make the beef taste "meaty" rather than just boiled.
Another common misconception is that you need to add a lot of water. You'll notice this recipe has very little added liquid. That is because the beef and the pear will release a significant amount of moisture as they cook. Adding extra water will only dilute that precious umami flavor and leave you with a bland soup.
Storage Guidelines and Zero Waste Ideas
This beef is actually one of those rare dishes that tastes better the next day. The flavors continue to meld and penetrate the meat as it sits.
- Fridge: Store in an airtight container for up to 4 days.
- Freezer: This freezes beautifully for up to 3 months. Freeze it in the sauce to prevent the meat from drying out.
- Reheating: Heat gently in a saucepan over medium low heat. Add a tablespoon of water if the sauce has thickened too much in the fridge.
Zero Waste Tip: Don't throw away that ginger peel! You can toss the scraps into a pot of simmering water with a bit of honey for a quick, spicy ginger tea while your beef cooks. Also, if you have leftover sauce but no meat, use it as a stir fry base for vegetables the next night. It is liquid gold.
Serving and Presentation Strategies
When you are ready to serve, think about colors and textures. This beef is dark and rich, so it needs something bright and crunchy to play against.
The Classic Rice Bowl
Serve a generous heap of beef over fluffy jasmine rice. Top with thinly sliced scallions, a heavy sprinkle of toasted sesame seeds, and some quick pickled cucumbers. The acidity of the pickles cuts through the richness of the beef perfectly.
Fusion Style Tacos
Char some small corn tortillas over a gas flame until they are slightly smoky. Fill with the shredded Korean beef and top with a zesty lime slaw and a drizzle of sriracha mayo. It is the ultimate party food that feels much fancier than a slow cooker meal usually does.
A Low Carb Alternative
If you want to keep things lighter, this beef is incredible inside large butter lettuce cups. The cool, crisp lettuce provides a "shatter" texture that contrasts beautifully with the velvety beef. Add some shredded carrots for extra crunch and a bit of color.
Very High in Sodium
810 mg 810 mg (35% 35%)
The American Heart Association recommends no more than 2,300mg of sodium per day, with an ideal limit of about 1,500mg for most adults.
Tips to Reduce Sodium in Your Beef Chuck Roast Recipe
-
Opt for Low-Sodium Soy Sauce-20%
The original recipe uses 1/2 cup of regular soy sauce, which is a major sodium contributor. Switching to low-sodium soy sauce can significantly reduce sodium without sacrificing much flavor.
-
Dilute the Gochujang-10%
Gochujang is inherently salty. While it's hard to eliminate, consider using a slightly smaller amount of gochujang or ensuring it's well distributed in the sauce to lower its sodium impact.
-
Emphasize Natural Sweetness-5%
The brown sugar contributes to flavor. Rely more on the natural sweetness from the grated Asian pear and reduce the brown sugar slightly to balance flavors.
-
Boost with Fresh Aromatics
Incorporate plenty of fresh garlic and ginger. These aromatics add immense flavor and can help compensate for reduced sodium.
-
Reduce Soy Sauce Portion-15%
Even with low-sodium soy sauce, the quantity can be high. Consider using 3/4 of the recommended amount of low-sodium soy sauce to further cut down on sodium.
-
Moderate Cornstarch Slurry
The cornstarch slurry primarily thickens. Ensure you're using the minimum amount needed for desired consistency, as it doesn't contribute significant sodium.
Recipe FAQs
Is it necessary to sear the beef before slow cooking?
Yes, searing is essential for flavor. By heating neutral oil over medium high heat and browning the chunks for 2-3 minutes per side, you create a dark, mahogany colored crust that deepens the final taste of the dish.
How to ensure the sauce thickens correctly?
Whisk the cornstarch into cold water first. Creating a slurry is vital because adding dry cornstarch directly to the hot braising liquid will cause it to clump instantly instead of thickening into a glossy glaze.
Why is the beef tough after the recommended cooking time?
No, this is a common misconception that heat equals tenderness. Cooking on the High setting can toughen the meat fibers, whereas utilizing the Low setting for the full 8 hours allows the collagen to break down into a fork tender consistency.
How to store leftovers properly?
Keep it in an airtight container in the fridge for up to 4 days. If you enjoyed mastering the slow cooker technique here, you will find that the flavors in this beef continue to meld beautifully while stored, often tasting even better the next day.
Can I freeze the cooked beef for later?
Yes, it freezes well for up to 3 months. Ensure you store the beef submerged in its sauce, as this prevents the meat from drying out during the freezing and thawing process.
How to prepare the Asian pear for the marinade?
Grate the pear finely, making sure to include all of its juice. This juice provides both natural sweetness and enzymes that help tenderize the beef chuck roast during the long braise.
Is it possible to reheat the sauce if it becomes too thick?
Yes, simply stir in a tablespoon of water while reheating. Gently warm the mixture over medium low heat to loosen the glossy glaze back to your desired consistency.
Slow Cooker Korean Beef