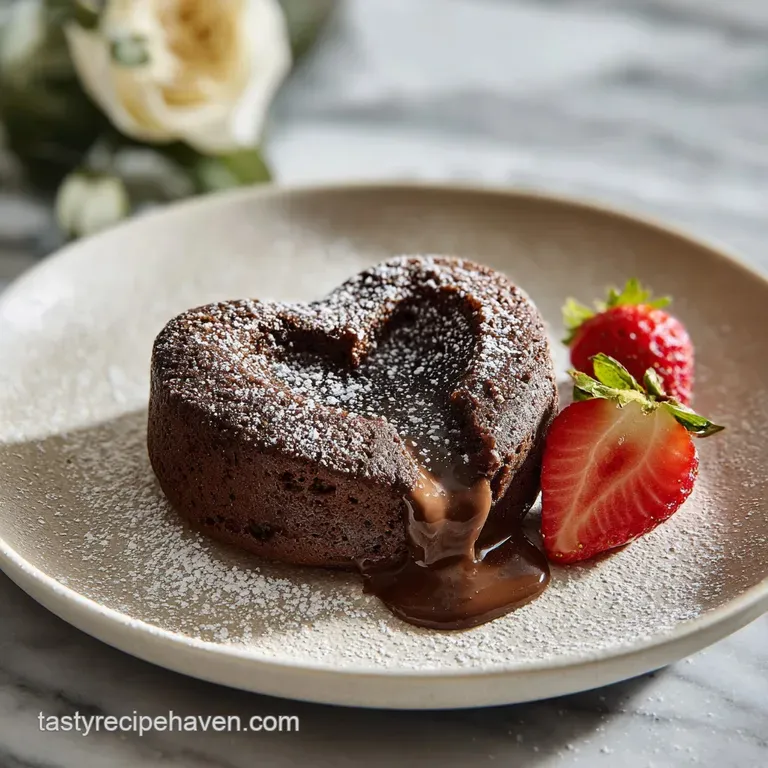
Chocolate Breakable Heart Recipe
- Time: Active 15 minutes, Passive 45 minutes, Total 1 hour
- Flavor/Texture Hook: Silky chocolate shell with a crisp, satisfying shatter
- Perfect for: Anniversary surprises, birthday gifts, or a festive Valentine's centerpiece
- Making a Budget Friendly Chocolate Breakable Heart
- The Physics of the Snap
- Quick Specs for Success
- Ingredients for Your Heart
- Tools for a Flawless Finish
- Steps for a Sturdy Shell
- Fixing Common Shell Issues
- Flavor Twists and Swaps
- Storing Your Chocolate Safely
- Creative Ways to Gift
- Recipe FAQs
- 📝 Recipe Card
Making a Budget Friendly Chocolate Breakable Heart
I still remember the first time I tried to make one of these for a friend's engagement. I was so nervous about the chocolate sticking to the mold that I practically held my breath for the entire forty minutes it spent in the fridge.
When I finally peeled the silicone back and heard that clean, hollow thud on the counter, I knew I was hooked. There is something so incredibly satisfying about the "clink" of a mallet hitting a shiny chocolate surface.
We have all seen those expensive gift boxes online that cost a fortune, but honestly, you can make a better version at home for a fraction of the price. The trick isn't in having a professional kitchen; it is all about understanding how the chocolate behaves when it hits the silicone.
I have cracked plenty of shells in my time, and I have realized that the "perfect" heart is actually just a result of a few smart layers and a bit of patience.
This specific method is designed to be accessible and foolproof. We are skipping the complicated thermometers and the marble slabs. Instead, we are using the latent heat of melting wafers to get that velvety look. It is much easier than the Valentines Day Recipe you might have tried before, focusing more on structural integrity and that fun, interactive "break" factor.
The Physics of the Snap
Molecular Alignment: Melting wafers contain stabilized fats that re solidify into a tight, organized structure without the need for manual tempering. This ensures the shell "contracts" slightly as it cools, allowing it to pull away from the mold walls naturally.
Thermodynamics of Thinning: Adding a tiny amount of coconut oil reduces the viscosity of the melted chocolate. This allows it to flow into the sharp points and crevices of the heart mold for a more defined shape.
| Method | Prep Time | Finish | Skill Level |
|---|---|---|---|
| Melting Wafers | 10 minutes | Satin/Gloss | Beginner |
| Tempered Bar | 30 minutes | Mirror Shine | Intermediate |
When you use the right wafers, you are essentially letting the science of the fats do the hard work for you. If you want a professional look without the price tag, sticking to high-quality wafers is the ultimate shortcut. For another fun holiday project, you might also enjoy my Valentine Chocolate Heart recipe which uses a similar flavor profile.
Quick Specs for Success
The beauty of this project lies in the precision of the layers. If you go too thick, the heart won't break; too thin, and it will crumble in your hands.
Chef Tip: Place your silicone mold in the freezer for 2 minutes before you start. Cold silicone helps the first layer of chocolate set instantly, preventing it from pooling at the bottom of the heart.
| Component | Science Role | Pro Secret |
|---|---|---|
| Dark/Milk Wafers (12 oz) | Structural Base | Use "compound" chocolate for the best snap without tempering. |
| Coconut Oil (1 tsp) | Viscosity Modifier | Helps the chocolate coat the mold evenly without air bubbles. |
| White Chocolate (2 oz) | Decorative Contrast | Keep the temperature low to prevent it from seizing or turning grainy. |
Building a sturdy rim is the most important part of the process. I always tell my friends to double coat the very top edge of the mold. That is where most breaks happen during the unmolding process. If you can master the "lip" of the heart, the rest is easy.
Ingredients for Your Heart
- 12 oz (340g) high-quality dark or milk chocolate melting wafers: These are the backbone of the shell. Why this? They contain palm or coconut oil, ensuring a shiny, firm set without tempering.
- Substitute: 12 oz high-quality chocolate chips with an extra teaspoon of coconut oil (Note: Slightly softer set).
- 2 oz (56g) white chocolate wafers: For the drizzled decoration. Why this? Contrast makes the heart "pop" visually.
- Substitute: Colored candy melts for a themed look.
- 1 tsp (5g) coconut oil: This is our secret to a silky pour. Why this? It thins the chocolate just enough to reach every corner.
- Substitute: Vegetable shortening (provides same flow but less shine).
- 0.5 cup (25g) mini marshmallows: For the surprise inside. Why this? They provide a soft landing for other treats.
- Substitute: Crushed graham crackers or sprinkles.
- 4 (50g) foil wrapped chocolate truffles: The "treasure" in the heart. Why this? They add weight and a premium feel to the filling.
- Substitute: A small piece of jewelry or a handwritten note.
- 1 tbsp edible gold luster dust: For that luxury finish. Why this? It hides any minor imperfections on the surface.
- Substitute: A sprinkle of sea salt or gold sanding sugar.
- 6 long stemmed strawberries: For serving on the side. Why this? The acidity balances the rich chocolate shell.
- Substitute: Raspberries or pretzel rods.
Tools for a Flawless Finish
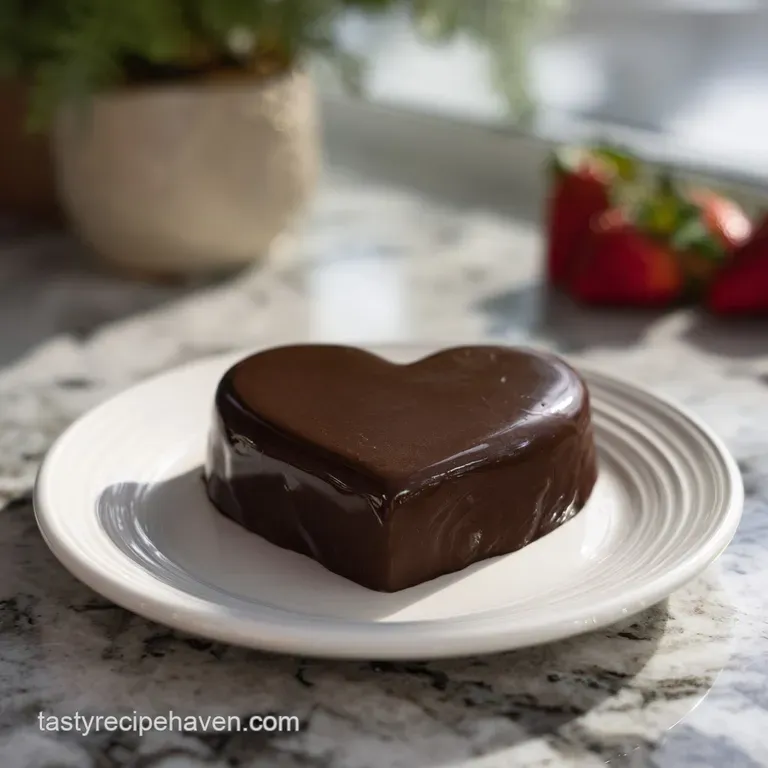
You really don't need a lot of fancy gear here. A standard large heart shaped silicone mold is the only "special" item. Make sure it is the flexible kind, as hard plastic molds are nearly impossible to use for breakables without shattering the chocolate.
You will also need a microwave safe glass bowl; I prefer glass because it retains heat longer than plastic, which keeps your chocolate fluid while you work.
A small, clean paintbrush (unused for paint, of course) or the back of a spoon is essential for "painting" the chocolate up the sides. I have found that a spoon works best for the first layer, but the brush is a lifesaver for the second layer to get into the tight corners. Finally,, grab a small mallet.
If you don't have one, a heavy metal spoon can work, but a wooden mallet really completes the gift experience.
Steps for a Sturdy Shell
- Prepare the mold. Wipe the inside of your heart mold with a lint free cloth. Note: Any dust or water droplets will cause the chocolate to bloom or streak.
- Melt the base. Heat 12 oz chocolate wafers and 1 tsp coconut oil in 30 second bursts. Stop when few small lumps remain and stir until they melt completely from the residual heat.
- Apply first coat. Pour roughly 3 tablespoons of chocolate into the mold. Rotate the mold until the bottom and sides are fully covered.
- Reinforce the edges. Use a spoon to pull the chocolate up to the very top rim. Note: A thin rim is the number one cause of breakage during unmolding.
- Initial chill. Place the mold in the fridge for 10 minutes until the chocolate feels firm and looks matte.
- Apply second coat. Focus on the sides and the top edge. Drip more chocolate along the rim to create a thick "lip."
- Final set. Chill for another 20 minutes. Wait until the shell is completely cold to the touch.
- Unmold gently. Pull the silicone away from the edges first, then slowly push from the bottom. Listen for the chocolate releasing from the mold.
- Fill and seal. Place 4 truffles and 0.5 cup marshmallows on a plate. Invert the shell over the pile.
- Decorate. Melt 2 oz white chocolate and drizzle over the top. Dust with gold luster dust while the drizzle is still slightly tacky.
Fixing Common Shell Issues
Why Your Shell Is Breaking
This usually happens because the walls are too thin, especially at the "v" of the heart or the top rim. If the chocolate is translucent when you hold it up to the light, it is too thin. You need that second, targeted coat to provide the structural integrity required to stand up on its own.
Why the Surface Is Dull
If your heart looks cloudy or has white streaks, the chocolate likely got too hot. When chocolate overheats, the fats separate and rise to the surface (this is called "bloom"). To fix this on your next batch, shorten your microwave bursts and stir more frequently.
For the current batch, a quick brush of gold luster dust will hide the streaks perfectly.
| Problem | Root Cause | Solution |
|---|---|---|
| Chocolate won't release | Shell too thin | Add a third layer to the sides next time. |
| White spots appear | Overheated chocolate | Use 15 second intervals and stir vigorously. |
| Shell shatters early | Room too warm | Keep the heart in the fridge until 5 minutes before serving. |
Common Mistakes Checklist
- ✓ Never let a single drop of water touch your chocolate or it will "seize" into a gritty paste.
- ✓ Don't skip the second coat; a single layer is almost never strong enough.
- ✓ Avoid over chilling; leaving it in the freezer for hours can make the chocolate brittle and prone to cracking.
- ✓ Use a glove or a piece of parchment when handling the finished shell to avoid leaving fingerprints on the shine.
Flavor Twists and Swaps
If you aren't a fan of dark chocolate, this recipe works beautifully with milk or even colored white chocolate wafers. Just keep in mind that white chocolate has a lower melting point, so it may require an extra 5 minutes in the fridge to set properly.
| Original Ingredient | Substitute | Why It Works |
|---|---|---|
| Dark Wafers (12 oz) | White Chocolate Wafers | Higher sugar content but provides a "blank canvas" for bright colors. |
| Mini Marshmallows | Popcorn (sweet/salty) | Adds a surprising crunch and fills the volume of the heart cheaply. |
One of my favorite variations is the "Salted Caramel" heart. I'll add a pinch of sea salt to the melted base and fill the inside with caramel filled chocolates instead of truffles. It is a simple switch that makes the whole thing feel much more expensive.
Storing Your Chocolate Safely
Storing a Chocolate Breakable Heart is mostly about managing temperature. You want a cool, dry place. The fridge is fine, but it can sometimes cause the chocolate to "sweat" when you bring it out to room temperature. If you have a cool pantry, that is the best spot.
It will stay fresh for up to 2 weeks, though the strawberries should be eaten within 24 hours.
For freezing, you can actually freeze the hollow shell! Wrap it gently in bubble wrap and place it in a hard sided plastic container. It will keep for 2 months. When you are ready to use it, move it to the fridge for 24 hours, then to the counter for another 2 hours.
Never take it straight from the freezer to the room, or the thermal shock will cause it to crack instantly.
Creative Ways to Gift
If you want to really impress someone, the presentation is just as important as the chocolate. I love using a "bakery box" with a clear window. Line the bottom with some shredded paper or tissue paper to create a "nest" for the heart. This prevents it from sliding around and breaking before the big reveal.
- The "Date Night" Box: Surround the heart with the 6 long stemmed strawberries and a small bottle of sparkling cider.
- The Proposal: Hide a small ring box inside the marshmallows. It is a moment they will never forget!
- The Gender Reveal: Fill the heart with either blue or pink candies and sprinkles.
Whatever you decide to put inside, the reaction is always the same pure excitement. It turns a simple dessert into an activity. If you're looking for more ways to use these skills, definitely check out the Valentine Chocolate Heart recipe for a different take on the shape. Trust me, once you realize how easy it is to work with these molds, you will be making them for every holiday on the calendar!
Recipe FAQs
Can I use standard baking chocolate bars instead of melting wafers?
No, tempering is required for standard bars. Standard bars contain cocoa butter which needs precise temperature control to achieve that shiny snap.
How do I ensure the chocolate shell is thick enough to hold filling but thin enough to break?
Apply two distinct, even layers. The first layer sets the basic shape, and the second layer must focus on building a reinforced "lip" around the top edge for structural support.
How do I prevent fingerprints or smudges on the finished heart surface?
Handle the finished shell only while wearing gloves or holding parchment paper. The oils on your skin warm the chocolate slightly, causing immediate dull spots and visible smudges.
What happens if my melted chocolate gets too hot and becomes thick or grainy?
The chocolate will seize or "bloom," resulting in a dull, grainy texture. To salvage it, quickly stir in one teaspoon of fresh, neutral oil or shortening to try and re-emulsify the fats.
How long must the heart chill before I attempt to unmold it?
Chill for a total of at least 30 minutes, checking after 10 minutes for the first coat. Do not rush the final set; if the chocolate is soft, it will cling to the silicone and tear.
Is it true that freezing the silicone mold beforehand makes unmolding easier?
Yes, chilling the mold for 2 minutes helps the first chocolate layer set instantly. This prevents the initial layer from sliding down the sides, giving you a strong base to build from.
What is the best alternative filling if I want something healthier than candy?
Use dried fruit mixed with crushed nuts for crunch and texture. If you master the shell coating technique here, you can apply the same low-viscosity approach to dipping fruits, similar to our Chocolate Covered Strawberries recipe.
Chocolate Breakable Heart Recipe

