Soft and Simple Sourdough Sandwich Bread
- Time: Active 45 mins, Passive 8 hours 15 mins, Total 9 hours
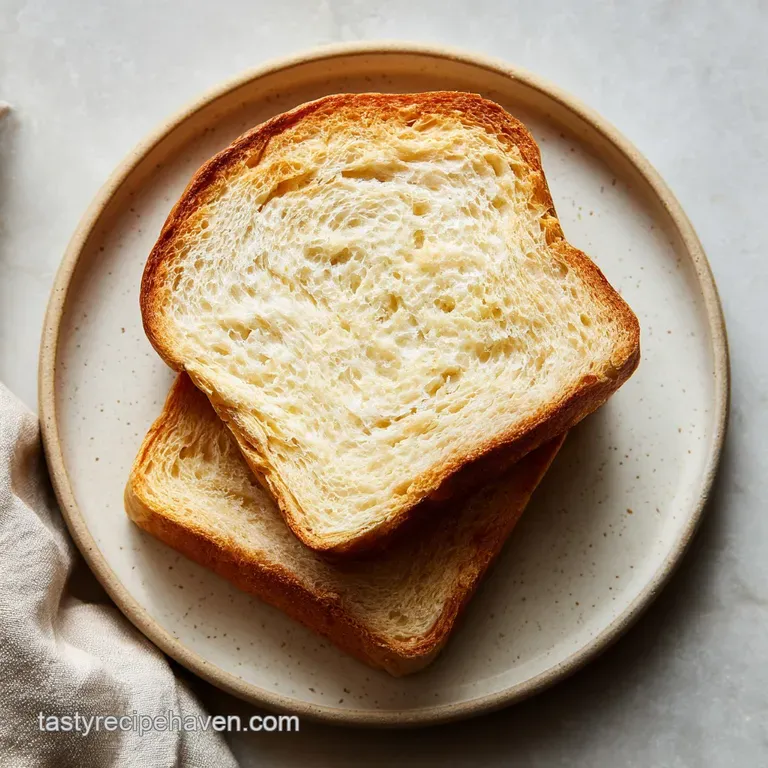
- Flavor/Texture Hook: Silky, honey sweetened crumb with a golden, buttery crust.
- Perfect for: School lunches, morning toast, and beginner bread bakers.
- Baking Soft and Simple Sourdough Sandwich Bread
- Components Behind the Cloud Like Crumb
- Strategic Component Analysis for Success
- Necessary Elements and Budget Alternatives
- Essential Tools for Even Slices
- Guided Steps to Your First Loaf
- Solving Common Texture and Rise Issues
- Smart Variations for Thrifty Bakers
- Keeping Your Bread Fresh Longer
- Busting Fermentation Myths
- Serving Your Loaf with Style
- Recipe FAQs
- 📝 Recipe Card
Baking Soft and Simple Sourdough Sandwich Bread
I remember my first successful sourdough loaf. It looked like a rustic masterpiece from a French bakery, but when I tried to make my daughter a grilled cheese, it was like biting into a brick of glass.
The crust was so hard it actually scraped the roof of her mouth, and I realized right then that the "artisan boule" life wasn't always the "sandwich life" my family needed.
We needed something that could actually hold a slice of turkey without shattering into a million crumbs. I spent months tweaking hydration levels and fat content until I found the sweet spot.
This recipe isn't about giant air bubbles or a thick, crunchy crust; it is about that nostalgic, squishy texture we all grew up with, but with the nutritional benefits and depth of flavor only a real sourdough starter can provide.
It feels like a small victory every time I pull this loaf from the oven. The kitchen fills with a warm, sweet aroma that is miles away from the acidic, vinegary smell of some sourdoughs. We are going for a mellow, approachable flavor that lets the honey and milk shine through.
If you have been intimidated by sourdough before, let this be your starting point because it is incredibly forgiving and designed for real life.
Components Behind the Cloud Like Crumb
- Dairy Enrichment: Using whole milk instead of just water introduces lactose and fats that interfere with gluten formation, creating a much softer bite.
- Honey as a Humectant: Honey naturally attracts and holds onto moisture, which keeps your sandwich slices from drying out by day three.
- High Protein Flour: Even though we want it soft, we need 550g of high protein bread flour to provide the structure necessary to support the "lift" during the long fermentation.
- Delayed Salt Addition: Integrating the 10g fine sea salt after the initial mix allows the yeast to colonize without the immediate restrictive pressure of salt.
The Physics of the Plush Crumb
Fat molecules from the butter and milk coat the gluten strands, preventing them from becoming too long and elastic. This results in a "short" crumb that feels tender rather than chewy or rubbery when you bite into it.
Chef's Tip: Freeze your butter for 10 minutes before the final mix, then grate it into the dough. This creates tiny pockets of steam during baking that contribute to a more uniform, velvety interior.
If you are looking for more ways to use your kitchen gadgets for baking, you might enjoy my Sourdough Bread machine recipe which simplifies things even further for busy weekdays.
| Method | Time | Texture | Best For |
|---|---|---|---|
| Oven (Standard) | 40 mins | Even golden crust | Daily sandwich bread |
| Stovetop (Dutch Oven) | 50 mins | Thicker, rustic base | Hearty toast and soups |
| Bread Machine | 3 hours 30 mins | Soft and uniform | Minimal cleanup days |
Finding the right balance between time and texture is key. While the oven provides the most consistent shape for sandwiches, the bread machine is a lifesaver when you can't be home for the shaping steps.
Strategic Component Analysis for Success
The science behind these ingredients is what makes this loaf stand out from a standard flour water salt sourdough. We are building a specific environment for the yeast to thrive while keeping the texture under control.
| Ingredient | Science Role | Pro Secret |
|---|---|---|
| 250g Whole Milk | Tenderizes gluten | Use room temp to avoid shocking the starter. |
| 40g Honey | Moisture retention | Speeds up browning for a beautiful golden crust. |
| 100g Sourdough Starter | Natural leavening | Feed it 4-6 hours prior for peak activity. |
| 50g Unsalted Butter | Crumb softening | Ensure it is "mushy" soft but not melted. |
Using high-quality ingredients at the right temperatures makes the fermentation much more predictable. For instance, the lukewarm milk ensures the 100g active sourdough starter begins working immediately rather than sluggishly waking up from the fridge.
Necessary Elements and Budget Alternatives
- 550g High Protein Bread Flour: Essential for the rise. Why this? Provides the structural strength needed to hold the weight of the milk and butter.
- 100g Active Sourdough Starter: Your engine. Why this? Using a bubbly, peaked starter ensures the bread rises high and light.
- 250g Lukewarm Whole Milk: For the softest texture. Why this? Fats in milk create a more delicate crumb than water only recipes.
- 50g Unsalted Softened Butter: Pure luxury and softness. Why this? Creates a velvety mouthfeel and helps the bread stay fresh.
- 40g Honey: A touch of sweetness. Why this? Acts as a natural preservative and feeds the yeast efficiently.
- 50g Warm Water (90°F): To dissolve the starter.
- 10g Fine Sea Salt: To control fermentation.
- 1 tbsp All purpose Flour: For dusting your work surface.
If you are just starting your sourdough journey, you can also check out this Einkorn Bread recipe for another beginner friendly approach to ancient grains.
| Original Ingredient | Substitute | Why It Works |
|---|---|---|
| Whole Milk (250g) | Oat Milk (full fat) | Similar sugar content for browning; slightly nuttier flavor. |
| Honey (40g) | Maple Syrup | Same liquid volume. Note: Adds a distinct maple aroma to the loaf. |
| Bread Flour (550g) | All Purpose Flour | Warning: Results in a flatter, less structured loaf. Use 20g less liquid. |
Essential Tools for Even Slices
To get that classic sandwich shape, you really do need a standard 9x5 inch loaf pan. I prefer heavy duty aluminized steel because it distributes heat so evenly that you don't end up with burnt bottoms and pale tops. A digital scale is also your best friend here.
While I grew up using cups, measuring by weight is the only way to ensure your dough isn't too dry one day and too sticky the next.
A bench scraper is another "not required but totally helps" tool. It makes handling the tacky dough much easier without you having to add too much extra flour. If you don't have one, a large spatula or even a stiff credit card (cleaned, obviously!) can work in a pinch to help scoop and flip the dough during the folding process.
Guided Steps to Your First Loaf
Activating the Levain
Whisk 100g active sourdough starter with 50g warm water. Note: This ensures the starter is fully incorporated before adding heavier ingredients.
Mixing the Enriched Dough
Stir in 250g lukewarm whole milk and 40g honey. Add 550g high protein bread flour and mix until a shaggy mass forms. Let it rest for 30 minutes until the flour is fully hydrated.
Incorporating the Softened Butter
Smear the 50g softened butter and 10g fine sea salt over the dough. Knead by hand or with a mixer for 5-8 mins until the dough looks silky and pulls away from the bowl.
Managing the Bulk Ferment
Place the dough in a greased bowl. Cover and let it sit at room temperature for 4-5 hours, performing 3 sets of "stretch and folds" every 30 mins until the dough feels airy and shows small bubbles.
Shaping the Sandwich Cylinder
Turn the dough onto a lightly floured surface. Flatten into a rectangle, fold the sides in, and roll it tightly into a log until the surface feels tense and smooth.
Proofing for the Final Rise
Place the log into a greased loaf pan. Cover and let it rise for 2-3 hours until the dough reaches 1 inch above the pan rim.
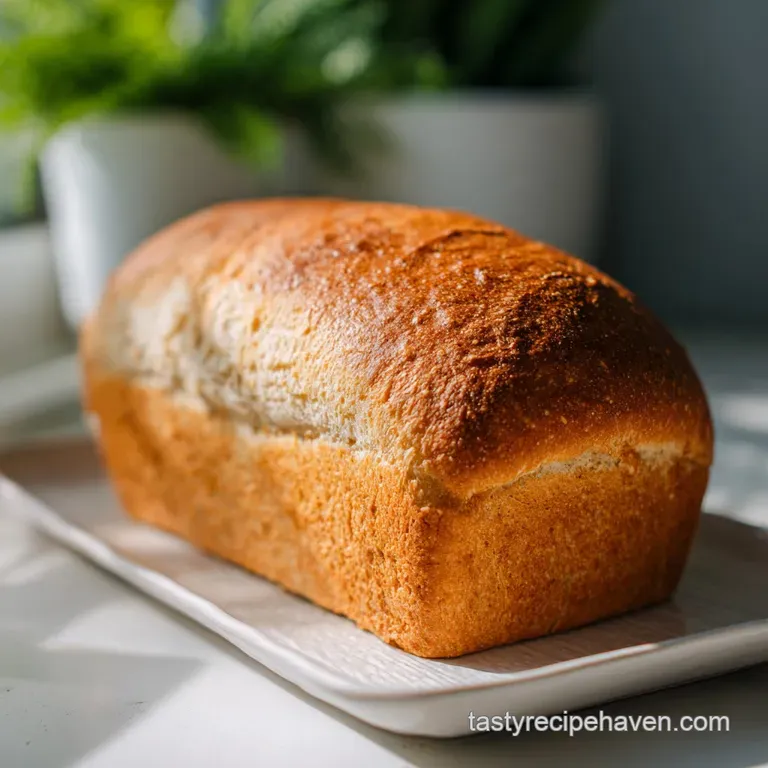
Baking to Golden Perfection
Preheat your oven to 350°F (180°C). Dust the top with 1 tbsp all purpose flour if desired. Bake for 40 mins until the crust is deep golden and sounds hollow when tapped.
The Patience Phase
Remove from the pan immediately and place on a wire rack. Let it cool for at least 2 hours until the internal structure is set and no longer steaming.
Solving Common Texture and Rise Issues
Why Your Bread Is Dense
If your loaf feels heavy and lacks those tiny, even air pockets, it is likely underproofed. Sourdough is a slow game. If your kitchen is cool (under 70°F), that 4-5 hour bulk ferment might need to be 6 or 7 hours.
Look for the dough to increase in volume by about 50% before you even think about shaping it.
Why the Crust Is Too Tough
A tough crust usually happens when the oven is too hot or the dough didn't have enough moisture. In this recipe, the milk and butter should prevent this, but if it's still happening, try placing a pan of hot water on the bottom rack of the oven during the first 15 minutes of baking.
This creates steam that keeps the exterior soft while the bread expands.
| Problem | Root Cause | Solution |
|---|---|---|
| Large gap at the top | Loose shaping | Roll the dough log tighter to eliminate air pockets. |
| Sour taste is too strong | Over fermented | Shorten the bulk ferment or use a cooler room temp. |
| Bread crumbles when cut | Cut too early | Wait 2 full hours. The steam inside must finish cooking the starch. |
Common Mistakes Checklist
- ✓ Check your starter's activity by seeing if a teaspoon of it floats in water.
- ✓ Use room temperature milk to keep the yeast "happy" and active.
- ✓ Avoid adding too much flour during shaping, which makes the loaf dry.
- ✓ Ensure the butter is truly soft; cold butter won't emulsify into the dough.
- ✓ Never skip the cooling time, or the center will turn gummy.
While waiting for your bread to cool, you can satisfy your sweet tooth with a batch of my Snickerdoodle Cookies Recipe, which also uses that perfect butter softening technique.
Smart Variations for Thrifty Bakers
Downsizing for Two
To make a smaller loaf, simply halve all the ingredients. You can use a smaller 8x4 inch pan or even a mini loaf pan. Reduce the baking time by about 10 minutes, but still look for that deep golden color.
If you have half an egg left over from another recipe, whisk it and use it as a wash for an even shinier top.
Doubling the Batch
If you're making two loaves, double the weights exactly, but be careful with the salt sometimes 1.5x is enough if you're sensitive to sodium. Work the dough in a large tub rather than a bowl to give it room to expand.
You'll likely need to add 5 minutes to the bake time if both loaves are in the oven at once.
Ingredient Shortcuts
If you don't have honey, granulated sugar works fine, but use 10% more milk to compensate for the lost liquid. If you're out of butter, 40g of neutral oil (like canola) will provide the softness, though you'll lose that specific buttery aroma that makes this loaf so special.
Keeping Your Bread Fresh Longer
Storage Guidelines Keep this loaf in a paper bag or a linen bread box for the first 24 hours. After that, move it to a sealed plastic bag or an airtight container to lock in the moisture. It will stay fresh at room temperature for up to 4 days.
Whatever you do, don't put it in the fridge! The refrigerator actually accelerates the staling process (retrogradation) and will make your soft bread feel like cardboard in hours.
Zero Waste Tips If the ends start to get a bit dry, don't toss them. Sourdough sandwich bread makes the most incredible French toast because the structure holds up better than white bread.
You can also cube the leftovers, toss them with olive oil and herbs, and bake them at 300°F until they turn into crunchy, artisan croutons.
Busting Fermentation Myths
Myth: Sourdough must always be "sour." Actually, the level of tang is entirely up to you. By using a young, active starter and keeping the fermentation time strictly to what's needed for the rise, you get a very mild, creamy flavor.
This recipe is specifically designed to be "sweet" and approachable for those who don't like the heavy acidic punch of traditional sourdough.
Myth: You need a Dutch oven for sourdough. While a Dutch oven is great for boules, it's actually a hindrance for sandwich bread. The open air of the oven, combined with the fats in our dough, allows the loaf to rise and brown evenly in a standard loaf pan.
You don't need fancy cast iron to get a professional result here.
Serving Your Loaf with Style
For the ultimate sandwich experience, slice this bread about half an inch thick. Because it is so soft, a sharp serrated knife is non negotiable otherwise, you'll just squash the loaf.
If you're serving it for breakfast, try a thick smear of salted butter and a drizzle of extra honey to echo the flavors inside the dough.
If you're hosting a brunch, this bread is the perfect base for avocado toast. The slight tang of the sourdough cuts through the richness of the avocado beautifully. I also love to use it for "club" style sandwiches with three layers; it's sturdy enough to handle the height without being so chewy that the fillings squeeze out the sides when you take a bite.
It really is the workhorse of the kitchen!
Recipe FAQs
What temperature should my kitchen be for the bulk fermentation?
Ideally between 72°F and 78°F. Cooler kitchens require significantly longer fermentation times, so aim for a warm spot to ensure the yeast is active enough for the rise.
How do I prevent the loaf from tasting overly sour or acidic?
Use a very active, recently fed starter and shorten the bulk proof time. A mild flavor comes from quick fermentation, ensuring the yeast produces gas before the lactic acid bacteria dominate the flavor profile.
Can I substitute whole milk with water to make a more traditional sourdough?
No, for this specific recipe you must use milk or a high fat alternative. The fats and lactose in the milk interfere with gluten development, which is crucial for achieving this bread's signature soft, tender sandwich crumb, much like how fat stabilizers impact cake structure in the Banana Bread Cookies recipe.
How long does the dough need to cool before slicing to avoid a gummy interior?
Wait a minimum of two full hours after removing it from the pan. The internal starches continue to set as the steam escapes; cutting it too soon traps moisture, resulting in a sticky, gummy texture.
What is the best way to shape the dough for a tall, uniform sandwich loaf?
Flatten the dough into a rectangle, fold the long sides into the center, and then tightly roll the dough into a log from one end to the other. This tight rolling action creates surface tension necessary to achieve a high, even rise in the loaf pan.
Why is my starter floating in water when I test it, but the dough still rose slowly?
False, the float test indicates potential, not readiness for mixing. A floating starter confirms activity, but the ideal time to use it is when it has doubled in size and is near its peak, which you can gauge by how quickly it incorporates into the liquids.
How can I ensure the crust stays soft and thin like commercial bread?
Bake with a source of steam present for the first 15 minutes. Placing a pan of hot water on the bottom rack creates steam, which keeps the crust from hardening prematurely while the loaf expands fully.
Simple Sourdough Sandwich Bread

