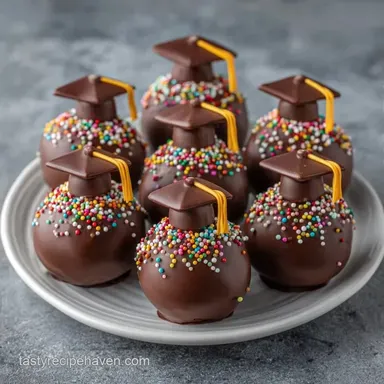
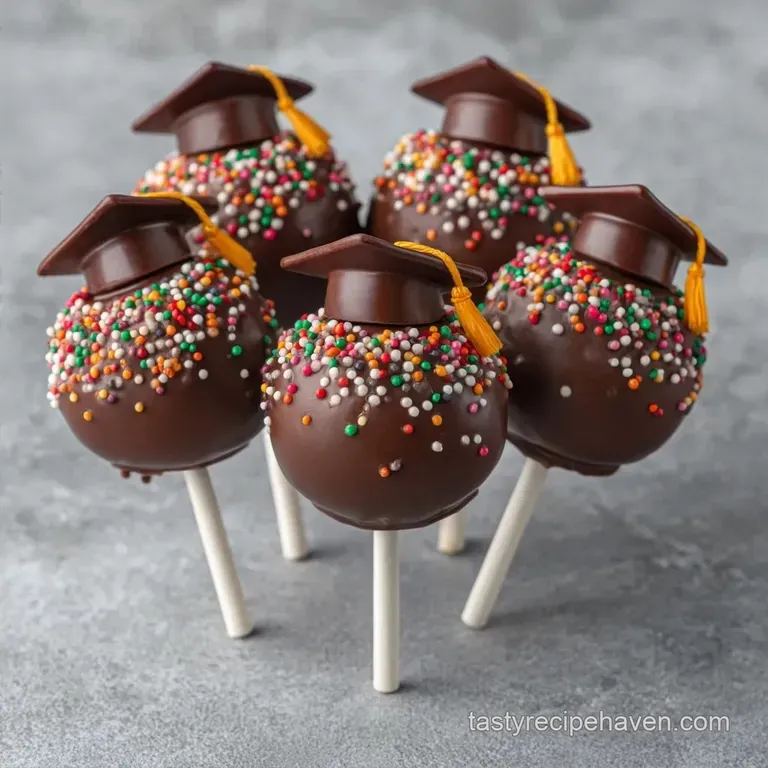
Easy Graduation Cake Pops: Velvety and Moist
- Time: 45 min active + 1 hour chilling
- Flavor/Texture Hook: Dense, moist crumb with a snappy chocolate shell
- Perfect for: Graduation parties, school celebrations, or beginner bakers
Easy Graduation Cake Pops
Ever wonder why some cake pops taste like a mouthful of pure sugar while others actually taste like cake? I remember making these for my cousin's grad party a few years back. I used the traditional method of mixing in heaps of buttercream frosting, and let me tell you, they were basically sugar bombs. Worst part?
Half of them slid right off the sticks and landed on the tablecloth because the frosting was too soft. It was a disaster.
That's why I ditched the frosting entirely for this version. I started experimenting with binders that add moisture without that overwhelming sweetness. Once I found the right ratio of Greek yogurt and lemon juice, everything changed.
These pops actually hold their weight, and the flavor is balanced, which means guests actually eat more than one.
You're going to love how these turn out. We're using whole wheat pastry flour for a bit more structure and a darker, richer crumb that pairs beautifully with dark chocolate. Whether you're making these for a huge party or just a small family gathering, this method is foolproof.
Just follow the timing, and you'll have professional looking treats that don't taste like a candy store exploded.
Why This Recipe Works
Most people struggle with cake pops because they don't understand the balance between the crumb and the binder. Here is what's actually happening in the bowl:
- Acidic Binding: The lemon juice and Greek yogurt break down the starch in the cake crumbs, creating a natural "glue" that is more stable than fat heavy frosting.
- Moisture Control: Using pastry flour ensures the cake is tender but doesn't absorb so much liquid that the balls become mushy.
- Fat Stabilization: Adding coconut oil to the chocolate chips prevents the coating from cracking when it hits the chilled cake.
- Temperature Shock: Chilling the balls for a full hour creates a temperature differential that sets the chocolate instantly upon dipping.
Before we jump into the ingredients, you need to decide how you're baking your base. While I prefer the oven for a more consistent crumb, some people swear by quick fix methods.
| Method | Time | Texture | Best For |
|---|---|---|---|
| Oven Bake | 30 mins | Airy & Stable | Large batches, traditional taste |
| Microwave | 5 mins | Denser & Moist | Last minute fixes, small yields |
| Steamed | 20 mins | Very Silky | Ultra moist preference |
Ingredient Breakdown
Understanding the "why" behind each ingredient helps you avoid those common baking pitfalls.
| Ingredient | Science Role | Pro Secret |
|---|---|---|
| Whole Wheat Pastry Flour | Structural Base | Lighter than regular whole wheat; keeps the pop from being "bready" |
| Coconut Sugar | Flavor & Color | Adds a caramel note that cuts through the dark chocolate |
| Greek Yogurt | Emulsifying Binder | Provides the "grip" needed to keep pops on the stick |
| Coconut Oil | Fluidity Agent | Stops the chocolate from seizing and adds a glossy shine |
What You Need
For these Easy Graduation Cake Pops, you'll need a few specific items. I've listed the exact measurements from my tested batch. If you're looking for a larger dessert, you might also want to check out a Graduation Cake for 12 recipe to put on the main table.
The Cake Base 1.5 cups (190g) whole wheat pastry flour Why this? Lighter than whole wheat, more structure than AP flour 0.5 cup (100g) coconut sugar Why this? Deep, caramel like sweetness 1 tsp (5g) baking powder 0.25 tsp (1.5g) salt 0.5
Cup (120ml) unsweetened almond milk Why this? Keeps the crumb light 1 large (50g) egg 3 tbsp (42g) coconut oil, melted 1 tsp (5ml) vanilla extract
The Binder and Coating 3 tbsp (45g) Greek yogurt Why this? Essential for the non sugar bind 1 tsp (5ml) lemon juice Why this? Cuts the richness and aids binding 12 oz (340g) dark chocolate chips 1 tbsp (15ml) coconut oil Why
This? Ensures a smooth, dip able coating Gel food coloring (to match school colors) Sprinkles for decoration
Quick Substitution Guide
| Original Ingredient | Substitute | Why It Works |
|---|---|---|
| Whole Wheat Pastry Flour | All Purpose Flour | Works well. Note: Texture will be slightly less hearty |
| Coconut Sugar | Brown Sugar | Similar moisture. Note: Increases sweetness slightly |
| Almond Milk | Oat Milk | Nearly identical fat content. Note: No flavor change |
| Greek Yogurt | Sour Cream | Similar acidity and thickness. Note: Slightly heavier taste |
Right then, let's talk about the gear. You don't need a professional kitchen, but a few specific tools make this much easier.
The Essential Gear

I've found that using the right tools prevents the "messy kitchen" syndrome. You'll need a standard 8 inch round cake pan and a mixing bowl. A handheld mixer is great, but a whisk works just fine if you've got the arm strength.
For the shaping phase, a food processor is a huge help for crumbling the cake, but your fingers work too. You will definitely need cake pop sticks and a Styrofoam block. If you don't have a block, you can use a cardboard box filled with rice or beans to hold the pops upright while the chocolate sets.
Finally, for the chocolate, use a microwave safe glass bowl or a double boiler. I prefer the microwave for speed, but you have to be careful not to overheat the chocolate. If you see it starting to clump, stop immediately.
Step by step Instructions
Let's get into it. I've broken this down into phases so you don't feel overwhelmed.
Phase 1: Baking the Foundation
- Preheat your oven to 350°F (175°C) and grease an 8 inch round cake pan.
- Whisk together the whole wheat pastry flour, coconut sugar, baking powder, and salt in a mixing bowl. Note: Ensure no clumps of sugar remain.
- Stir in the almond milk, egg, melted coconut oil, and vanilla extract. Mix until the batter is smooth.
- Pour the batter into the pan and bake for 25–30 minutes until a toothpick inserted in the center comes out clean.
- Let the cake cool completely on a wire rack. Note: If you crumble a warm cake, the pops will be too mushy.
Phase 2: Shaping the Pops
- Crumble the cooled cake into a bowl. Use your fingers or a food processor until it resembles fine sand.
- Fold in the Greek yogurt and lemon juice one tablespoon at a time. Mix until you reach a smooth, clay like consistency. Note: Stop adding yogurt as soon as it holds its shape; too much makes them slide.
- Roll the mixture into small, uniform balls. Insert the cake pop sticks about halfway into each ball.
- Place the cake balls in the refrigerator for 1 hour until they feel firm to the touch.
Phase 3: Dipping and Finishing
- Melt the dark chocolate chips with 1 tbsp coconut oil. Do this in 30 second bursts in the microwave, stirring in between to prevent seizing.
- Stir in your gel food coloring until you hit the exact shade of your school colors.
- Dip each chilled cake pop straight down into the chocolate, swirl slightly, and lift. Decorate with sprinkles immediately and set on your Styrofoam block until the shell is hard.
Chef's Note: For a velvet smooth finish, tap the pop gently on the edge of the bowl after dipping to remove excess chocolate. This prevents those ugly "puddles" at the bottom of the pop.
Fix Common Mistakes
Cake pops can be temperamental. If yours aren't behaving, it's usually a temperature or ratio issue.
Cake Pops Sliding Off the Stick
This is the most common nightmare. It usually happens because the cake was too moist or the balls weren't chilled long enough. The "anchor" (the part of the stick inside the cake) needs to be secure. If you find they are sliding, try adding another tablespoon of crumbled cake to your mixture.
Chocolate Seizing or Clumping
If your chocolate looks grainy or separates, it has "seized." This happens if a drop of water gets into the bowl or if you overheat it. You can sometimes save it by stirring in a tiny bit more coconut oil or a teaspoon of vegetable oil, but it's better to start over if it's completely clumped.
Cracked Chocolate Shells
Cracks happen when the cake pops are too cold or the chocolate is too thick. Make sure your coconut oil is well incorporated into the chocolate to give it that necessary flexibility.
| Problem | Root Cause | Solution |
|---|---|---|
| Sliding Pops | Too much binder / Not chilled | Add more cake crumbs; chill 1 extra hour |
| Grainy Coating | Overheated chocolate | Add 1 tsp coconut oil and stir slowly |
| Lumpy Balls | Over mixing the cake | Mix gently; don't over process in food processor |
Common Mistakes Checklist
- ✓ Did you cool the cake completely before crumbling?
- ✓ Did you add the yogurt one tablespoon at a time?
- ✓ Were the balls chilled for at least 60 minutes?
- ✓ Did you stir the chocolate every 30 seconds?
- ✓ Did you use gel coloring instead of liquid (liquid can thin the chocolate)?
Try These Variations
Once you've nailed the basic Easy Graduation Cake Pops, you can start playing with flavors. According to King Arthur Baking, the type of flour you use can significantly change the "lift" and density of your bake, so feel free to experiment here.
For a Zesty Twist Add the zest of one lemon to the dry ingredients. This brightens the whole pop and makes the dark chocolate taste even richer. It's a great way to balance the sweetness for people who don't like heavy desserts.
For Double Dark Cocoa Replace 1/4 cup of the pastry flour with high-quality Dutch processed cocoa powder. This turns the inside of the pop into a rich fudge like treat. If you do this, you might need an extra tablespoon of almond milk to keep the batter from getting too dry.
For a Vegan Alternative The recipe already uses coconut oil and almond milk. To make it fully vegan, swap the egg for a "flax egg" (1 tbsp ground flaxseed mixed with 3 tbsp water) and use a vegan Greek style yogurt. The texture remains remarkably similar.
For a gluten-free Option Use a 1:1 gluten-free baking flour blend. Note that gluten-free crumbs tend to be more fragile, so you might need a slightly higher ratio of Greek yogurt to keep the balls from cracking during the rolling process.
Decision Shortcut If you want a richer taste → Add cocoa powder to the base. If you want a brighter flavor → Add lemon zest. If you want them more stable → Increase chill time to 2 hours.
Keep Them Fresh
Because these contain Greek yogurt, they shouldn't sit out on a warm counter for too long. Treat them like a refrigerated cake.
Storage Guidelines Store your cake pops in an airtight container in the fridge for up to 5 days. If you're storing them in a container, place pieces of parchment paper between layers so the chocolate doesn't stick and peel off.
Freezing Tips These freeze surprisingly well. Wrap them individually in plastic wrap or freeze them on a tray before transferring them to a freezer bag. They'll stay good for up to 2 months. To thaw, just move them to the fridge overnight.
Zero Waste Ideas If you have leftover cake crumbs that didn't make it into a pop, don't toss them! Put them in a glass and layer them with fresh berries and a dollop of whipped cream for a quick "graduation trifle." Any leftover melted chocolate can be drizzled over fruit or used to make a quick batch of chocolate bark.
Great Side Treats
Cake pops are great, but a party needs variety. If you're planning a full dessert spread, these pops pair perfectly with something a bit more traditional. I usually suggest having one large centerpiece cake and several smaller treats.
For a silky, creamy contrast to the snappy chocolate of the pops, I highly recommend making a Homemade Grad Party Cake. The vanilla notes in that cake complement the dark chocolate in the pops without competing for attention.
If you're serving these at a brunch style graduation event, you could also offer some Applesauce Coffee Cake. The spiced apple flavor is a nice bridge between the sweetness of the cake pops and the savory elements of a morning spread.
- 1. Bake Temp
- Exactly 350°F (175°C) - any higher and the edges will dry out, making the crumbs too coarse.
- 2. Bake Time
- 25-30 mins - check at 25; overbaking leads to pops that crumble instead of sticking.
- 3. Chill Time
- 60 mins minimum - this is non negotiable if you want to avoid the "sliding pop" disaster.
Recipe FAQs
How to make cake pops quickly?
Crumble the cooled cake in a food processor. This method is much faster than using your fingers and ensures the cake resembles fine sand before you mix in the Greek yogurt.
Can I make cake pops a day before the party?
Yes, you can prepare them in advance. Store them in an airtight container in the refrigerator to maintain their structure and freshness.
What is the recommended storage for cake pops?
Store them in the refrigerator. Keep them in a sealed container or a covered tray to prevent the chocolate coating from absorbing other food odors.
How do I keep the coating smooth and shiny?
Stir 1 tbsp of coconut oil into the melted dark chocolate. This prevents the chocolate from seizing and gives the pops a professional, glossy finish.
Can I personalize cake pops with messages?
Yes, use melted chocolate or gel food coloring. Pipe small letters onto the firm coating using a fine tipped piping bag for a custom touch.
What decorations can be used for graduation cake pops?
Use colorful sprinkles and gel food coloring. Mix the coloring into the chocolate to match school colors; these pair well with pretzel bites for a balanced dessert table.
Is it true that cake pops must be made and served immediately to stay fresh?
No, this is a common misconception. The cake balls actually benefit from chilling for one hour to stabilize before dipping, and the finished pops stay fresh for several days when refrigerated.
Easy Graduation Cake Pops