Simple High School Graduation Cake: Velvety and Moist
- Time: 45 min active + 2 hours 25 mins cooling/decorating
- Flavor/Texture Hook: Velvety, buttery sponge with silky smooth frosting
- Perfect for: Large graduation parties, beginner bakers, and family celebrations
- Simple High School Graduation Cake Guide
- Secrets for a Moist Crumb
- Essential Baking Metrics
- Pantry Staples and Substitutes
- Tools for Precision Baking
- Steps from Batter to Decor
- Fixing Common Baking Mistakes
- Troubleshooting Common Issues
- Flavor and Style Variations
- Adjusting the Batch Size
- Debunking Baking Myths
- Storage and Waste Tips
- Best Pairings for Dessert
- Recipe FAQs
- 📝 Recipe Card
Simple High School Graduation Cake Guide
The smell of vanilla and toasted butter filling the kitchen is the best part of any celebration. I remember the first time I tried to make a celebration cake for a family event, and it was a total disaster. The edges were burnt, but the middle was a raw, gooey mess that looked more like pudding than cake.
It was the classic sheet cake trap: the pan is too large, the heat distribution is uneven, and you end up with a dessert that's half brick and half lava.
That's exactly why I developed this specific method. We aren't just throwing ingredients in a bowl; we're managing moisture. By mixing butter for flavor and oil for shelf life, we solve the dryness problem that plagues most home baked party cakes.
You get a slice that stays soft even if it sits on the table for a few hours while everyone is chatting.
Whether you're looking for a Simple High School Graduation Cake for girl or a more neutral design for a group, this base is foolproof. It's sturdy enough to hold a heavy fondant cap but light enough that it doesn't feel like you're eating a sponge. We'll focus on the precision of the creamed butter and the exact timing to make sure your cake comes out flat, golden, and ready for frosting.
Secrets for a Moist Crumb
Baking a large surface area cake requires a bit of a strategy. If you just use butter, the cake can feel stiff once it hits the fridge. Adding a bit of vegetable oil ensures the fat stays liquid at lower temperatures, which is what gives you that "melt in-your mouth" feel.
Acidic Tenderizing: The buttermilk reacts with the baking powder to create a lift that's more consistent than using milk alone. The acid also breaks down long gluten strands, which prevents the cake from becoming chewy or bread like.
Air Incorporation: Creaming the butter and sugar for a full few minutes creates tiny air pockets. These pockets expand in the oven, giving the cake its structure without needing an excessive amount of chemical leaveners.
Moisture Balance: Using a 9x13 pan spreads the batter thin enough that the heat penetrates the center quickly. This avoids the "sunk center" syndrome often seen in deeper round cakes.
Fat Emulsion: Adding eggs one by one allows the fat and water to bind properly. If you dump them all in at once, the batter can break, leading to a greasy texture and a poor rise.
| Method | Time | Texture | Best For |
|---|---|---|---|
| Traditional Oven | 25 mins | Even rise, golden crust | Standard celebrations |
| Stovetop Steaming | 60 mins | Extremely moist, no crust | No oven households |
Essential Baking Metrics
Precision is everything in baking. If you're off by a few grams of flour, you might end up with a cake that's too dense. I always recommend using a digital scale for the dry ingredients to ensure every batch is identical.
| Ingredient | Science Role | Pro Secret |
|---|---|---|
| Buttermilk | pH Balance | Use full fat for a richer, velvetier crumb |
| Vegetable Oil | Texture Stabilizer | Prevents the cake from drying out in the fridge |
| Powdered Sugar | Structure/Sweetness | Sift it twice to avoid lumps in your piping |
| All Purpose Flour | Framework | Spoon and level the cup to avoid packing too much |
Pantry Staples and Substitutes
For this Simple High School Graduation Cake, I use a mix of fats to get the best of both worlds. Don't skip the buttermilk; it's the secret to the texture. If you don't have any, you can make a quick version by adding a tablespoon of lemon juice to regular milk and letting it sit for 5 minutes.
For the Cake Base 3 cups (375g) all purpose flour Why this? Balanced protein for structure. (Substitute: Cake flour for a finer crumb, but use 3.5 cups) 2 cups (400g) granulated sugar Why this? Standard sweetness and aeration. (Substitute:
Cane sugar for a deeper flavor) 1 tbsp (12g) baking powder Why this? Reliable lift. (Substitute: Baking soda + extra buttermilk) 1/2 tsp (3g) salt Why this? Balances the sugar. (Substitute: Fine sea salt) 3/4 cup (170g) unsalted butter, softened
Why this? Essential for flavor. (Substitute: Margarine, though flavor drops) 3 large eggs Why this? Binding and structure. (Substitute: 3 flax eggs for vegan, though texture changes) 1 cup (240ml) buttermilk Why this? Tenderizes the
Crumb. (Substitute: Milk + 1 tbsp vinegar) 1/4 cup (60ml) vegetable oil Why this? Maintains moisture. (Substitute: Canola or melted coconut oil) 2 tsp (10ml) pure vanilla extract Why this? Classic aroma. (Substitute: Almond extract for a wedding
Cake vibe)
For the Signature Buttercream 2 cups (450g) unsalted butter, softened Why this? Base for the frosting. (Substitute: high-quality vegan butter) 6 cups (720g) powdered sugar, sifted Why this? Sweetness and stability. (Substitute: None) 3
Tbsp (45ml) heavy cream Why this? Adjusts consistency. (Substitute: Whole milk) 1 tsp (5ml) vanilla extract Why this? Depth of flavor. (Substitute: Clear vanilla for white frosting) Pinch of salt Why this? Cuts the
Sweetness. (Substitute: None)
For the Graduation Decor Gel food coloring Why this? Stronger color without thinning frosting. (Substitute: Paste colors) 1 oz (28g) gold star sprinkles Why this? Visual pop. (Substitute: Silver or school colors) 1 pre made fondant
Graduation cap Why this? Professional look. (Substitute: Hand cut black fondant) Black piping gel Why this? High contrast for writing. (Substitute: Melted dark chocolate)
Tools for Precision Baking
You don't need a professional kitchen, but a few specific tools make this Simple High School Graduation Cake much easier to handle. A stand mixer is great, but a handheld electric mixer works just fine as long as you're patient with the creaming process.
- 9x13 inch baking pan: This is non negotiable for the timing. If you use a round pan, you'll need to adjust the bake time.
- Electric mixer: Needed for the buttercream to get it airy and smooth.
- Sifter: Essential for the powdered sugar. Lumps in frosting are a nightmare when you're trying to write a name.
- Offset spatula: This helps you get that smooth, professional finish on top of the cake.
- Piping bag and round tip: For adding the final decorative borders.
Steps from Batter to Decor
The key here is not to rush the mixing. If you overwork the batter after the flour goes in, you'll develop too much gluten and the cake will be tough. Keep it on low speed.
Phase 1: Baking the Foundation
- Preheat your oven to 350°F (175°C) and grease your 9x13 inch baking pan. Note: Greasing the sides prevents the cake from sticking and tearing during removal.
- Cream the softened butter and granulated sugar together using an electric mixer until the mixture is pale and fluffy. This usually takes about 3-5 minutes.
- Incorporate eggs one by one, then stir in the vanilla extract and vegetable oil. Note: Adding eggs slowly prevents the batter from separating.
- Alternately add the flour, baking powder, and salt mixture and the buttermilk, mixing on low speed until just combined. Stop as soon as the flour streaks disappear.
- Spread the batter evenly into the prepared pan and bake for 25 minutes, or until the edges pull away from the pan and the center springs back when touched.
- Remove from oven and allow the cake to cool completely in the pan. Note: Frosting a warm cake is the fastest way to end up with a melted mess.
Phase 2: The Buttercream Build
- Prepare the buttercream by whipping together the butter, powdered sugar, heavy cream, vanilla, and salt until smooth and velvety. If it's too stiff, add a teaspoon more cream.
Phase 3: Personalized Decorating
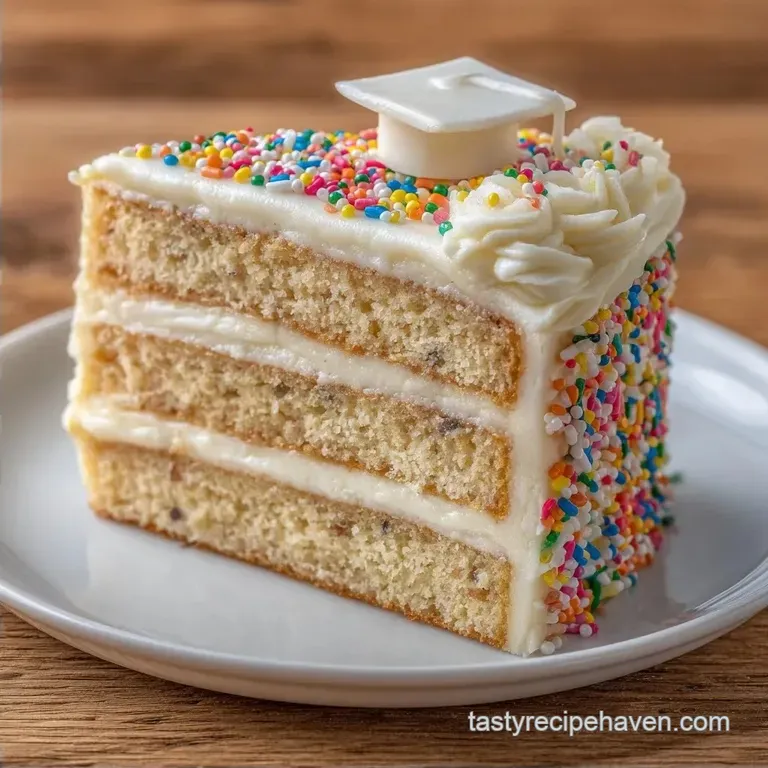
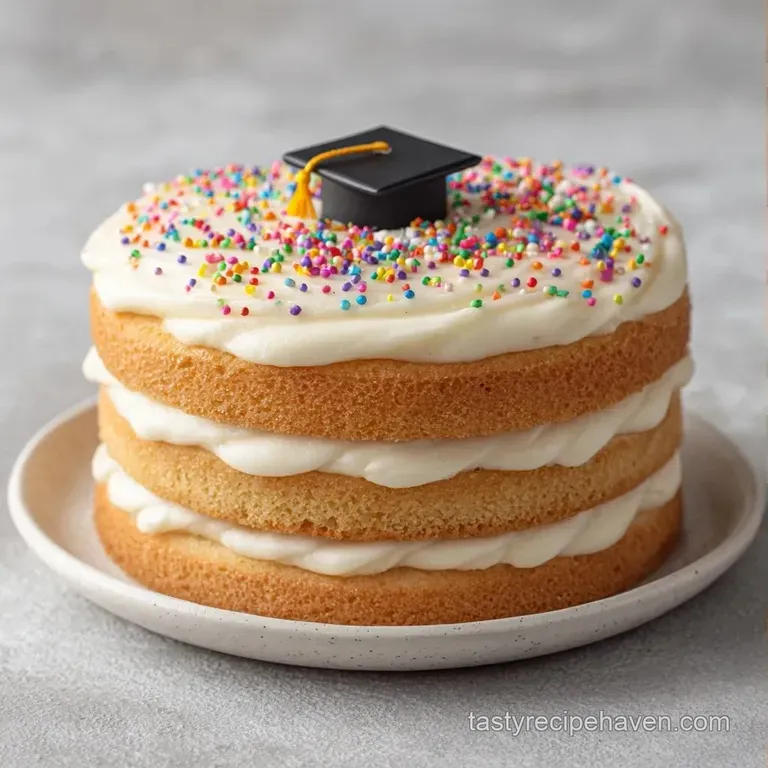
- Frost the cake using an offset spatula. Decorate using gel food coloring to match school colors, then add the gold star sprinkles, the fondant graduation cap, and use black piping gel for the calligraphy.
Chef's Tip: To get perfectly sharp edges on your frosting, chill the cake for 15 minutes after the first "crumb coat" layer of frosting, then apply the final smooth layer.
Fixing Common Baking Mistakes
Even with a simple recipe, things can go sideways. Most issues with a Simple High School Graduation Cake come down to temperature or over mixing.
Troubleshooting Common Issues
| Issue | Solution |
|---|---|
| Why Your Cake Sank in the Middle | This usually happens if the oven door was opened too early, letting out the heat, or if you used too much baking powder. The structure collapses before it's set. |
| The Frosting is Too Runny | If your kitchen is hot, the butter in the buttercream can soften too much. Don't add more sugar immediately. Instead, pop the bowl in the fridge for 10 minutes, then whip it again. |
| Why the Cake Texture is Rubbery | Over mixing the batter after adding the flour is the culprit here. When you mix too much, you create a strong gluten network that makes the cake feel like bread. |
Common Mistakes Checklist
- ✓ Butter is truly room temperature (it should dent when pressed, not be melted).
- ✓ Flour is measured by weight or spooned into the cup, not scooped.
- ✓ Cake is completely cold before frosting is applied.
- ✓ Powdered sugar was sifted to ensure a smooth finish.
- ✓ Oven was preheated fully before the cake went in.
Flavor and Style Variations
One of the best things about this base is how versatile it is. You can easily adapt this Simple High School Graduation Cake to fit the personality of the graduate.
Simple High School Graduation Cake for Girls
For a more feminine touch, try using a pastel pink or lavender gel food coloring in the buttercream. Instead of just gold stars, add edible pearls and fresh berries. If you want to add a flavor twist, replace the vanilla in the cake base with almond extract and add a layer of Sauce in 25 Minutes recipe between the cake and the frosting for a bright, fruity contrast.
Simple High School Graduation Cake Ideas for Guys
For a more masculine or neutral look, stick to deep school colors like navy blue, forest green, or burgundy. Use a matte finish for the frosting and keep the decorations minimal. A Simple High School Graduation Cake homemade for guys often looks great with a "Class of 202X" message in bold black piping gel and a few gold accents to keep it celebratory.
Turning it Into a Chocolate Treat
If the graduate is a chocolate lover, you can swap 1/2 cup of the all purpose flour for high-quality cocoa powder. Increase the buttermilk by 2 tablespoons to compensate for the drying effect of the cocoa. Pair this with a chocolate vanilla swirl frosting for a decadent result.
Vegan Adaptation
To make this a vegan celebration cake, use a high-quality vegan butter substitute and replace the eggs with "flax eggs" (1 tbsp ground flaxseed mixed with 3 tbsp water per egg). Replace the buttermilk with a mixture of soy milk and apple cider vinegar. The texture will be slightly denser, but still very satisfying.
Adjusting the Batch Size
Sometimes you need to feed a small family, and other times you're feeding the whole graduating class. Here is how to handle the scaling for this recipe.
Scaling Down (Half Batch) If you only need a small cake, use an 8x8 inch square pan. Reduce the bake time by about 20% (start checking at 18-20 minutes). Since the recipe calls for 3 eggs, beat one egg in a small bowl and use half of it to get the ratio right.
Scaling Up (Double Batch) For a massive party, you can double the recipe to fill two 9x13 pans. Be careful not to double the salt and baking powder exactly; use about 1.5x the amount of those to avoid a metallic taste or an over risen cake that collapses.
I recommend working in batches if you have a smaller mixer, as a double batch of buttercream can overflow a standard 5 quart bowl.
Baking Large Volume When baking two cakes at once, lower the oven temperature to 325°F (160°C) and extend the time by 5-10 minutes. This ensures that the air circulates properly and both cakes bake evenly without the bottoms burning.
Debunking Baking Myths
There's a lot of noise out there about how to bake, and some of it is just plain wrong. Let's clear a few things up.
Myth: Searing the cake "seals in" the moisture. You can't "sear" a cake. Any idea that high heat at the start prevents moisture loss is false. Moisture is managed by the ratio of fats (oil/butter) and the acidity of the buttermilk.
Myth: You must use "cake flour" for a professional result. While cake flour has less protein, you can get an equally tender result with all purpose flour by using the buttermilk method. The acid does the work of tenderizing the gluten for you.
Myth: Room temperature eggs are just a suggestion. This is actually critical. Cold eggs can cause the creamed butter to seize and clump, which destroys the air pockets you worked so hard to create. Soak cold eggs in warm water for 5 minutes if you forgot to take them out.
Storage and Waste Tips
Once you've spent all that time decorating your Simple High School Graduation Cake, you want it to stay fresh. According to storage guidelines, dairy based frostings should be handled with care.
Fridge and Freezer Store the cake in an airtight container in the fridge for up to 4 days. Because we used oil in the sponge, it won't get as hard as a butter only cake. For long term storage, you can freeze the un frosted cake layers.
Wrap them tightly in plastic wrap and then foil; they'll stay fresh for up to 3 months. Thaw in the fridge overnight before frosting.
Reheating and Serving If the cake has been refrigerated, let it sit at room temperature for about 30-60 minutes before serving. This allows the butter in the sponge and frosting to soften, bringing back that velvety texture.
Zero Waste Tips If you have leftover cake scraps from leveling the top, don't toss them! Crumble them up, mix with a bit of the remaining buttercream, and roll them into cake pops. Alternatively, freeze the scraps and use them as a base for a trifle with fresh fruit and whipped cream.
Best Pairings for Dessert
A Simple High School Graduation Cake is rich and sweet, so it pairs best with things that provide a bit of contrast or a complementary creamy element.
Drink Pairings For an adult friendly celebration, serve slices of cake with a glass of Homemade Baileys Irish Cream. The creamy, coffee like notes of the Irish cream cut through the sweetness of the buttercream perfectly. For a non alcoholic option, a tart iced tea or a cold glass of milk is the classic way to go.
Side Additions Since this is a sheet cake, it's great for buffet style serving. I like to put out a bowl of fresh raspberries or sliced strawberries on the side. The acidity of the berries refreshes the palate between bites of rich cake.
If you want something more indulgent, a dollop of lightly sweetened whipped cream on the side of each slice adds a nice lightness to the plate.
Presentation Tip When serving, use a hot knife (dip it in hot water and wipe it dry between cuts) to get clean, sharp edges on every slice. This makes a homemade cake look like it came from a professional bakery.
Recipe FAQs
Why did my cake sink in the middle?
Avoid opening the oven door too early. This lets out heat and can cause the structure to collapse before it is fully set.
Why is the cake texture rubbery?
Stop mixing as soon as the flour is incorporated. Over mixing the batter develops too much gluten, which creates a tough, rubbery crumb.
What should I do if the buttercream is too runny?
Chill the bowl in the fridge for 10 minutes. Whip it again after cooling to firm up the butter without needing to add more sugar.
How long can I keep this cake in the fridge?
Store it in an airtight container for up to 4 days. The vegetable oil in the sponge prevents the cake from hardening as quickly as butter only cakes.
How to decorate the cake for graduation?
Frost with buttercream and add a fondant graduation cap. Use gel food coloring, gold star sprinkles, and black piping gel for the calligraphy.
How long do I bake the cake at 350°F?
Bake for 25 minutes. The cake is ready when the edges pull away from the pan and the center springs back.
Why is the cake so fluffy?
Creaming softened butter and sugar creates essential air pockets. If you enjoyed mastering this light texture here, see how we achieve a similarly airy result in our dinner rolls.
Simple High School Graduation Cake

